EasyManua.ls Logo

Procolored A3-L1800 - User Manual

Procolored A3-L1800
14 pages
Print Icon
To Next Page IconTo Next Page
Loading...
*Due to occasional product upgrades, this manual is for reference only.
0
A3-L1800- Roller version Dtf
Printer manual
Question and Answer IconNeed help?

Do you have a question about the Procolored A3-L1800 and is the answer not in the manual?

Summary

Safety Instructions

Machine Views

Introduction of Printer Buttons

Connect the Printer

Install the Drive

Find Driver File on U Disk

Locate the driver file "DTF1800" on the provided U disk for installation.

Install Driver to C Drive

Install the printer driver to the computer's C drive using the setup utility.

Install RIP Software

Insert Software Dongle

Insert the provided software dongle before proceeding with the RIP software installation.

Create DTGRIP Folder and Exclusions

Create a "DTGRIP" folder and add it to Windows Security exclusions for proper installation.

Install Print Curves

Locate Curve Setup File

Find the "curve setup file" within the data U disk for printer calibration.

Copy Media and Profile Folders

Copy the "media" and "profile" folders to the RIP software's installation directory.

Verify RIP Software Curves

Open the RIP software after installation to confirm that the correct curves are loaded.

Machine Installation and Setting

Install Waste Ink Bottle

Securely install the waste ink bottle by threading the tube and fastening screws.

Load PET Film

Insert PET film into the feeder, ensuring the matte side faces front, and test the feeder.

Set Preheating Temperature

Adjust the preheating temperature to the recommended range of 35°C to 45°C.

Install Film Tray and Reel

Install the pet film tray and the pet film reel onto the printer.

Install Battery and Fill Ink Cartridges

Install the LR44 battery and inject ink into cartridges using syringes, avoiding spills.

Guide Waste Ink and Print Test Strip

Direct waste ink to the bin and print a clear, complete test strip.

Whole Process of Printing

Prepare and Print Image

Place PET film, select image, adjust size, and configure print settings.

Apply Powder and Cure

Transfer printed film to powder, shake evenly, and cure in an oven at 95-100°C.

Heat Press Transfer

Lay shielding paper, textile, printed film, and another shielding paper, then heat press.

Cool and Peel Film

Cool the film after heat pressing, then carefully peel it from the textile.

Maintenance

Optimal Working Environment

Maintain temperature between 25-30 degrees and humidity above 50% for best performance.

Ink Usage and Storage

Use ink within 3 months of opening to prevent spoilage.

Proper Shutdown Procedure

Turn off printer, then main power, keeping ink cartridge on the right to prevent clogging.

Cleaning Waste Ink and Sponge

Regularly clean the waste ink cartridge and the ink sponge on the machine.

Cleaning Guide Rails and Grating Strips

Clean lubricating oil from guide rails and clean grating strips for accuracy.

Daily Printing Preparation

Prepare Ink and Start Printer

Shake ink bottles to increase ink activity and then start the printer.

Head Cleaning and Test Print

Perform head cleaning and print a test page to check print head status.

Overview

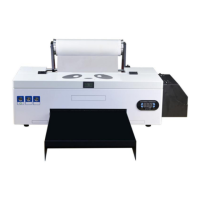
This document serves as a user manual for the Procolored A3-L1800 Roller version DTF Printer, providing instructions for setup, operation, and maintenance.

Function Description:

The Procolored A3-L1800 is a Direct-to-Film (DTF) printer designed for creating transfers that can be applied to various textiles. It is a roller version, indicating its capability to handle film rolls for continuous printing. The printer's primary function is to print designs onto PET film using DTF inks, which are then cured with powder and heat-pressed onto garments.

Important Technical Specifications:

While specific technical specifications like print resolution (DPI) and print speed are not explicitly listed in a dedicated section, the manual does show settings within the RIP software. For instance, the "Resolution(White)" and "Resolution(Color)" are set to "1440 x 1440 DPI" in the software interface. The "Feeding" is set to "Roll Feed," confirming its roller functionality. The "Speed" is indicated as "Bidirection." The preheating temperature can be set between 35°C to 45°C. The oven temperature for curing powder is 95-100°C for 200 seconds, and the heat press machine temperature is 160°C for 40 seconds for transfer. The printer uses a multi-color ink channel system, including Yellow (Y), Cyan (C), Magenta (M), Black (K), and White (W) inks, as indicated by "Ink Chnnel YKWWMC." The ink limit is adjustable, with a default of 65.0% (Max:100). The recommended working environment temperature is 25-30 degrees Celsius, with humidity above 50%.

Usage Features:

The printer features a user-friendly interface with several buttons for operation:

  • Start Button: To power on and off the printer.
  • Ink Button: Moves the print head for cartridge changes, checks ink levels, returns the print head to the initial position after changing cartridges, and initiates print head cleaning (by pressing for 3 seconds when ink indicator lights go out).
  • Printing Paper Button: Loads or ejects print paper, resumes printing after paper errors, or cancels print jobs.
  • Temperature and Humidity Display: Provides real-time information on the printer's operating environment.
  • Printer Panel Buttons: Include "set," "OK," "ENT," "plus," and "minus" buttons for controlling the microcomputer digital thermostat (XH-W1308), likely for adjusting preheating or curing temperatures.

The workflow for printing involves several steps:

  1. Connecting the Printer: Connect the data cable and insert the data U disk containing drivers and software. Power on the printer and click the start button. The printer is ready when the power light stops flashing.
  2. Installing Drivers: Locate and install the "DTF1800" driver from the U disk to the C drive.
  3. Installing RIP Software: Insert the dongle. Create a folder named "C:\DTGRIP" and add it to the Windows Security exclusions. Install the RIP software, which is crucial for managing print settings and color profiles.
  4. Installing Print Curves: Copy "media" and "profile" folders from the "curve setup file" in the U disk into the DTGRIP installation folder. After successful installation, the DTF-1390 curve will be visible in the RIP software.
  5. Machine Installation and Setting:
    • Install the waste ink bottle by unscrewing, threading the plastic tube, and fastening.
    • Load PET film into the feeder, ensuring the matte side faces the front.
    • Set the preheating temperature (35-45°C).
    • Install the PET film tray and reel.
    • Install the LR44 button battery for the display.
    • Fill ink into the cartridges according to color instructions, using syringes to draw out 2-3ml of ink from each ink sac while avoiding outflow.
    • Guide the waste ink tube to the waste ink bin.
    • Print a test strip to ensure clarity and completeness.
  6. Whole Process of Printing:
    • Place PET film with the matte side up.
    • Select and adjust the image in the RIP software.
    • Set up and import preset parameters.
    • Open and check print settings, selecting the correct print port.
    • Set white and color to print simultaneously, choosing "print color first" and "color+white."
    • After printing, apply powder to the PET film and shake to spread it evenly.
    • Cure the powder in an oven at 95-100°C for 200 seconds.
    • Perform heat press transfer at 160°C for 40 seconds. This involves laying shielding paper, placing the textile, positioning the printed PET film, adding another shielding paper on top, and setting time/temperature.
    • After transfer, cool the film for a few seconds before carefully tearing it from the textile.

Maintenance Features:

Regular maintenance is emphasized to ensure optimal performance and longevity of the printer, especially due to the characteristics of DTF ink.

  • Ink Usage: Use opened ink within 3 months to prevent spoilage.
  • Shutdown Procedure: Always turn off the printer using the button first, then the main power supply. Ensure the ink cartridge cart is on the right side to protect the print head from clogging.
  • Ink Cleaning:
    • Regularly clean the waste ink cartridge and ink sponge.
    • Clean and suck ink from the left side of the machine regularly.
  • Guide Rails and Grating Strips:
    • Regularly clean black lubricating oil from the ink car guide rail.
    • Add new lubricating oil to keep the ink car guide rail smooth.
    • Clean grating strips with alcohol and a dust-free cloth to maintain printing accuracy.
  • Daily Pre-Printing Work:
    • Shake ink bottles to increase ink activity.
    • Start the printer.
    • Take out the film.
    • Press F12 to clean the print head.
    • Put in a single sheet of film.
    • Press F11 to print a test page to check print head status.
  • Print Head Maintenance: The print head and waste ink pump are not covered by warranty. If the printer is not used for more than three days, install print head moisturizing solution to prevent clogging. If the print head test line is not neat or has missing lines, perform F12 "Head Cleaning" again and reprint.

Procolored A3-L1800 Specifications

General IconGeneral
BrandProcolored
ModelA3-L1800
CategoryPrinter
LanguageEnglish

Related product manuals