Do you have a question about the Procolored A3-R1390 and is the answer not in the manual?
Explains the function of start, ink, and paper buttons for printer control.
Details the set, OK, plus, and minus buttons on the digital thermostat.
Locates and copies the 'media' and 'profile' folders to the software installation directory.
Confirms successful installation by opening the rip software and checking DTF-1390 curves.
Step-by-step guide for installing the waste ink bottle, including screw and tube connections.
Instructions for inserting PET film, testing the feeder, and setting the preheating temperature.
Guidance on installing ink cartridges, injecting ink, and managing waste ink flow.
Covers placing PET film, selecting images, setting parameters, and configuring print ports.
Details on applying powder to the printed film and curing it in an oven.
Instructions for heat pressing, including setup, paper placement, and temperature settings.
Specifies optimal working environment conditions and ink shelf-life recommendations.
Outlines the correct sequence for shutting down the printer and main power supply.
Describes regular cleaning of waste ink cartridges, ink sponges, and left-side components.
Provides instructions for cleaning and lubricating guide rails and grating strips for accuracy.
This document outlines the operation, maintenance, and safety guidelines for the Procolored A3-R1390 Roller DTF Printer. It serves as a comprehensive manual for users, covering everything from initial setup to routine care.
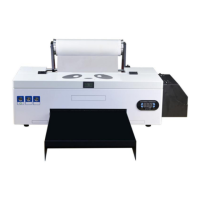
The Procolored A3-R1390 is a Direct-to-Film (DTF) printer designed for creating high-quality transfers. Its primary function is to print designs onto PET film, which can then be transferred to various textiles. The "Roller version" indicates its capability to handle roll-fed PET film, facilitating continuous printing for larger production runs. This feature is particularly useful for businesses requiring efficient and consistent output of custom apparel or other fabric-based products. The printer is equipped with a film feed position and a film exit position, ensuring a smooth path for the roll film throughout the printing process. An integrated film reel further supports the roll-fed operation, managing the film as it moves through the machine.
Key usage features of the A3-R1390 include a user-friendly interface with clearly labeled buttons for essential functions. The "start button" powers the printer on and off, while the "Ink button" controls the movement of the print head for cartridge changes and ink checks. Pressing the Ink button for 3 seconds also initiates a print head cleaning cycle when the ink indicator lights are off. The "Printing paper button" is used to load or eject print film and can also resume printing after a paper error or cancel ongoing print jobs. The printer also features a temperature and humidity display, crucial for maintaining optimal operating conditions, as DTF printing is sensitive to environmental factors. An electronic thermostat with "SET," "ENT," "plus," and "Minus" buttons allows for precise control over preheating temperatures, which are recommended to be between 35°C and 45°C for effective printing.
The setup process begins with connecting the printer data cable and inserting the data U disk, which contains the necessary drivers and software. After connecting the power supply and pressing the start button, the printer undergoes a self-check. Successful self-checking is indicated by the power light stopping its flashing. The installation of the printer drive involves selecting the appropriate "DTF1390" driver from the U disk and installing it to the C drive. Following this, the rip software installation requires creating a dedicated folder named "C:\DTGRIP" in the computer's root directory. It's important to add this folder to the Windows Defender Antivirus exclusions to prevent interference with the software. The rip software is activated using a golden U disk dongle. After installing the rip software, print curves, which are essential for accurate color reproduction and print quality, must be installed. This involves copying "media" and "profile" folders from the U disk into the rip software's installation directory. Once these steps are completed, the DTF-1390 curve should be visible within the rip software, indicating successful setup.
Operating the printer for a print job involves several steps. First, the PET film, with its matte side facing forward, is placed into the feeder. The preheating temperature is set using the electronic thermostat. The desired image is then selected in the rip software, and its size and position are adjusted. Simple print settings are configured, and preset parameters are imported. The print settings are checked, and the correct print port is selected. For simultaneous white and color printing, the "print color first" and "color+white" options are chosen, followed by pressing print. After printing, the film is transferred to a powdering station where powder is applied and spread evenly. The powdered film is then cured in an oven at 95-100°C for 200 seconds. Finally, for heat press transfer, the heat press machine is set to 160°C for 40 seconds. A piece of shielding paper is laid on the heat press, followed by the textile, the printed PET film (adjusted for position), and another piece of shielding paper on top. After the heat press transfer, the film is allowed to cool for a few seconds before being carefully peeled off the textile to reveal the finished product.
Maintenance is crucial for the longevity and optimal performance of the A3-R1390 printer, especially given the characteristics of DTF ink. The recommended working environment is a temperature of 25-30 degrees Celsius and humidity above 50%. It is advised to use up opened ink within 3 months to prevent spoilage. Proper shutdown procedures are vital: first, turn off the printer using its button, then turn off the main power supply, ensuring the ink cartridge cart is positioned on the right side. This prevents the print head from clogging by keeping it sealed with the waste ink pump. Regular cleaning of the waste ink cartridge and ink sponge is necessary, as is cleaning and sucking ink from the left side of the machine. The guide rails and grating strips also require attention. The black lubricating oil on the ink car guide rail should be cleaned regularly, and new lubricating oil added to ensure smooth movement. The grating strips should be cleaned with alcohol and a dust-free cloth to maintain printing accuracy.
Daily pre-printing work includes shaking the ink bottles to ensure ink activity and starting the printer. If the print head test line shows missing lines, a "Head Cleaning" cycle (F12) should be performed, followed by another test print. The print head and waste ink pump are not covered by the warranty due to the nature of DTF ink, which can easily block the print head if not used for extended periods. If the printer is not used for more than three days, a print head moisturizing solution should be applied, and users are advised to contact after-sales service for guidance. Before printing, it's recommended to take out the film, press F12 to clean the print head, and then press F11 to print a test page to verify print head status. A good test page indicates the printer is ready for normal operation.
| Number of Colors | 6 |
|---|---|
| Maximum Print Resolution | 5760 x 1440 dpi |
| Number of Ink Colors | 6 |
| Ink Type | Pigment Ink |
| Media Size | A3, A4, A5, A6 |
| Interface | USB |
| Operating System Compatibility | Windows |