8
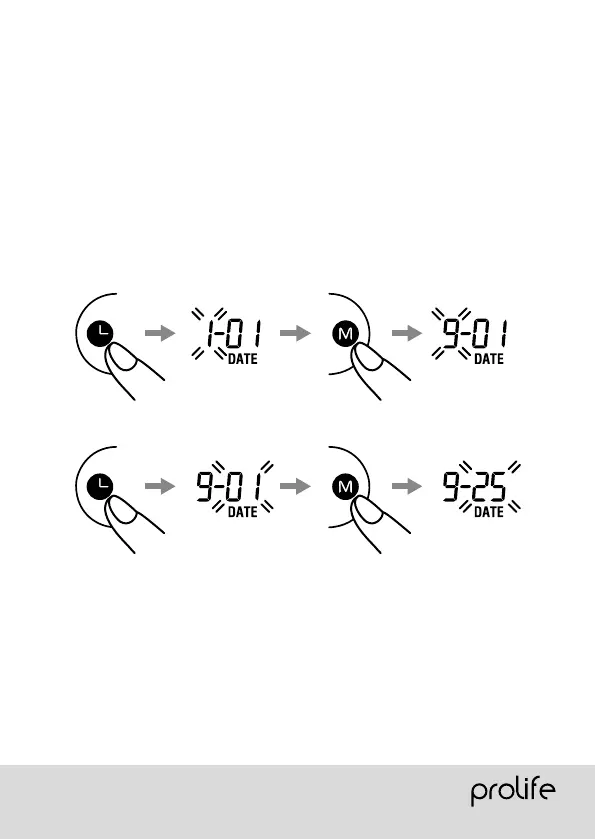
SETTING THE TIME AND DATE
This blood pressure monitor incorporates an integrated clock with date display.
This has the advantage, that at each measurement procedure, not only the blood-
pressure values are stored, but also the exact moment of the measurement.
After new batteries have been inserted, the clock begins to run from 12:00, after
pressing the TIME button – the date is 1–01. You must then re-enter the date and
current time. For this, please proceed as follows:
1. Press the TIME button for at least 3 seconds. Firstly, user icon blinks. Then
press TIME button again.
2. The display now indicates the set year, during which the four characters
blink. The correct year can be entered by pressing the MEMORY button.
3. Press the TIME button again. The display now switches to the current date,
during which the first character (month) blinks. The corresponding month
can now be entered by pressing the MEMORY button.
4. Press the TIME button again. The last two characters (day) are now blinking.
The corresponding day can now be entered by pressing the MEMORY button
.
5. Press the TIME button again. The display now switches to the current time,
during which the first character (hour) blinks. The corresponding hour can
now be entered by pressing the MEMORY button.
6. Press the TIME button again. The last two characters (minutes) now blink.
The exact time can now be entered by pressing the MEMORY button.
7. Now after all settings have been made, press the TIME button. The indicator
«00» appears on the display. Press the TIME button again in order to com-
plete the device setup.
The setting is confirmed and the clock starts running.
8. Press the TIME button once again. The date is briefly displayed and then
the time.
 Loading...