ECLIPSEFS
12
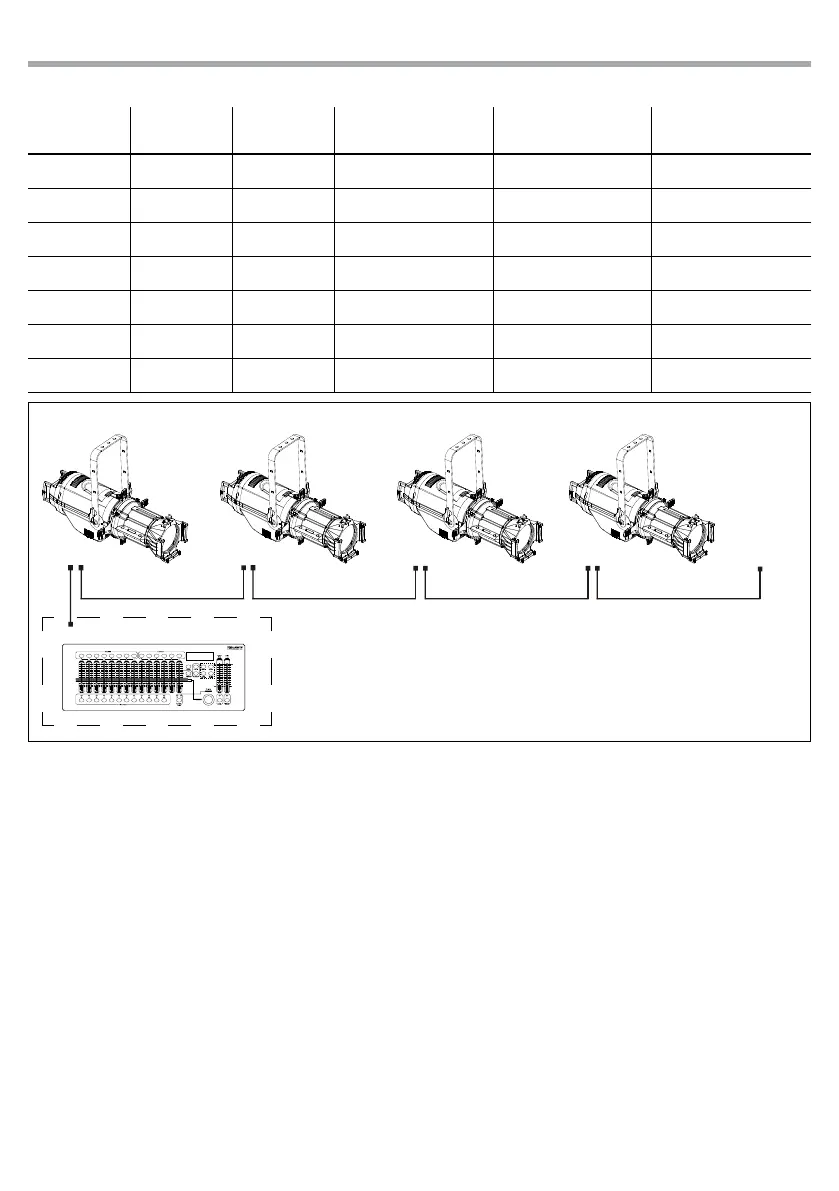
automatically assigned to the following addresses. An example with the start address 33 is shown below:
DMX Address: 48DMX Address: 38DMX Address: 33 DMX Address: 43
Fig.5 - Example 5 DMX channels conguration
DMX512 Controller
Number of
DMX channels
Start address
(example)
DMX Address
occupied
Next possible start
address for unit No. 1
Next possible start
address for unit No. 2
Next possible start
address for unit No. 3
1 33 33 34 35 36
2 33 33-34 35 37 39
3 33 33-35 36 39 42
4 33 33-36 37 41 45
5 33 33-37 38 43 48
8 33 33-40 41 49 57
13 33 33-45 46 59 72
. . . . . . . . . . . .
3.8 FIXTURE ID AND RDM
With this function you can call up various submenus via RDM.
This device is RDM ready. RDM stands for “Remote Device Management” and makes remote control of
devices connected to the DMX-bus possible. Manual settings like adjusting the DMX starting address are
no longer needed. This is especially useful when the device is installed in a remote area. RDM is integrated
in DMX without inuencing the connections. The RDM-data is transmitted via the standard XLR-poles
1and 2 – new DMX-cables are not necessary. RDM ready and conventional DMX devices can be operated
in one DMX line. The RDM protocol sends own packages in the DMX512 data feed and does not inuence
conventional devices. If DMX splitters are used and RDM control is to be used, these splitters must sup-
port RDM. The number and type of RDM parameters depend on the RDM controller (not included) is used.
• Press the button MODE so many times until the display shows CONNECT, then press the button ENTER.
• Press the UP/DOWN button to scroll through the menu, then select RDM ID and press the ENTER button.
• Press UP/DOWN button to scroll through the menu, then select Password and press ENTER to conrm.
• Use the arrow keys to enter the password 050 and press ENTER to conrm.
• Once you have entered your password, you can set the PID Code, necessary to control the unit with
the RDM protocol. Press the UP/DOWN button to scroll through the menu, select PID Code and press
ENTER to conrm.
• Use the arrow keys to enter the PID Code, then press the ENTER button to conrm your choice.
• Press the MODE button to exit the menu and save changes.