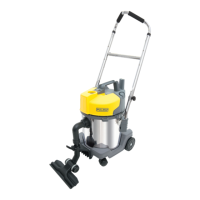
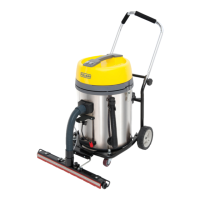
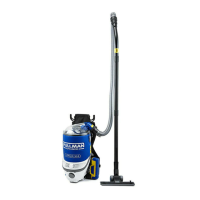
The Pullman WD20LSSO is a versatile 20L wet and dry vacuum cleaner, designed for a range of cleaning applications in various environments. Its robust construction and patented technology make it suitable for both dry vacuuming and wet pick-up tasks, catering to the needs of motels & hotels, workshops & garages, restaurants & cafes, and offices.
Function Description:
The primary function of the Pullman WD20LSSO is to provide efficient cleaning for both dry debris and liquid spills. It operates as a conventional dry vacuum cleaner when equipped with its HEPA filter and, optionally, a dust bag, effectively capturing dust, dirt, and small particles. For wet applications, the HEPA filter and dust bag are removed, allowing the machine to safely collect liquids. The vacuum features an "Outrigger" assembly, which includes a handle and a specialized gulper floor tool, enhancing maneuverability and ease of use, particularly for larger areas. It also boasts a blower function, allowing the hose to be connected to a blower port for tasks like clearing debris from surfaces. The telescopic handrail is adjustable to three different height options, accommodating various user heights and can be folded down for compact storage.
Important Technical Specifications:
- Model: WD20LSSO
- Capacity: 20 Liters (for both wet and dry collection)
- Power Supply: 240V~50HZ
- Motor Power: 1100W MAX / 1000W NOM
- Noise Level: 75dbA
- Filter Type: HEPA Filter (for dry vacuuming)
- Outrigger Assembly: Included, with a telescopic handrail and gulper floor tool.
- Accessories: Wet Pick Up Floor Tool, Crevice Tool, Dusting Brush, Gulper Floor Tool, 2 Piece Chrome Tube, Hose Assembly, Extension Cord.
- Cable Restraint: Patented technology to secure the extension cord, preventing accidental disconnections and ensuring safety.
Usage Features:
The WD20LSSO is designed for user-friendliness and versatility.
- Dry Vacuum Cleaning: For dry cleaning, the HEPA filter and mesh must always be fitted. Users have the option to use the vacuum with or without a dust bag. If a dust bag is used, it must be fitted properly, and replaced when full to maintain optimal performance.
- Wet Vacuum Cleaning: Before wet vacuuming, the HEPA filter and dust bag must be removed. The tank should be cleaned after each use to prevent residue buildup and odors. Wet pick-up accessories should be washed periodically.
- Assembly: The assembly process is straightforward, starting with disconnecting latches and removing the canister lid. The blue plastic cover inside the tank needs to be removed. Castor wheels are installed by pushing them firmly into the base. The canister lid is then replaced, ensuring the power cord faces the opposite direction of the hose inlet. The outrigger handle assembly involves inserting the handrail into the trolley frame, securing it with a bolt and star grip knob, and adjusting the height using locking pins. The bend tube pre-assembly is inserted into the hose inlet, followed by the fixed support pre-assembly and the gulper floor tool, which is secured by turning a locker.
- Hose Connection: For vacuuming, the hose end is inserted into the hose inlet and turned clockwise to lock. For the blower function, the hose end is connected to the blower port and locked in the same manner.
- On/Off Switch: The cleaner is started by pressing the On/Off switch, which is equipped with a water-proof cover for added safety.
- Accessories: The Gulper Floor Tool is ideal for both carpets and hard floors. The Wet Pick Up Floor Tool is specifically designed for wet applications. The Dusting Brush is used for cleaning furniture, curtains, and upholstery, while the Crevice Tool is perfect for reaching tight spaces. These accessories attach to the chrome tube for extended reach.
- Cable Restraint: A crucial safety feature, the cable restraint ensures the extension cord is securely connected and prevents accidental unplugging. The extension cord is looped through the restraint opening, placed over a hook, and pulled down firmly to lock it in place.
Maintenance Features:
Regular maintenance is essential to ensure the longevity and optimal performance of the Pullman WD20LSSO.
- Safety First: Always switch off the cleaner and remove the plug from the mains power supply before performing any cleaning or maintenance tasks.
- HEPA Filter Maintenance: The HEPA filter and mesh should be regularly checked. If suction weakens or the cleaner runs hot, the filter may be clogged and needs to be brushed clean. If the condition persists, the filter should be changed. The filter can be removed by twisting the locking knob anti-clockwise. It should be washed carefully with lukewarm water and then air-dried for 24 hours. Once dry, it is placed back into the cleaner and locked into position by twisting the knob clockwise.
- Tank Cleaning: After each wet vacuuming use, the tank should be emptied and thoroughly cleaned with lukewarm water to prevent the accumulation of dirt or dirty water.
- Dust Bag Replacement: If using a dust bag for dry vacuuming, it should be replaced with a new one once it is full.
- General Cleaning: The machine's interior and exterior should be wiped clean periodically with lukewarm water.
- Power Cable Inspection: Always examine the power cable for cuts or damage before use. Any damaged or defective power supply cords must be replaced by the manufacturer, its service agent, or similarly qualified persons to avoid hazards.
- Accessory Cleaning: Wet pick-up accessories should be washed periodically to maintain hygiene and effectiveness.
- Obstruction Removal: If suction weakens, check the floor tool, hose, and other fittings for obstructions and remove them if present. Ensure all fittings are tight and the tank cover is sealed properly to prevent air leaks.
- Saturated Filter: If misting occurs in the exhaust air, it indicates a saturated filter, which should be removed along with the filter mesh.
- Professional Servicing: While motor maintenance is generally unnecessary with proper care, it is recommended that the cleaner be serviced once a year by a qualified technician. Any damage to the cable restraint, cord, or plug must also be repaired by a qualified technician.
The Pullman WD20LSSO is backed by a 1-year parts and labor warranty against product defects and failures, provided the product is used in accordance with the instruction manual. This warranty does not cover normal wear and tear, alterations, improper installation, physical abuse, misuse, accidental damage, or the use of non-genuine parts.