ENGLISH
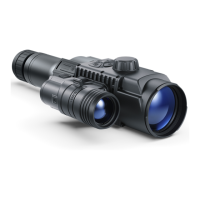
IR Illuminator
•
Remove the cap (12) from the
connector to attach the IR
illuminator (13).
•
Remove the cover (11) from the
IR illuminator.
•
Mount the IR illuminator on the
device. The lever (25) should be
in the up position.
•
Lock the IR illuminator by
pressing the lever (25) down.
•
Make sure that the IR
illuminator is mounted and connected to the device.
•
Turn on the device using the ON (9) button to activate the IR illuminator.
•
The status bar will display a disabled illuminator icon if the IR illuminator is
not connected. This icon is not displayed when the IR illuminator is connected.
•
Briey press the IR (24) button at the end of the illuminator. The power level
when switching on is minimum
.
•
The IR illuminator icon will be displayed on the status bar with the relevant
power level.
•
Successive brief presses of the IR (24) button will toggle the brightness level
of the illuminator (
).
•
To adjust the position of the light spot in the eld of view of the device, turn
the IR-illuminator lens lock knob (26) to the OPEN position.
•
By moving the lens of the IR illuminator with your hand, adjust the required
position of the light spot in the eld of view of your device. After successful
adjustment, turn the lock knob (26) in the CLOSE direction while aiming the
lens in the desired direction to lock the IR illuminator lens.
•
The IR illuminator is turned off by a long press of the IR (24) button.
•
The IR icon will disappear from the screen.
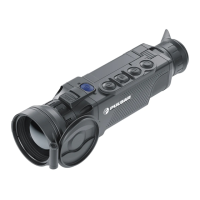
Mounting a monocular on the digital module
The Pulsar 5x30 monocular (included in the package) enables you to transform
a digital module into a digital vision device for night-time observation with a
magnication of 5x.
•
Insert the monocular
tightly into the digital
module as far as it will go
so that the pins on the
monocular body (A) t
into the slots (B) of the
digital module (see Fig.).
•
Turn the monocular anticlockwise
so that the monocular is xed onto
the digital module. The triangular mark
on the digital module and the square on the
monocular body must be aligned.
•
To remove the monocular, turn it clockwise and gently
pull it towards you.
24
25
13
11
26
12
B
B
A
5