6
7
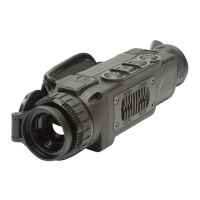
External power supply (AC/DC) is to be connected to “Power” (10)
jack located on the bottom side of the device.
Please note that the central pin of the power supply that you connect to
the “power” jack of the riflescope, must have marking “+”. The power
supply may have marking
EXTERNAL POWER SUPPLY
7
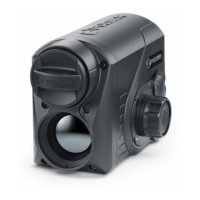
Connection of an external power supply (icon appears in the status bar) automatically
cuts off power supply from batteries.
External power supply DOES NOT charge the rechargeable batteries in the unit.
Attention! We suggest that you use battery packs EPS3 or EPS5 ensuring from 9 to 20
hours of operation.
The scope can be powered with an external DC power supply (2.1mm
pin) with stabilised voltage ranging from 8.4V to 15V (max. consumption
power 3W) or a 12V vehicle socket.
OPERATION
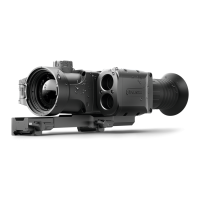
8
Switching on and calibration
Press “ON/OFF” (1) to switch on the unit. Green LED indicator (14) will
light up. In case of low battery the LED will turn red and battery icon
will start flashing.
Do the calibration of image. Calibration levels background temperature
of the microbolometer and eliminates image flaws.
There are three calibration modes:
manual (M), semiautomatic (H) and automatic (А).
Manual calibration mode
The lens cap (4) should be closed (in 19mm models a diaphragm (15)
inside the objective lens plays the role of the cap. Rotate the wheel (16)
clockwise to open the diaphragm, counterclockwise to close it). Turn on
the unit, press and hold the controller (5) for two seconds to enter the
menu.
Rotate the controller to select option Cal. Press the controller.
Rotate the controller to select mode М. Press the controller to confirm.
To exit the menu, press and hold the controller (5) for two seconds or
wait 10 seconds for automatic exit.
Press the CAL (2) button to calibrate. The image will freeze for 1-2
seconds. Then open the lens cap. Calibration is completed.
In case you see image flaws (such as frozen image, vertical stripes
etc.) re-calibrate the unit.
Semiautomatic calibration mode
Turn on the unit, open the lens cap.
Press and hold the controller (5) for two seconds to enter the menu.
Rotate the controller to select option Cal. Press the controller.
Rotate the controller to select mode H. Press the controller to confirm.
Press the CAL (2) button to calibrate. The image will freeze for 1-2
seconds and you will hear the sound of the internal shutter. Calibration
is completed.
Automatic calibration mode
With the automatic calibration mode the thermal imager calibrates by
itself according to the software algorythm. The detector
(microbolometer) is closed with the shutter automatically. User
assisted calibration with the CAL (2) button is allowed in this mode.
Turn on the unit, open the lens cap.
Press and hold the controller (5) for two seconds to enter the menu.
Rotate the controller to select option Cal. Press the controller.
Rotate the controller to select mode A. Press the controller to confirm.
At the moment of the automatic calibration the image will freeze for 1-2
seconds and you will hear the sound of the internal shutter.
Time intervals between calibrations depends on the heat of the
detector. The unit may require calibration more frequently on
activation.
WARNING! Do not point the objective lens of the unit at intensive
sources of light such as the sun. This may disable electronic
components of the unit. The warranty does not cover damage
caused by improper operation.
Turn the lever of the battery compartment (12) 90 degrees in “Open”
position and, pulling by the lug of the cover, remove the battery
container.
Install four AA batteries (or rechargeable batteries) observing polarity
shown on the battery container.
Insert the battery container into the battery compartment and turn the
lever 90 degrees clockwise.
Battery charge level is displayed in the status bar ( ).
In case of complete battery discharge, icon is flashing in the status
bar and in the centre of the display.
INSTALLATION OF BATTERIES
Note: to ensure long and reliable operation it is recommended that you use quality
rechargeable batteries with a capacity of at least 2500 mAh. Please do not use batteries of
different types or batteries with various charge levels.
6
Focusing and image adjustment
Open the lens cap (4).
Adjust sharp image of the display icons by turning the eyepiece diopter
adjustment ring (13).
To adjust display brightness, press briefly the controller (5) - brightness
icon should appear in the upper right portion of the display. Rotate
the controller to select brightness level (from 0 to 20).
To adjust display brightness, press briefly the controller (5) - contrast
icon should appear in the upper right portion of the display. Rotate
the controller to select contrast level (from 0 to 20).