EasyManua.ls Logo

PUTCO Hornet - User Manual

PUTCO Hornet
4 pages
Print Icon
To Next Page IconTo Next Page
Loading...
INSTRUCTION GUIDE
REQUIRED TOOLS
CONTENT LIST
Bracket
10-32 Bolt
10-32 Nylock Nut
HD Unthreaded Bumper
8-32 Cap Bolt
8-32 Nut
QTY
1
4
4
2
2
2
PLEASE READ ALL INSTRUCTIONS BEFORE INSTALLATION
AND CHECK TO SEE THAT ALL PARTS ARE INCLUDED
T20 TORX DRIVER
WRENCH (size: 3/8”)
20092018 DODGE RAM
Congratulations on your purchase of a high quality PUTCO
®
product. Should
you need any application or technical assistance, feel free to call us at:
Monday-Friday 8:00am - 5:00pm (Central Standard Time)
Contact your PUTCO
®
dealer for other quality accessories.
1-800-247-3974
ALLEN WRENCH
(size: 1/8” & 9/64)
950004I
Question and Answer IconNeed help?

Do you have a question about the PUTCO Hornet and is the answer not in the manual?

Summary

Hornet Light Installation Guide

Pre-Installation Instructions

Read all instructions before installation and verify all parts are included.

Mounting and Wiring the Hornet Light

Remove Existing Light and Prepare

Instructions for removing the original 3rd brake light and its screws.

Install Bumpers and Gasket

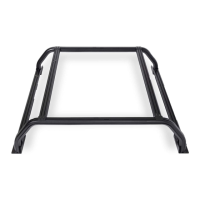
Attaching rubber bumpers and installing the gasket onto the bracket.

Attach Hornet Light to Bracket

Mounting the Hornet light assembly onto the prepared bracket.

Wire Routing and Gasket Slotting

Cutting a slot in the gasket and routing wires through the vehicle.

Secure Light and Reconnect Harness

Positioning the light on the bracket and reconnecting the harness.

Connect Wiring and Test Switch

Connecting wires according to the diagram and testing the switch functionality.

Overview

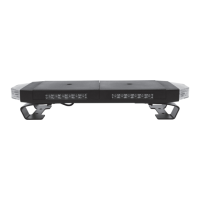
The PUTCO Hornet Amber LED Stealth Rooftop Strobe Light Bar is an aftermarket lighting accessory designed for 2009-2018 Dodge Ram trucks. This instruction guide provides a comprehensive overview of the installation process and key features of the product.

Function Description:

The Hornet light bar serves as an auxiliary lighting system, primarily functioning as an amber LED strobe light. It is designed to be mounted on the rooftop of the vehicle, specifically in the area of the third brake light. The strobe function enhances vehicle visibility, which can be particularly useful for work vehicles, emergency responders, or anyone requiring increased presence on the road. The "stealth" aspect likely refers to its low-profile design, integrating seamlessly with the vehicle's aesthetics while providing powerful illumination. The light bar is controlled via a switch, allowing users to turn it on/off and cycle through different modes.

Important Technical Specifications:

While specific lumen output or power consumption figures are not provided in this document, the product is identified as an "Amber LED Stealth Rooftop Strobe Light Bar," indicating its primary light color and function. The installation process involves a 12V power source, as evidenced by the switch wiring diagram which connects to "+12V From Battery" and "Acc. Red Wire from Hornet." The light bar is designed to fit 2009-2018 Dodge Ram models, suggesting specific mounting dimensions and compatibility with the vehicle's existing third brake light assembly.

Usage Features:

  • Mode Control: The Hornet light bar offers multiple modes, which can be cycled through using a dedicated switch. The primary switch (connected to the red wire) controls the power to the light, turning it on and off. To change modes, the primary switch must be in the ON position, and 12V power must be supplied to the yellow wire. The light bar features a memory function, retaining the last selected mode even after being turned off.
  • Enhanced Visibility: The amber LED strobe lights are designed to significantly increase the vehicle's visibility, making it more noticeable to other drivers, especially in low-light conditions, adverse weather, or during roadside operations.
  • Durable Construction: Putco guarantees its Stainless Steel and Aluminum products against defects in workmanship and material for as long as the original owner owns the vehicle. This implies the use of robust materials for longevity and resistance to environmental factors. Painted surfaces have a 90-day warranty.

Maintenance Features:

  • Warranty: Putco offers a lifetime warranty on its Stainless Steel and Aluminum products against defects in workmanship and material for the original vehicle owner. This covers repairs or replacements at Putco's discretion. Painted products have a 90-day warranty on the painted surface.
  • Exclusions: The warranty explicitly excludes extra labor costs, damages caused by freight carriers, improper installation, misuse, collision, or neglect. This highlights the importance of correct installation and proper handling to maintain warranty validity.
  • Customer Support: Putco provides customer support for application or technical assistance via a toll-free number (1-800-247-3974), available Monday-Friday from 8:00 am to 5:00 pm (Central Standard Time). This ensures users can get help with any issues during installation or operation.

Installation Process Overview:

The installation involves several steps, requiring specific tools such as Allen wrenches (1/8" and 9/64"), a T20 Torx driver, and a 3/8" wrench.

  1. Preparation: Remove the existing third brake light by unscrewing it with a T20 Torx driver and unplugging its harness.
  2. Bumper Installation: Install rubber bumpers onto the Hornet light bracket using 8-32 bolts and nuts, tightening them with a 9/64" Allen wrench.
  3. Gasket Application: Apply the gasket to the side of the bracket that will face the truck.
  4. Light Bar Mounting: Mount the Hornet light onto the bracket using 10-32 nuts and bolts, requiring a 1/8" Allen wrench and a 3/8" wrench.
  5. Wire Routing: Cut a small slot in the gasket for the wire to pass through, preventing pinching. Feed the wire through the hole behind the third brake light and route it into the cab to a suitable switch mounting location.
  6. Reinstallation: Position the third brake light on the bracket, reconnect its harness, and reinstall it, ensuring the Hornet light cable is not pinched. The guide suggests installing and slightly tightening the two inside screws first for easier installation.
  7. Wiring: Wire the switch according to the provided diagram, connecting to ground, 12V battery power, and the accessory red wire from the Hornet.

The Hornet light bar is designed for a straightforward installation, allowing users to enhance their vehicle's safety and utility with a high-quality, durable lighting solution.

PUTCO Hornet Specifications

General IconGeneral
BrandPUTCO
ModelHornet
CategoryAutomobile Accessories
LanguageEnglish

Related product manuals