Q5X USER MANUAL: QT-AD10 TRANSMITTER FAMILY JUNE 2020
___________________________________________________________________________________
___________________________________________________________________________________
For an updated copy of this document, visit www.Q5X.com/support 3 | Page
3.0 MICCOMMANDER
3.1 START-UP
Turn on the MicCommander by pressing the button on the top of the unit. Upon powering up, the MicCommander will
display a list of transmitters to which it is currently registered. If the desired transmitter is not displayed on this Active
Transmitters list, it must be “added” as described in section 3.3.
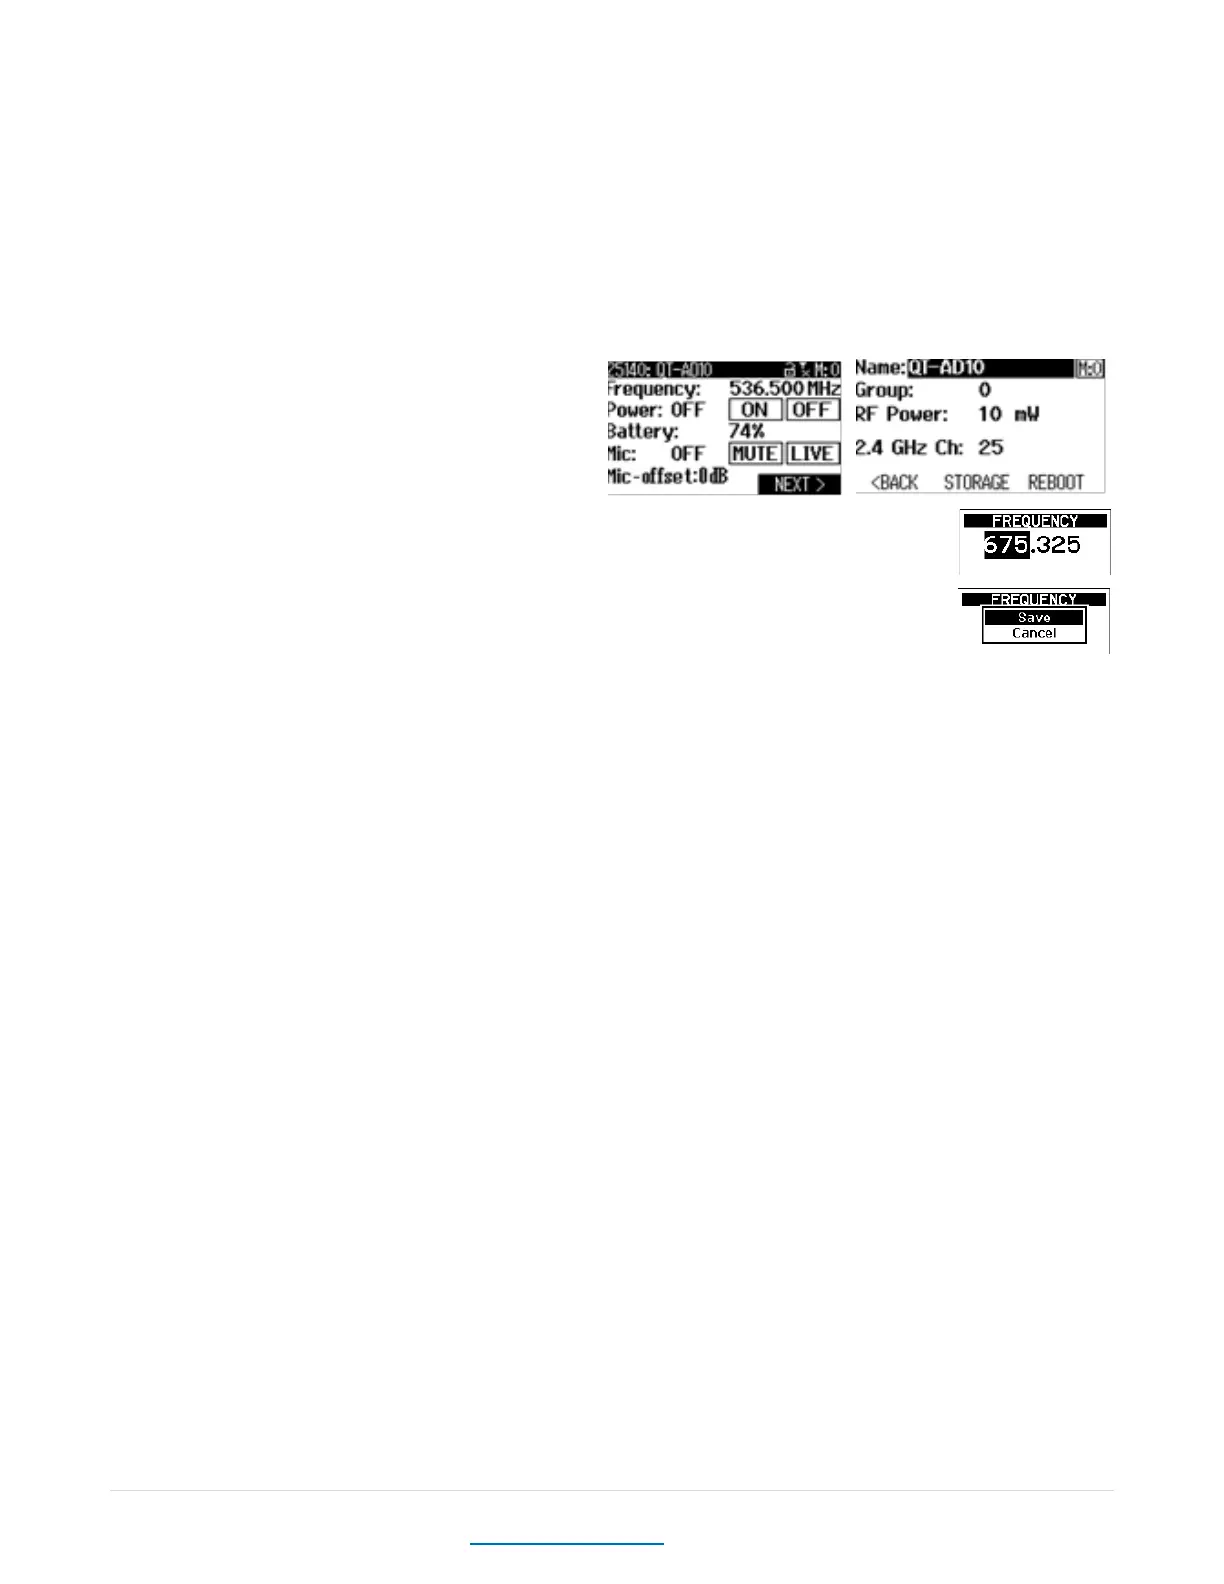
3.2 SETTINGS
Select a transmitter from the active transmitters list with
the “ENTER” button to view or edit its settings. When
selected, the menu on the left will appear, the menu on
the right is accessed by selecting “Next”
Frequency can be adjusted by moving the cursor to the frequency value using the navigational arrows
then pressing “ENTER” button. This will bring up the screen shown on the right. To change the MHz
values use the UP/DOWN arrows. To edit the frequency’s kHz, press the “RIGHT” button to highlight
them then use the “UP/DOWN” arrows again. The “ENTER” or “BACK” button can be used to save
changes. Select “Save” to confirm or “Cancel” to cancel.
Power from this location the transmitter power can be set to ON or STBY.
Battery is the percentage of battery life remaining. The “CHG” to the left of the percentage denotes that the device is
currently charging.
Mic is the microphone state, either Live or Mute. Muting will turn the audio off and leave the transmitter UHF carrier on.
This function can be used to remotely mute a mic on any QT-AD10 transmitter or to override a physical mute switch on
transmitters such as the QT-AD10 CoachMic.
Mic-Offset is used to match audio levels of different types of microphones. If using a single transmitter, set Mic-Offset to
0dB. When pairing two or more transmitters to a single receive channel, there may be a difference in volume levels
between microphones or instruments. If this occurs, use the Offset function to match the audio levels and eliminate
audible volume differences between transmitters. To adjust the Mic-Offset if needed:
• Turn on the first transmitter. Perform a sound check to test the audio level. Turn off the transmitter.
• Turn on the second transmitter. Perform a sound check to test the audio level. If the level is different than that of
the first transmitter, adjust the Mic-Offset to match the audio levels at the receiver. Turn off the transmitter.
• Repeat for any additional transmitters.
Name is a 15-character alphanumeric name which can be entered for each transmitter. Note that the receiver will not
display all 15 characters of the full transmitter name.
Group is the group number (1-16) to which the transmitter belongs, allowing it to be controlled with group commands
(see Group Commands below). To change the group to which the transmitter belongs, select the displayed group number
and adjust it using the UP/DOWN arrows. Once satisfied, press the “ENTER” or “BACK” button and “Save” when prompted.
RF Power is the power setting of the UHF RF output of the transmitter. This can be adjusted by bringing up the PA Output
Power menu and selecting the desired value. Using 2 vs 10 mW will not affect run time but using 20 mW will decrease run
time by half.
2.4 GHz Channel, the RCAS control channel default is 25, change this on the transmitter only if you are having control
issues that can be seen when you have completed a 2.4GHz spectrum scan. See Device Configuration, the 2.4 GHz
Channel description in Link ID section 3.5.