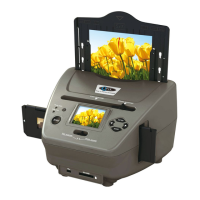
The CBS1400 Multi-Function Combo Scanner is a versatile device designed to convert films, slides, photos, and name cards into digital images. It boasts a 14-megapixel CMOS sensor and offers a 22M interpolation resolution for high-quality digital output.
Function Description:
The CBS1400 acts as a comprehensive digitizer for various analog media. It can scan 135 positive slides, 135 negative films, 110 films, and a range of photo sizes including 5"x7" (5R), 4"x6" (4R), and 3½"x5" (3R), as well as name cards. The device features a 2.4-inch LTPS LCD display for live preview and on-screen menu navigation. It can store captured images on an SD/MMC card or its built-in internal memory (used when no SD card is inserted). For business cards, it integrates with NIMOCARD software, a professional business card scanning and management tool. This software uses an advanced OCR engine to convert card images into text, categorize information, and allows for manual editing, import/export to applications like Microsoft Outlook, and data backup.
Important Technical Specifications:
- Sensor: 14 mega pixels CMOS sensor
- Scan High Resolution: 22M interpolation resolution
- LCD: 2.4 inch LTPS LCD Display
- External Memory: SD/MMC card
- Exposure: Auto
- Color Balance: Auto
- Data Conversion: 24 bits per color channel
- Scan Method: Single pass
- Light Source: 16 white LED/Backlight (3 white LED)
- LED Light Lifetime: 10000 times
- Power: Powered from USB/5V adapter
- Interface: USB 2.0
- Dimensions: 294.7mm(L) x 229.7mm(W) x 191.1mm(H)
- Weight: 1810g
- Lens (Film): 3G2P F/NO=3.98, f=5.22, Film Range: 51.5mm
- Lens (Photo): F/NO=3.4, f=5.12, Photo Range: 170mm
- Supported Languages: English, French, German, Italian, Spanish, Traditional Chinese, Simplified Chinese, Japanese
Usage Features:
Quick Start:
- Insert a memory card into the device.
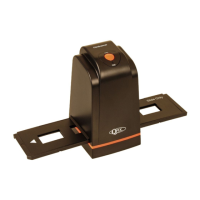
- Push the switch to the left for film scanning or to the right for photo scanning.
- Insert the appropriate Slide/Negative Holder or align photographs with the respective photo holders (5x7 (5R), 4x6 (4R), 3½x5 (3R), name card).
- Apply power via USB cable to PC or 5V adapter.
- Press the POWER button to turn on the scanner.
- Follow on-screen menu for scanning.
- Remove the memory card after scanning.
Main Menu (Film Scanner Mode):
The main menu displays options for Language, USB mode, Capture mode, Format, Playback mode, Film Type, and Resolution.
Main Menu (Photo Scanner Mode):
The main menu displays options for Language, USB mode, Capture mode, Format, Playback mode, Effect (multicolor, B&W), and Crop proportion (5"x7", 4"x6", 3½"x5", name card).
Capture Mode:
- Live Preview: An indicator on the top left corner shows live preview.
- Brightness and Color Adjustment: Press ENTER to enter EV value mode, then LEFT/RIGHT to adjust brightness (EV), red (R), green (G), and blue (B) values. Press ENTER to confirm.
- Mirror/Flip: Use LEFT/RIGHT buttons in live preview mode to mirror or flip the image, correcting orientation if the film is placed upside down or flipped.
- Saving Images: Press the SCAN button in live preview to select the image. The save icon will be highlighted. Press ENTER to save to internal memory or memory card.
- Canceling Edits: Select the Cancel icon and press ENTER to discard edits.
- Home: Select the Home icon and press ENTER or SCAN to return to the main menu.
Playback Mode:
- Auto Slide Show: Displays all images stored in memory with a 2-second interval. Press ENTER to pause.
- Single Picture Playback: From slide show mode, press ENTER to browse individual pictures using LEFT/RIGHT.
- Edit Menu (Playback): Press ENTER in single picture playback to access options: Exit (return to slide show), Delete (delete current picture), Home (return to main menu).
- Deleting Images: In playback, select the delete icon with LEFT/RIGHT and press ENTER.
- No Picture: If no images are stored, a "No File" symbol appears.
Film Type Selection:
In film scanner mode, enter the Film Type menu. Use LEFT/RIGHT to select between Slides (110, 135) or Negatives Film (110, 135) and B&W (110, 135). Press ENTER to confirm.
Effect Selection (Photo Scanner Mode):
In photo scanner mode, enter the Effect menu. Select between Multicolor effect and B&W effect. Press ENTER to confirm.
Crop Proportion Selection (Photo Scanner Mode):
In photo scanner mode, enter the Crop menu. Select crop proportions for 5"x7" (5R), 4"x6" (4R), 3½"x5" (3R), or Name card. Press ENTER to confirm.
Resolution Selection:
Enter the Resolution menu. Select between 14M resolution and 22M resolution. Press ENTER to confirm.
Language Selection:
Enter the Language menu. Select from English, French, German, Italian, Spanish, Traditional Chinese, Simplified Chinese, and Japanese. Press ENTER to confirm.
USB Mode:
When connected to a PC via USB, the scanner acts as a mass storage device, allowing preview or editing of images on the PC. Press MODE to return to the main menu.
Business Card Reader (NIMOCARD Software):
- Insert the OCR CD into the CD-ROM drive.
- Follow the pop-up installation interface to install the Business Card Reader software.
- Name Card Recognition: Select "File" → "open image", choose language, and the software will automatically recognize the name card.
- Edit Window: Select a name card from the preview window and click "Edit" to manually change content or redirect text from the card image to the sorting fields. Images can be rotated.
- Add Business Card: Click "New" in the main window to create a new business card entry.
- Software Features:
- Multi-language OS support: Uses Unicode encoding.
- OCR for multiple languages: Supports English, Simplified Chinese, Traditional Chinese, etc.
- Business card management: Edit, sort, import/export data (Outlook, Excel), quick search.
- Business card printing: Provides templates for labels or envelopes.
- Data backup: Local file backup or internet server backup.
Maintenance Features:
- Scanning Surface Cleaning: Use the provided cleaning cloth to frequently wipe the scanning surface to prevent dust on captured images.
- Lens Cleaning: Use the provided cleaning brush to remove dust from the lens. Ensure the device is in PHOTO MODE for this.
- Gently push the brush into the scanner.
- Flip the cover open and look through the transparent scanning surface.
- Ensure the brush is fully inserted and covers the lens.
- Rotate the brush so the arrow faces upwards (if it doesn't rotate, insert further).
- Move the brush gently forward and backward along the slot to wipe the lens surface.
- Reverse steps to remove the brush.
Safety Precautions:
- Do not expose to rain or moisture.
- Do not disassemble the unit.
- Ensure proper ventilation; do not block openings.
- Keep away from heat sources.
- Clean glass surface periodically with a clean, dry, nonalcohol cotton swab.
- Unplug the USB cord when not in use for long periods.
- Avoid USB overloading to ensure proper power supply.
- Refer servicing to qualified personnel.
- Be aware that non-standardized film may result in a small black line on the image edge, which can be removed with photo editing software.
Troubleshooting:
- Unwanted stripe appearance: Gently move the slide holder back and forth. If persistent, contact the retailer.
- Device not connecting to computer: Check USB cable connection to a computer USB port (preferably motherboard directly). Turn on power and enter USB mode.