17
FR FR
TD-000368-03-A
Étape 2 —
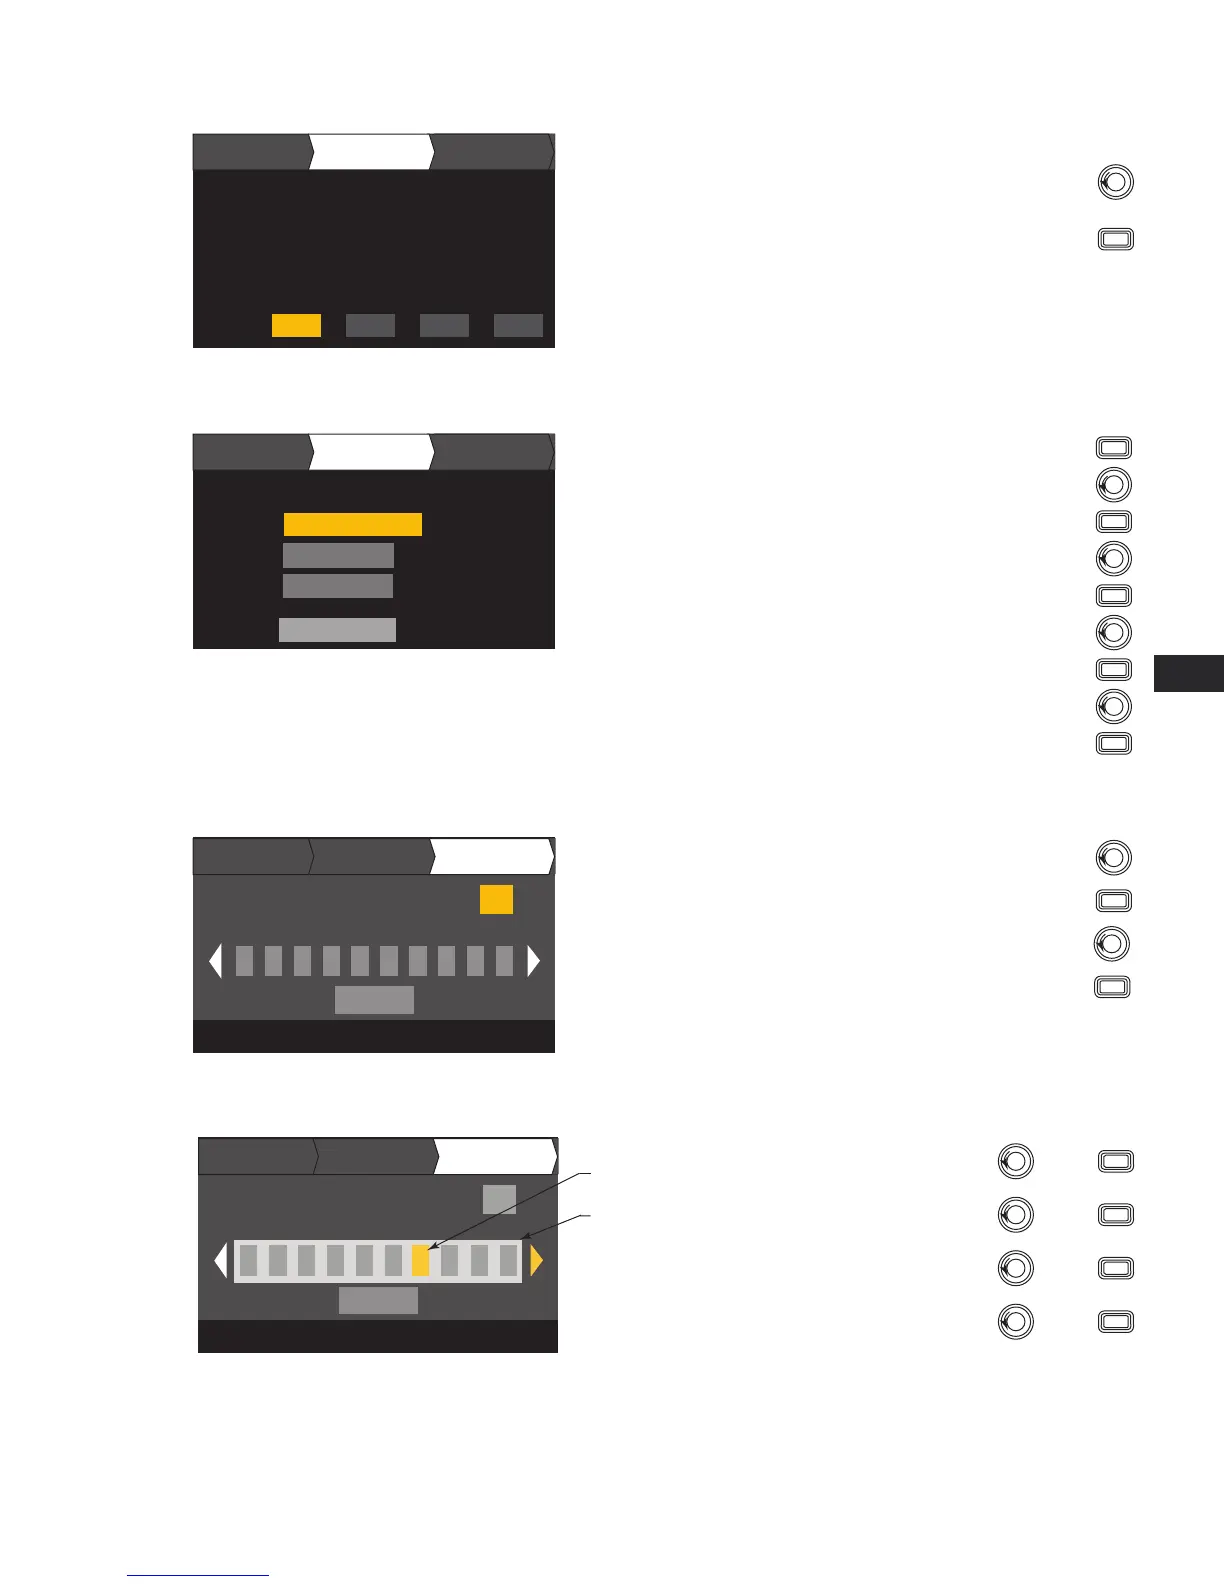
Sélection du canal de sortie pour l'affectation du haut-parleur
OUTPUTS SPEAKERS SAVE
Assign
AssignAssign
Output:
A DCB
Imped:
8.0 8.08.08.0
Spkr:
- - - - - - - -- - - -- - - -
Assign
Power:
625 625625625
Loudspeaker assignment is optional,
you can assign a loudspeaker to one
or more channels, or none at all.
When you are finished setting
the Impedance and Power for
each output, continue to scroll
to access the SPEAKERS tab.
To Assign a loudspeaker, press
Continue to Step 3.
Scroll to select Output channel
ENTER
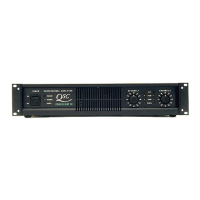
Étape 3 —
Sélection du type de haut-parleur pour le canal
OUTPUTS SPEAKERS SAVE
Output:
A
ASSIGN
2-Way LF
Speaker:
80 Hz
Band:
WL2102 BiLFNS
Filter:
Scroll to select a Speaker model
To edit Speaker, press
ENTER
Scroll to select (Band, Filter)
To confirm, press
ENTER
Turn to adjust parameter
ENTER
To edit, press
To confirm, press
ENTER
Band and Filter
selections are based on
the Speaker you select.
You must select a
loudspeaker before
selecting Band and Filter.
Scroll to select ASSIGN
ENTER
To assign the speaker to the output channel, press
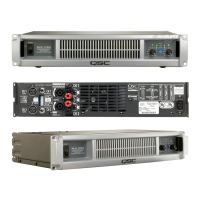
Étape 4 —
Sélection d'un numéro de préréglage utilisateur
Edit preset number or press EXIT
User Preset Number:
21
SAVE
New Preset Name
C o n f i g - A
OUTPUTS SPEAKERS SAVE
Scroll to the Save screen
To edit User Preset number, press
ENTER
When you have finished
selecting loudspeakers,
continue to scroll to
access the SAVE tab.
Turn to adjust parameter
To confirm, press
ENTER
Étape 5 —
Assignation d'un nom à un nouveau préréglage
Edit preset number or press EXIT
User Preset Number:
21
SAVE
New Preset Name
OUTPUTS SPEAKERS SAVE
Scroll to New Preset Name press
ENTER
Scroll to desired letter position press
ENTER
M y P r e s
Turn to select desired character press
ENTER
When finished, scroll to SAVE press
ENTER
Up to 21 characters
A - Z / a - z / 0 - 9 /
_ / - / space
Indicates “New
Preset Name”
selection
Indicates editing
Tourner pour sélectionner le
canal de sortie
Pour modifier le haut-parleur, appuyer sur
Tourner pour atteindre l'écran Save
Pour confirmer, appuyer sur
Tourner pour sélectionner (Band, Filter)
Tourner pour ajuster le paramètre
Pour modifier, appuyer sur
Pour confirmer, appuyer sur
Tourner pour ajuster le paramètre
Pour confirmer, appuyer sur
Tourner pour sélectionner ASSIGN
Pour assigner le haut-parleur au canal de sortie, appuyer sur
Pour assigner un haut-parleur,
appuyer sur
Passer à l'étape 3.
Une fois le réglage Imped et Power
terminé pour chaque sortie,
continuer à tourner le bouton de
commande pour accéder à l'onglet
SPEAKERS.
L'assignation d'un haut-parleur est
facultative – l'utilisateur peut assigner
un haut-parleur à un ou plusieurs
canaux, ou aucun.
Une fois la sélection des
haut-parleurs terminée,
continuer à tourner pour
accéder à l'onglet SAVE.
Tourner jusqu'à la position
de lettre souhaitée
Tourner jusqu'au nom du
nouveau préréglage
appuyer
sur
appuyer
sur
appuyer
sur
Une fois terminé,
tourner jusqu'à SAVE
appuyer
sur
Indique une
modification
Indique la sélection
« Speaker Profile Name »
Tourner pour sélectionner un modèle de haut-parleur
Les sélections pour
Band et Filter sont
fonction du haut-parleur
sélectionné. L'utilisateur
doit sélectionner un
haut-parleur avant de
renseigner les champs
Band et Filter.
Pour modifier le numéro du préréglage utilisateur, appuyer sur
Tourner jusqu'au
caractère souhaité
21 caractères maximum
A – Z / a – z / 0 – 9 /
_ / – / espace