EasyManua.ls Logo

Quoizel WVR8405EK - User Manual

Quoizel WVR8405EK
2 pages
Print Icon
To Next Page IconTo Next Page
Loading...
Package Contents
Warnings and Cautions
1of2
Assembly Instruction Sheet #IS-WVR8405EK
For Style WVR8405EK
Turn off electricity at circuit breaker or main fuse box before installation. Consult a licensed electrician if in doubt.
These instructions are provided for your safety. It is very important you read them completely before installing the fixture. We strongly
recommend that a licensed, professional electrician perform the installation.
Disconnect fixture from power source before replacing bulbs. Make sure bulbs are given sufficient time to cool before removal.
A
Crossbar Assembly
x1
Pleasegoto forproductcleaningtips.Gotothe selection.
(1)A19MediumBasebulb100WMaximumor
(1)MediumBaseVintageBulbisrecommendedbutnotsupplied.
20-30minutes
Identifyandinspectallpartsbeforebeginninginstallation.Checkpackagecontentlistanddiagramsbelowtoensureallpartsare
present.Ifanypartsaremissingordamaged,donotattempttoassemble,install,oroperatethefixture.Contactcustomerserviceforreplacement
parts.
www.quoizel.com Care+Maintenance
LightSource:
EstimatedAssembly Time:
Preparation:
Fixturecanonlybemountedinthedirectionindicatedonpage2.
ToolsRequired:Flatheadscrewdriver,Phillipsscrewdriver,pliers,wirecutters,wirestrippers,electricaltape,safetyglasses.
C
Thank you for purchasing a Quoizel product.
Need assistance with parts or assembly? Call Quoizel customer service at 1-800-645-3184
or visit us on-line at www.quoizel.com
D
Glass Panel
x4
B
Alternate
Mounting
screw
x2
STEP 1 Install Glass Panels-
A. Insert the Glass Panel (C) into the
cage with beveled edge is
outside. Attach the top edge of the
Glass Panel (C) to the slot in the
top of the cage. Fold tabs in the
bottom edge of the cage to secure
Glass Panels (C).
Figure 1
STEP 2 Installing the Crossbar Assembly-
A. Pass the supply wires through the Crossbar Assembly (A). Attach
the Crossbar Assembly (A) to the Outlet Box with the head of the
Green Ground Screw facing you. Secure the Crossbar Assembly (A)
with Outlet Box Screws (not included). Tighten until snug
Note: Use the Alternate Shorter Mounting Screw (B) if your
installation requires a shorter mounting screw.
.
Supply Wires
with Ground Wire
Outlet Box Screws
(not included)
Outlet Box
A
Figure 2
Mounting Screw
or Alternate Short
Mounting Screw
Fixture Body
x1
D
C
Slot
Tab
Cage
STEP 3 Test Fit the Backplate to the Crossbar Assembly-
A. Remove the mounting balls from the Crossbar Assembly (A). Place
the backplate and Fixture Body (D) onto the Crossbar Assembly (A)
and secure with mounting balls. Note: The backplate and Fixture
Body (D) should be snug against the wall and held tight with the
mounting balls. If it is not, adjust the length of the mounting screw or
alternate short mounting screw on the Crossbar Assembly (A) by
unscrewing the preassembled hex nut and lock washer and then
D
Mounting Ball
A
Backplate
Hex Nut and
Lock Washer
Mounting Screw
or Alternate Short
Mounting Screw
Figure 3
screwing the mounting
screws or alternate short
mounting screws in or out
of the crossbar until the
correct length is achieved.
Once the backplate and
Fixture Body (D) is secure,
remove the mounting ball
and Fixture Body (D) and
proceed to Step 4.
2017 QuoizelInc.
ReleasedDate:2017-08-31
Question and Answer IconNeed help?

Do you have a question about the Quoizel WVR8405EK and is the answer not in the manual?

Summary

Warnings and Cautions

Electrical Safety Precautions

Ensure electricity is off before installation and disconnect fixture before replacing bulbs.

Package Contents

Assembly Steps

Install Glass Panels

Insert glass panels into the cage and secure them.

Installing the Crossbar Assembly

Attach the crossbar assembly to the outlet box using provided screws.

Test Fit the Backplate to the Crossbar Assembly

Fit the backplate and fixture body, adjust screw length if needed.

Wire Connections

Connect ground, white, and black wires using connectors and tape.

Install the Fixture Body

Position backplate and fixture body onto crossbar and secure with mounting balls.

Install the Bulb and Apply Silicone Sealer

Screw in the bulb and apply caulk around the backplate for sealing.

Overview

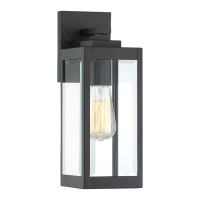
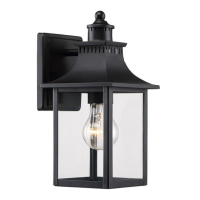
The Quoizel WVR8405EK is an outdoor wall-mounted light fixture designed for residential use, featuring a robust construction and an Earth Black finish. This assembly instruction sheet provides comprehensive guidance for its installation, operation, and maintenance.

Function Description:

The primary function of the Quoizel WVR8405EK is to provide illumination for outdoor spaces, such as porches, patios, or entryways. It is designed to be hardwired into an existing electrical system, offering a permanent lighting solution. The fixture accommodates a single medium base bulb, allowing users to select a light source that best suits their aesthetic and illumination needs. Its design, incorporating glass panels and a cage structure, aims to distribute light effectively while protecting the bulb from environmental elements. The fixture is intended for fixed, wall-mounted installation, with a specific orientation requirement as indicated in the assembly diagrams to ensure proper function and aesthetic alignment.

Important Technical Specifications:

  • Model Number: WVR8405EK
  • Finish: Earth Black
  • Light Source: Requires one (1) A19 Medium Base bulb with a maximum wattage of 100W. A medium base vintage bulb is recommended but not supplied with the fixture.
  • Power Source: Designed for hardwired installation into a standard electrical outlet box.
  • Dimensions (Approximate):
    • Overall Height: 14 inches
    • Width: 5 inches
    • Depth (from wall): 6.5 inches
    • Backplate Dimensions: 5 inches (width) x 5 inches (height)
    • Fixture Body Dimensions: 4.5 inches (width) x 6 inches (depth)
  • Mounting: Wall-mounted, with a specific orientation required. The fixture can only be mounted in the direction indicated in the diagrams.
  • Materials: Includes a metal fixture body (cage), glass panels, and a crossbar assembly for mounting.
  • Estimated Assembly Time: 20-30 minutes.

Usage Features:

  • Outdoor Application: Specifically designed for outdoor environments, suggesting a degree of weather resistance, though external caulking is required for moisture protection.
  • Bulb Versatility: Compatible with standard A19 Medium Base bulbs, offering flexibility in light output and color temperature. The recommendation for a vintage bulb suggests an aesthetic preference for a warm, classic look.
  • Secure Mounting: Utilizes a crossbar assembly that attaches to a standard outlet box, providing a stable and secure mounting point. Mounting screws and mounting balls ensure the fixture is held snugly against the wall.
  • Glass Panel Design: Features four glass panels that are inserted into the cage structure, secured by folding tabs. This design allows for easy installation of the glass while providing protection for the bulb.
  • Aesthetic Integration: The Earth Black finish and classic design are intended to complement various architectural styles, particularly those with a traditional or rustic aesthetic.
  • Specific Mounting Orientation: A critical usage feature is the requirement for the fixture to be mounted in a specific direction, as illustrated in the diagrams. This ensures proper drainage, aesthetic alignment, and potentially optimal light distribution.

Maintenance Features:

  • Cleaning: The manufacturer, Quoizel, provides cleaning tips on their website (www.quoizel.com) under the "Care + Maintenance" selection. This indicates that regular cleaning is expected to maintain the fixture's appearance.
  • Bulb Replacement: Designed for user-friendly bulb replacement. Users are instructed to disconnect power and allow the bulb to cool before removal. The glass panels and cage structure provide access to the bulb.
  • Caulking for Weather Protection: A crucial maintenance step for outdoor use is the application of exterior-grade caulk around the backplate. This prevents moisture intrusion, protecting the internal wiring and components from damage. Specific instructions are provided to caulk the top and sides, but not the bottom, to allow for proper moisture drainage.
  • Component Replacement: In case of missing or damaged parts, Quoizel offers customer service support for replacement parts, ensuring the longevity and continued functionality of the fixture.
  • Professional Installation Recommendation: While detailed instructions are provided for DIY installation, the manufacturer strongly recommends that a licensed, professional electrician perform the installation. This ensures safety and proper wiring, potentially reducing future maintenance issues related to faulty installation.
  • Pre-installation Inspection: Users are advised to identify and inspect all parts before beginning installation, which helps in proactively addressing any manufacturing defects or shipping damages, preventing issues during or after installation.
  • Power Disconnection for Maintenance: Emphasizes the importance of turning off electricity at the circuit breaker or main fuse box before any installation or bulb replacement, a fundamental safety practice.

Quoizel WVR8405EK Specifications

General IconGeneral
BrandQuoizel
ModelWVR8405EK
CategoryOutdoor Light
LanguageEnglish

Related product manuals