EasyManua.ls Logo

RAB LESLIE - User Manual

RAB LESLIE
2 pages
Print Icon
To Next Page IconTo Next Page
Loading...
INSTRUCTIONS
LESLIE® INSTALLATION


IMPORTANT
READ CAREFULLY BEFORE INSTALLING FIXTURE. RETAIN THESE INSTRUCTIONS FOR FUTURE REFERENCE.



WARNING: Make certain power is OFF before installing or maintaining  xture. No user serviceable parts inside.
CAUTION: For proper weatherproof function all gaskets must be seated properly and all screws inserted and tightened
rmly. Apply weatherproof silicone sealant around the edge of the ceiling mounting box and/or junction box. This is
especially important with an uneven ceiling surface. Silicone all plugs and unused conduit entries.
LESLIE®




Junction Box (not supplied) and Cover
Plate (not supplied)


 Cover Plate

 (Fig. 3).
3. Attach Cover Plate to Junction Box.
4. 
Arm Screw.
Mount to a Mighty Post (RAB Cat# MP19)
 Mighty Post Cap (ordered separately)

 (Fig. 3). Push all
Mighty Post Cap (ordered separately).
3. Place Mighty Post Cap on the Mighty Post.
4. 
Arm Screw.
Cover Plate
(not supplied)
Junction Box
(not supplied)
Arm Screw
Mighty Post and Cap
(ordered separately)
Arm Screw
Question and Answer IconNeed help?

Do you have a question about the RAB LESLIE and is the answer not in the manual?

Summary

Important Safety and Installation Instructions

General Safety Precautions

Read instructions carefully, retain for future reference, and follow all codes for safe installation by qualified personnel.

Weatherproof Functionality

Ensure gaskets are seated, screws are tight, and use silicone sealant on boxes for weatherproof function.

Mounting Options

Wall Mounting Procedure

Mount to a weatherproof junction box using a cover plate, apply sealant, and secure the fixture arm.

Ground Mounting Procedure

Mount to a Mighty Post using its cap, apply sealant to the arm thread, and secure the fixture arm.

Electrical Connection and Troubleshooting

On-Off Wiring Guide

Connect fixture leads (black to line, white to common, ground to ground) for 120V operation.

Troubleshooting Tips

Verify correct line voltage at the fixture and ensure proper grounding for operation.

Cleaning and Maintenance

Maintenance Precautions

Ensure fixture is cool and de-energized before cleaning; use non-abrasive solutions on the lens.

Overview

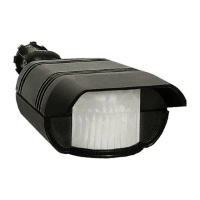
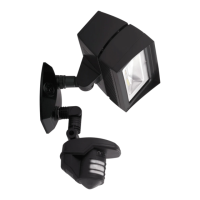
The RAB Leslie® is an LED lighting fixture designed for both wall and ground mounting applications, offering energy-efficient illumination. It is engineered for easy installation by electricians and aims to provide high-quality, affordable, and well-designed lighting solutions.

Function Description:

The Leslie® fixture provides illumination for various outdoor settings. Its primary function is to deliver light efficiently and reliably, whether mounted on a wall or in the ground. The fixture operates on a standard 120V, 50/60 Hz power supply, making it suitable for common electrical systems. It is designed to be a durable and low-maintenance lighting solution, with a focus on weatherproof performance to withstand outdoor elements.

Important Technical Specifications:

  • Power Supply: Operates at 120V, 50/60 Hz.
  • Mounting Options:
    • Wall Mounting: Designed to mount to a weatherproof Junction Box (not supplied) and a Cover Plate (not supplied).
    • Ground Mounting: Designed to mount to a Mighty Post (RAB Cat# MP19) using a Mighty Post Cap (ordered separately).
  • Weatherproofing: Requires the application of weatherproof silicone sealant around the edge of the mounting box/junction box, especially on uneven surfaces, and around all plugs and unused conduit entries to ensure proper function. Gaskets must be properly seated, and all screws firmly tightened for optimal weatherproof performance.
  • Wiring: Features a simple on-off wiring configuration:
    • Black fixture lead connects to the LINE supply lead.
    • White fixture lead connects to the COMMON supply lead.
    • Ground wire from the fixture connects to the supply ground.
  • Internal Components: No user-serviceable parts inside the fixture. LEDs are not to be touched or cleaned directly.
  • Lens Material: Polycarbonate lens.

Usage Features:

  • Installation Flexibility: Can be installed on walls or in the ground, providing versatility for different lighting needs and landscape designs.
  • Ease of Installation: The instructions emphasize a straightforward installation process, with clear steps for both mounting types.
  • Adjustable Aim: The fixture allows for aiming in the desired direction, with a locknut and arm screw to secure its position after adjustment.
  • Durability: Built to withstand outdoor conditions, with a strong emphasis on proper sealing and grounding to ensure longevity and safety.
  • Compliance: Must be wired in accordance with the National Electrical Code and all applicable local codes, and installed by a person familiar with product construction, operation, and associated hazards.
  • Safety: Requires power to be OFF before installation or maintenance. Proper grounding is essential for safety.

Maintenance Features:

  • Cleaning: The polycarbonate lens can be cleaned with a non-abrasive cleaning solution.
  • No Internal Servicing: Users are explicitly warned not to open the fixture to clean the LEDs or touch them, as there are no user-serviceable parts inside.
  • Temperature Consideration: Before cleaning or maintenance, ensure the fixture temperature is cool enough to touch.
  • Long-Term Reliability: The design focuses on minimizing maintenance needs through robust construction and sealing, reducing the need for frequent intervention.
  • Troubleshooting: Basic troubleshooting steps are provided, including checking line voltage and ensuring proper grounding, to address common issues.

The RAB Leslie® is designed to be a reliable, easy-to-install, and low-maintenance outdoor lighting solution, emphasizing safety and compliance with electrical codes. Its dual mounting options and robust weatherproofing make it suitable for a variety of exterior applications.

RAB LESLIE Specifications

General IconGeneral
BrandRAB
ModelLESLIE
CategoryLighting Equipment
LanguageEnglish

Related product manuals