EasyManua.ls Logo

RAB STEALTH 360 - User Manual

RAB STEALTH 360
12 pages
Print Icon
To Next Page IconTo Next Page
Loading...
Installation Manual
STL360HBW
The STEALTH 360 is the most reliable
and technically advanced motion-
activated light control ever
produced. This technical manual is
written for electrical professionals
who wish to maximize the
performance and reliability of this
superb sensor.
RAB welcomes your questions or
comments.
Please call 888 722 1000 or email
marketing@rabweb.com.
Thank you for purchasing a RAB sensor.
STL360H
Specications:
Switching Capacity: 8 amps
Voltage: 120 volts
Protection Pattern: 180º forward
360º below and to the sides
Time Adjustment: 5 seconds to 12 minutes
Power Consumption: 1 watt
Surge protection: 6000 volts
Cautions:
TURN OFF ALL POWER AT CIRCUIT BREAKER/FUSE PANEL
Read entire Installation Manual before proceeding.
All wiring should comply with local electrical codes and
requires a qualied electrician.
The total lighting load connected to STL360 must not exceed (1000 watts
incandescent, 250 watts uorescent). To switch more wattage, an electri-
cian can install a relay.
Line Carrier Remote Control Systems such as X-10, Leviton or Radio Shack
are incompatible with sensors and may cause false activations.
Do not install sensors on a circuit that feeds motor loads such as kitchen
appliances, HVAC equipment, washer/dryer, or garage door openers.
Sensor functions best when the direction of expected
movement is across its detection pattern, not towards the sensor.
Mount 6’-10’ high for optimum range and detection.
STL3FFLED18
Question and Answer IconNeed help?

Do you have a question about the RAB STEALTH 360 and is the answer not in the manual?

Summary

Specifications and Cautions

Cautions

Provides essential warnings and safety precautions before installation and operation.

Choosing the Best Location

Assembly and Wiring Guide

Mounting the STL360

Details the physical installation steps for the sensor and floodlights.

Wiring the STL360

Explains the electrical connections required for the sensor.

Adjusting Sensor Settings

Time Delay Adjustment

Sets the duration lights remain on after motion detection.

Photocell Setting

Configures the sensor for night-only or 24-hour operation.

Sensitivity Adjustment

Controls the sensor's responsiveness and detection range.

Evening Timer Mode

Allows lights to stay on continuously for a set time after dusk.

Sensor Modes Explained

Walk Testing and Troubleshooting

Walk Testing Procedure

Steps for aiming, testing detection, and adjusting settings.

Technical Tips: Inappropriate Operation

Inappropriate Activation;Deactivation

Solutions for lights turning on/off inappropriately due to wiring or ambient light.

Technical Tips: Light Behavior

Lights Turn Off Too Quickly

Addresses premature shut-off due to reflected light or lamp types.

Range Appears Limited

Solutions for limited detection range due to aiming or mounting height.

Overview

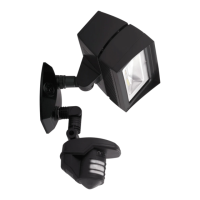
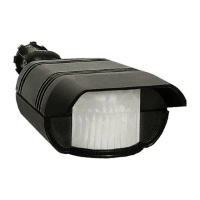
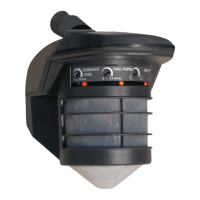
The RAB STEALTH 360 is a motion-activated light control designed for outdoor use, offering advanced detection capabilities and energy efficiency. It is engineered to automatically turn on lights when it detects movement within its protection zone, serving both as a welcoming feature for visitors and a deterrent for intruders.

Function Description

The STEALTH 360 utilizes an infrared sensor to detect temperature changes caused by the motion of people or cars. This allows it to activate connected lights automatically. The device boasts a "Can't Miss" Detection system, combining two powerful detectors to provide a broad coverage area. This includes a 180° long forward range (180° x 60') and a superb 360° downward detection that covers all sides.

The sensor operates in several modes:

  • Automatic Mode: In this default mode, the sensor is "On Guard" and continuously scans for movement. When motion is detected, the lights turn on and remain on as long as movement persists within the protection zone. Once the area is vacated, the lights will turn off after a user-adjustable delay. Red scanning LEDs indicate the sensor is active in this mode, except during detections when the LEDs are off and the lights are on.
  • Manual Override Mode: This mode allows users to keep the lights on continuously until dawn. It is activated by flipping the indoor light switch twice slowly (off-on-off-on) within 1-2 seconds. A steady middle LED indicates the sensor is ready for Manual Override Mode. This feature is useful for continuous lighting during evening activities or to simulate occupancy when away from home.
  • Evening Timer Mode: This mode provides continuous lighting for a set duration (1 to 8 hours) after dusk, then reverts to motion-activated mode. It is activated by flipping the indoor light switch three times slowly (off-on-off-on-off-on) within 1.5-3 seconds. A blinking middle LED indicates the sensor is ready for Evening Timer Mode. This mode is ideal for creating a "lived-in" look during vacations.
  • Test Mode: This mode allows users to test the sensor's detection capabilities during the day, regardless of the photocell setting. To enter Test Mode, the time setting knob is turned to 5 seconds, power is turned off for 10 seconds, then back on. After a 30-second warm-up, the lights will turn on for 5 seconds each time movement is detected. All LEDs remain off in Test Mode. This mode is crucial for adjusting the sensor's aiming and sensitivity.

The STEALTH 360 is designed to be highly energy-efficient, consuming only 1 watt of power. Lights are only on when needed, contributing to energy savings.

Usage Features

The STEALTH 360 offers several adjustable settings to optimize its performance:

  • Time Adjustment: Users can set how long the lights remain on after detection, ranging from approximately 5 seconds to 12 minutes. The factory setting is 12 minutes.
  • Photocell Adjustment: For night-only operation, the photocell knob should be turned completely counterclockwise to the moon symbol. For 24-hour operation, it should be turned clockwise to the moon/sun symbol. This allows the sensor to operate during both day and night. The knob can be adjusted to have the sensor come on earlier or later at dusk.
  • Sensitivity Adjustment: The sensitivity knob increases or decreases the sensor's responsiveness and range, adjustable from 30% to 100%. The factory setting is 100%. This helps in limiting detection to specific areas or preventing false activations from wind, foliage, traffic, or animals.
  • Mounting: The sensor can be wall or soffit mounted. Optimal range and detection are achieved when mounted 6-10 feet high. Mounting above 15 feet may reduce usable range.
  • Lens Mask: A provided lens mask or opaque tape can be used to block detection from unwanted movement or heat sources, such as swaying trees, road traffic, dryer vents, swimming pools, or hot tubs. This helps in fine-tuning the detection pattern.
  • Animal Detection: While the sensor may detect large animals, which can give a "lived-in" look, users can limit animal detection by turning down the sensitivity knob or placing blinders on the lower part of the forward lens.
  • Walk Test: A walk test procedure is outlined to check and adjust the coverage pattern. This involves aiming the sensor, walking across the pattern to observe light activation, and adjusting aiming and sensitivity as needed.

Maintenance Features

The manual provides comprehensive guidance for troubleshooting common issues:

  • Lights Do Not Turn Off: Solutions include ensuring the sensor is not in Manual Override or Evening Timer Mode, checking for unwanted movement or heat sources (e.g., waving branches, water, heating vents), masking the lens, lowering sensitivity, ensuring stable mounting, and verifying proper wiring. It also advises checking if heat from the lights is triggering the sensor, recommending the sensor be mounted below and as far away as possible from the lights.
  • Lights Turn On and Off Inappropriately: Recommendations include installing the sensor on a dedicated circuit free of motor loads, avoiding parallel wiring with multiple sensors, ensuring no people are in the detection pattern, checking for reflective surfaces that might trick the photocell, and ensuring the sensor is not aimed at roads or sidewalks. Reducing sensitivity can help with activations caused by heavy rain, snow, high winds, or moths.
  • Lights Do Not Turn On: Troubleshooting steps include checking lamps and fixtures, verifying wiring and power, ensuring the photocell is not set to night-only during daylight if daytime operation is desired, and checking for external light sources that might deactivate the photocell.
  • Range Appears Limited: Solutions involve ensuring the sensor is level and pointed correctly, checking mounting height (optimal 6-10 feet), and verifying that movement is across the detection pattern rather than directly towards the sensor. "Micro Adjust" by moving the sensor sideways slightly can help in allowing earlier detection.

The STEALTH 360 is designed with surge and transient protection to IEC specifications, enhancing its durability. However, it is not recommended to install sensors on circuits that feed motor loads (e.g., kitchen appliances, HVAC equipment, washer/dryer, garage door openers) as significant voltage variations can cause malfunction.

For support, RAB provides a Tech Help Line and email, encouraging users to have specific information ready, such as the catalog number, wattage and types of lights, electrical circuit details, and the sensor's serial number. This comprehensive approach to usage and maintenance ensures optimal performance and longevity of the STEALTH 360.

RAB STEALTH 360 Specifications

General IconGeneral
CategoryLighting Equipment
IP RatingIP65
Lifespan50000 hours
MaterialAluminum alloy
CertificationUL Listed, DLC Listed

Related product manuals