INSTRUCTIONS
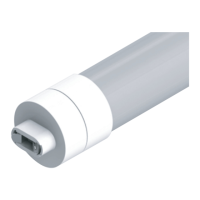
T8 LED SIGN TUBE
RAB Lighting is committed to creating high-quality, affordable, well-designed and energy-efficient LED lighting and controls that make it easy for electricians to install
and end users to save energy. We’d love to hear your comments. Please call the Marketing Department at 888-RAB-1000 or email: marketing@rablighting.com
IMPORTANT
READ CAREFULLY BEFORE INSTALLING TUBES. RETAIN THESE INSTRUCTIONS FOR FUTURE REFERENCE.
RAB LED tubes must be wired in accordance with the National Electrical Code and all applicable local codes. Proper grounding is
required for safety. THIS PRODUCT MUST BE INSTALLED IN ACCORDANCE WITH THE APPLICABLE INSTALLATION CODE BY A PERSON
FAMILIAR WITH THE CONSTRUCTION AND OPERATION OF THE PRODUCT AND THE HAZARDS INVOLVED.
PARTS/COMPONENTS INCLUDED IN KIT
KIT IS COMPLETE ONLY WHEN ALL PARTS REQUIRED BY THE INSTRUCTIONS ARE PRESENT.
WIRING DIAGRAM
Endcap with L
mark
AC Input
Connect
Live wire
to this side
Connect
Neutral wire
to this side
Endcap with N
mark
- Installation Instructions 10pcs/carton
- LED Lamp 10pcs/carton
- Luminaire Marking Labels 10pcs/carton
WARNINGS:
• Risk of electric shock - Do not use where directly exposed to water.
• Risk of re or electric shock - LED Retrofit Kit installation requires knowledge of sign electrical systems. If not qualified, do not
attempt installation. Contact a qualified electrician.
• Risk of re or electric shock - Install this kit only in host signs that have been identified in the installation instructions and where
the input rating of the retrofit kit does not exceed the input rating of the sign.
• Risk of re or electric shock - Installation of this LED retrofit kit may involve drilling or punching of holes into the structure
of the sign. Check for enclosed wiring and components to avoid damage to wiring and electrical parts.
• Prevent wiring damage or abrasion, do not expose wiring to edges of sheet metal or other sharp objects.
• Installers should not disconnect existing wires from lampholder terminals to make new connections at lampholder terminals.
Instead installers should cut existing lampholder leads away from the lampholder and make new electrical connections to
lampholder lead wires by employing applicable connectors.
• Installers should examine all parts that are not intended to be replaced by the retrofit kit for damage and replace any
damaged parts prior to installation of the retrofit kit.
• Repair and seal any unused openings in the electrical enclosure. Openings greater than 12.7-mm (1/2-in) diameter require a metal
patch secured by screws or rivets and caulked with non-hardening caulk. Smaller openings may be sealed with non-hardening caulk.
SAFETY INFORMATION:
For your and others’ safety, please read the precaution carefully before installation:
- Always keep AC supply off during installation.
- The light source contained in this luminaire shall only be replaced by the manufacturer, its service agent, or a similar qualified person.
- Not for use with dimmers.
- This product is not intended for use with emergency exits.
- Do not make or alter any open holes in an enclosure of wiring or electrical components during kit installation.
- The electrical rating is 120-277Vac, the installer must determine whether they have 120-277Vac at the luminaire before installation.
GENERAL PURPOSE
RETROFIT SIGN
CONVERSION
FOR USE ONLY
IN ACCORDANCE WITH
KIT INSTRUCTIONS
KIT IS COMPLETE ONLY WHEN ALL PARTS
REQUIRED BY THE INSTRUCTIONS ARE PRESENT