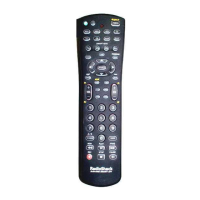
Introduction
Thank you for buying a RadioShack Remote Control.
You can use your remote to replace a broken or lost
remote or combine the functions of two or more
remotes.
This remote control operates the common features of
most (but not all) models and brands of IR (Infrared)
controlled video equipment. This remote may support
functions that are not available on your device. Some
functions of your particular device (such as menu
functions) may not be controlled by this remote. In
such cases, use the original remote control for your
device.
Please use this manual to become familiar with your
remote, then install batteries and set up your remote for
your particular device and brand.
Battery Installation
1.Push down on the tab on the back of the remote and
lift off the cover.
2.Match the batteries to the + and - marks inside the
battery case, then insert 2 AAA alkaline batteries.
3.Replace the cover.
When the remote’s range decreases or it does not
operate properly, replace the batteries. You have 2
minutes to change the batteries without losing codes
you have programmed. Do not press any buttons until
batteries are installed. If buttons are pressed without
batteries in the remote, all codes will be lost.
Battery Saver
Your remote automatically times out if the buttons are
pressed more than 30 seconds. This will save your
batteries should your remote get stuck in a place (for
example, between sofa cushions) where the buttons
remain pressed.
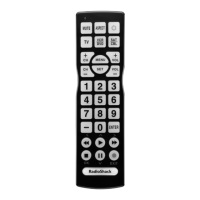
Cat. No. 15-2113 [A] 1. 2. 3. 4. 5. 6.
TV Volume/Mute Punch-Through
The TV Volume/Mute punch-through feature lets you
control the Volume and Mute function of your TV in
any mode programmed to be a VCR or Cable device
without changing to TV mode.
TV/VCR Punch-Through
When the remote is in TV mode or any mode pro-
grammed for Cable, the 6 VCR keys (Play, Pause, Stop,
Record, FF and Rewind) will punch-through to the
device programmed under VCR (in TV mode), or any
mode programmed for Cable.
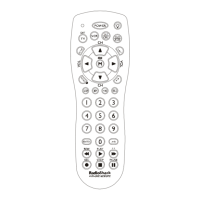
Button functions
The remote powers on in TV mode.
A-B Operates as TV/Video, TV/VCR, etc.,
depending on mode.
Enter Used to enter channel numbers for
some devices.
Menu Puts the remote in menu mode and
displays the menu on the TV. The
indicator light blinks continuously to
indicate the remote is in Menu mode,
VOL UP/DOWN keys operate as cursor
right/left, CH+/- keys operate as cursor
up/down, and Mute operates as OK.
Press any mode key to exit Menu.
Disp Displays device on-screen status
information.
Last Goes to last channel viewed.
100+ Press first, then enter the number for
channels higher than 100.
Note: Some buttons on the remote might have functions
that are labeled differently on the device you are
controlling, depending on the brand and model of your
device. For example, Last may be called RECALL or
Previous Channel; ENTER may be called DISPLAY.
Also, this remote can only operate features that exist on
your device. For example, your device must have
Previous Channel capability for the Last button to
operate this feature.
Code Setup
The Setup button is used to setup the remote. You can
set up the remote using the code for your brand of
device from the code list, or search through the library
of codes until you find a code that works for your
device.
You can store any kind of code under any mode (except
TV). For example, you can store a VCR code under the
CBL key. However, you can only store TV codes under
the TV key.
Direct Code Entry
1.Press and hold the Setup button until the red
indicator stays on. Release the Setup button.
2.Press and release the desired mode button (TV, VCR,
etc.). The red indicator blinks, then stays lit.
3.Enter the 3 digit code from the code list.
Note: The red indicator turns off after a valid code
entry and flashes for an invalid code.
4.With your device on, press Channel Up. If the
device responds, no further setup is required.
Note: If some buttons on your device do not
operate, try one of the other codes for your brand.
TV/VCR Combo units
For some TV/VCR combo units, you might need to set
up two different buttons to control both parts of the
combo unit. See “Direct Code Entry” on page 3). For
example, set up a code under the TV button to control
the TV part of the combo unit and a separate code for
the VCR under any other button you choose.
Programming with Code Search
1.Manually turn on the device (TV, VCR, etc.) to be
controlled.
2.Press and hold the Setup button until the red
indicator stays on. Release the Setup button.
3.Press and release the desired mode button (TV,
VCR, etc.). The red indicator blinks, then stays lit.
4.Repeatedly press the Channel Up button (up to 300
times) until the device to be controlled changes
channel. The red indicator blinks, then stays lit.
If you accidentally overshoot the desired code, press
the Channel Down button to backtrack through the
library until the device changes channels. Pressing
Channel Up changes the direction to forward again.
Press and release the Enter button to set the code. If
the device does not have a Channel Up button, use
Play (VCR) or Power instead.
This method assumes that you want to store VCR
codes under the VCR button, CBL codes under CBL,
etc. If you want to store a VCR code under CBL, first
follow the procedure for “Direct Code Entry” on page 3,
trying any CBL code from the code tables (that is, press
CBL in step 2, then enter any VCR code). Then follow
the steps for Code Search above.
Operation
1.Press the mode button for the desired device.
2.Aim the remote at the device.
3.Press POWER to turn on the device.
4.Press other buttons to operate the features of your
device.
Note: The REC button must be pressed TWICE to
record from your VCR. For some brands of VCRs, you
might need to press the REC button once, then press it
again for three seconds.
Code Identification
1.Press and hold the Setup button until the red
indicator stays lit. Release the Setup button.
2.Press and release the desired mode button (TV,
VCR, etc.). The red indicator blinks, then stays lit.
3.Press and release the Setup button. The indicator
light blinks off.
4.To find the first digit for the code stored under the
mode key you pressed in step 2, press each numeric
key from 0-9 in turn. When the indicator blinks off,
the number you pressed is the first digit for the
code you are searching for.
5.Repeat step 4 to find the second and third digits.
Troubleshooting
Remote does not operate your device.
• Press the mode button of the device you want to
control.
• Program the remote with a new code.
• Install new batteries. (You might have to reprogram
your remote after installing new batteries.)
• Remote may not be compatible with your device.
Remote does not operate some features of your device.
• Program remote with a new code.
• Remote may not be able to operate all features of
your device or button names might be different than
your device.
Indicator light blinks after you program a device code.
• Remote did not accept the code.
• Try to program the code again or try a different code.
Limited Ninety-Day Warranty
This product is warranted by RadioShack against manufacturing
defects in material and workmanship under normal use for
ninety (90) days from the date of purchase from RadioShack
company-owned stores and authorized RadioShack franchisees
and dealers. EXCEPT AS PROVIDED HEREIN, RadioShack
MAKES NO EXPRESS WARRANTIES AND ANY IMPLIED
WARRANTIES, INCLUDING THOSE OF MERCHANTABIL-
ITY AND FITNESS FOR A PARTICULAR PURPOSE, ARE
LIMITED IN DURATION TO THE DURATION OF THE
WRITTEN LIMITED WARRANTIES CONTAINED HEREIN.
EXCEPT AS PROVIDED HEREIN, RadioShack SHALL HAVE
NO LIABILITY OR RESPONSIBILITY TO CUSTOMER OR
ANY OTHER PERSON OR ENTITY WITH RESPECT TO
ANY LIABILITY, LOSS OR DAMAGE CAUSED DIRECTLY
OR INDIRECTLY BY USE OR PERFORMANCE OF THE
PRODUCT OR ARISING OUT OF ANY BREACH OF THIS
WARRANTY, INCLUDING, BUT NOT LIMITED TO, ANY
DAMAGES RESULTING FROM INCONVENIENCE, LOSS OF
TIME, DATA, PROPERTY, REVENUE, OR PROFIT OR ANY
INDIRECT, SPECIAL, INCIDENTAL, OR CONSEQUENTIAL
DAMAGES, EVEN IF RadioShack HAS BEEN ADVISED OF
THE POSSIBILITY OF SUCH DAMAGES.
Some states do not allow limitations on how long an implied
warranty lasts or the exclusion or limitation of incidental or
consequential damages, so the above limitations or exclusions
may not apply to you. In the event of a product defect during
the warranty period, take the product and the RadioShack sales
receipt as proof of purchase date to any RadioShack store.
RadioShack will, at its option, unless otherwise provided by law:
(a) correct the defect by product repair without charge for
parts and labor; (b) replace the product with one of the same or
similar design; or (c) refund the purchase price. All replaced
parts and products, and products on which a refund is made,
become the property of RadioShack. New or reconditioned
parts and products may be used in the performance of warranty
service. Repaired or replaced parts and products are warranted
for the remainder of the original warranty period. You will be
charged for repair or replacement of the product made after
the expiration of the warranty period.
This warranty does not cover: (a) damage or failure caused by
or attributable to acts of God, abuse, accident, misuse, improper
or abnormal usage, failure to follow instructions, improper
installation or maintenance, alteration, lightning or other
incidence of excess voltage or current; (b) any repairs other
than those provided by a RadioShack Authorized Service
Facility; (c) consumables such as fuses or batteries; (d) cosmetic
damage; (e) transportation, shipping or insurance costs; or (f)
costs of product removal, installation, setup service adjustment
or reinstallation.
This warranty gives you specific legal rights, and you may also
have other rights which vary from state to state.
RadioShack Customer Relations, 200 Taylor Street, 6th Floor,
Fort Worth, TX 76102
Custom Manufactured in China for RadioShack, Ft. Worth, TX
76102.
 Loading...