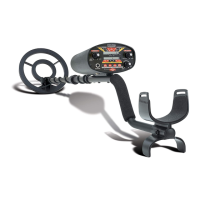
PREPARATION
ASSEMBLING THE
DETECTOR
I
Upperl
Stem
_ Searchcoil
8 utto
~---
Assembling your detector
is
easy and
requires
no
special tools. Follow these
steps to assemble the detector.
1.
Loosely attach the searchcoil to
the lower stem using the supplied
bolt and knurled knob. _
Do
not
tighten the bolt
and
knob yet.
2.
While pressing and holding down
the button
on
the top of the lower
stem, slide the lower stem tube
into the upper stem tube.
3.
Adjust the stem to a length that
lets you comfortably stand upright.
The stem should be long enough
to let you comfortably hold the
detector so the searchcoil
is
level
to
the ground and about ½ to 2
inches above the ground with your
arm relaxed at your side.
4
4.
Wind the searchcoil's cable
around the stem. Leave enough
slack
in
the cable
to
let you adjust
the searchcoil when you are hunt-
ing
on
uneven ground.
5.
Insert the searchcoil's plug into the
matching connector on the detec-
tor's control housing. Make sure
the pins
on
the plug align with the
holes
in
the connector.
Cautions:
• The searchcoil's plug fits into
the connector only one
way.
Do
not force it.
•
To
disconnect the searchcoil's
cable from the detector, grasp
the plug and pull
it
out of the
connector. Never pull
on
the
cable.
6.
Adjust the searchcoil to the
desired position, then tighten it
by
turning the bolt and knurled knob
in
opposite directions until they
stop.
Caution:
Do
not overtighten the
searchcoil or use tools such as pli-
ers to tighten it.
INSTALLING BATTERIES
You need two 9-volt alkaline batteries
(such as Cat. No. 23-553) to power
your detector.
1.
If the detector
is
on, turn SENSITIV-
ITY
on
the front panel fully counter-
clockwise until it clicks to turn it off.
 Loading...