RP1 Receiver User Manual
YL520
AI1e
1281
2340
45746
1.1
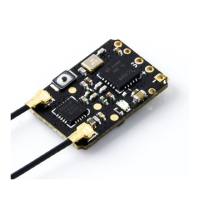
BOOT
RP1
V1.2
VCWI
u.Fl LED
TX 5V gRX
13mm
26.000
MHZ
E
L
R
S
5V TX RX
−
11mm
ESP
8285
Firmware upgrade button
Use a metal object to short-circuit
the GND while powering ON.
SPECIFICATIONS
•Size: 13*11*3mm
•Weight:
2.2g (w/antenna)
•MCU: ESP8285
•RF Chip: SX1281
•Frequency Band: 2400MHz-2483MHz
•Input Voltage: 5V
•Receiver protocol: CRSF
•Firmware (pre-installed): ExpressLRS v3.0
INCLUDES
1x RP1 ELRS 2.4ghz Receiver
1x 65mm UFL 2.4Ghz T-Antenna
1x User Manual Card
4x Silicone wires
DEFAULT FIRMWARE
RadioMaster RP1/2 2400 RX
For more information, please visit the ELRS website:
https://www.expresslrs.org/2.0/
TRADITIONAL BINDING
Binding Phrase field must be uncommented in Device options on the RX.
1. Power OFF your transmitter/radio.
2. Plug in and unplug your receiver 3 times.
3. Make sure the LED is doing a quick double blink, which indicates
the receiver is in bind mode.
4. Power ON your transmitter/radio and use the [BIND] button
on the ExpressLRS Lua script, which sends out a binding pulse.
5. If the receiver has a solid light, it's bound!
CONFIGURATION
115200USB VCP
Identifier Serial RXConfiguration/MSP
UART1
UART2
115200
115200
Open Betaflight Configurator, go to Ports tab and enable the corresponding
UART as a Serial RX (e.g. UART2 as shown above). Save and Restart.
On the Configuration tab, click on Serial-based receiver on the Receiver
panel, and select CRSF.
Receiver
Serial (via UART)
CRSF
Receiver Mode
Serial Receiver Provider
• The UART for the receiver must be s et to ‘Serial Rx ’ (in the
Ports
tab)
• Select the correct data format from the drop-down, below:
BOTTOM
2.2
GRAMS
2.4
GHZ
TOP
55mm
65mm