EasyManua.ls Logo

RainPoint Smart+ HIS019 - User Manual

RainPoint Smart+ HIS019
27 pages
Print Icon
To Next Page IconTo Next Page
Loading...
HUB USER MANUAL
Email: seice@rainpointus.com
WEBwww.rainpointonline.com
WhatsApp: +1 626-780-5952
US Free Hotline(English): +1 833-381-5659
(MON-FRI 9:30 AM-5:30 PM PST)
EU Free Hotline(English Deutsch): +44 800-808-5337
(MON-FRI 9:00 AM-5:00 PM CET )
Welcome to the RAINPOINT sma family! Please read the manual
before using to learn about the features and functions.
Have Questions?
Sma Garden Irrigation System
AM
PM
M
D
D
M
GAL
LAST USAGE
NEXT PLAN
L
SENSOR NO.
INDOOR
TODAY TOMORROW
24H
SMART GARDEN ZONE.
+
Question and Answer IconNeed help?

Do you have a question about the RainPoint Smart+ HIS019 and is the answer not in the manual?

Summary

WI-FI DISPLAY HUB HIS019 WRF-V2

1.1 Product Overview

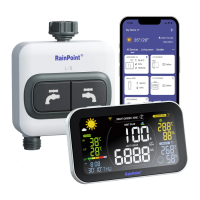
Overview of the Wi-Fi Display Hub, identifying key components and ports.

1.2 Button Introduction

Details the functions of the Wi-Fi, Light, Zone, and Sensor buttons on the hub.

1.3 LCD Screen Overview

Explains each numbered indicator and section of the hub's LCD screen.

WORK ON APP

2.1 APP Installation

Guides on downloading and installing the HOMGAR app for device management.

2.1.2 Before Connection

Lists essential requirements and tips for successfully connecting the hub to Wi-Fi.

2.2 Connection

General information and steps for connecting the hub to your network.

2.2.1 Smart WiFi Connection

Step-by-step instructions for establishing a Smart Wi-Fi connection for the hub.

2.2.2 AP Connection

Alternative method to connect the hub via AP Connection Mode if Smart Connection fails.

2.3 APP Overview

Provides an overview of the HOMGAR app's main features and interface sections.

2.3.1 APP Home Page

Explains the various sections and functionalities available on the app's home page.

2.3.2 Plan Page

Describes how to view, manage, and set rain delays for irrigation plans.

2.3.3 Event Page

Details how to review past system events and operational logs.

2.3.4 Me and Basic Settings

Covers managing account details, home settings, and other application preferences.

2.3.5 Device Page

Explains the information displayed on the device detail page within the app.

2.3.6 Device Settings

Outlines various settings available for connected devices, including display and timing options.

BASIC SUB-DEVICES

3.1 How to Connect

General guidance on connecting sub-devices to the hub via the app.

3.2 HTV113 FRF Smart 1-Zone Water Timer

Instructions for adding and operating the 1-Zone Smart Water Timer sub-device.

3.3 HTV213 FRF Smart 2-Zone Water Timer

Instructions for adding and operating the 2-Zone Smart Water Timer sub-device.

3.4 HCS014 ARF Outdoor Thermo-Hygrometer Sensor

Guide for connecting and using the Outdoor Thermo-Hygrometer Sensor.

3.5 HCS021 FRF Soil Moisture Sensor

Instructions for adding and operating the Soil Moisture Sensor sub-device.

3.6 HCS008 FRF Water Flow Meter

Guide for connecting and operating the Water Flow Meter sub-device.

TROUBLESHOOTING

Power problem

Solutions for common power-related issues with the display hub.

Disconnection

Steps to resolve disconnection problems between the hub and sub-devices.

Outdoor sensor drains batteries quickly

Explains reasons for rapid battery drain in outdoor sensors and potential solutions.

Device offline

Steps to troubleshoot when a device appears offline in the app.

Overview

The RainPoint Smart+ Garden Irrigation System Hub is designed to be the central control unit for your smart garden, offering comprehensive monitoring and intelligent irrigation management. More than just a display, it acts as the brain of your system, connecting various sensors and water timers to provide an integrated and efficient watering solution.

Function Description

The Hub serves as a Wi-Fi display and control center, integrating data from multiple smart garden devices to provide a holistic view of your garden's conditions and irrigation schedule. Its primary function is to facilitate smart watering, ensuring your plants receive the right amount of water at the right time, thereby conserving water and promoting healthier growth.

The device displays a wealth of information on its LCD screen, including a weather forecast for reference, which can help in making informed watering decisions. It features a freezing point alert to protect your plants from frost and a Wi-Fi signal indication to ensure stable connectivity. The hub shows the next watering plan time and the remaining watering time, keeping you updated on your irrigation schedule. It supports multiple smart garden zones, each representing a water timer outlet, allowing for customized watering across different areas of your garden. A watering reminder ensures you don't miss any critical irrigation events.

Battery levels for both the water timers and the hub itself are displayed, prompting you to replace batteries when necessary. The hub also integrates indoor thermo-hygrometer readings, providing information on the temperature and humidity within your home. For outdoor conditions, it connects to external sensors to display outdoor thermo-hygrometer data, soil moisture levels, and rainfall information, if these sensors are connected. The display also indicates the UV level, current time, and calendar, along with the highest and lowest temperatures for the day.

A key feature is its ability to display sensor data. If external sensors are connected, the screen will show their readings; otherwise, it will display data obtained from the network. The hub also provides an indoor comfort level indicator, categorizing the environment as dry, comfortable, or wet based on humidity and temperature. It can initiate a rain delay, automatically pausing irrigation plans if rain is detected or forecasted. Water usage is tracked and displayed, helping you monitor consumption. Manual watering can be initiated directly from the hub for a chosen zone, providing flexibility for immediate needs. The smart backlight mode adjusts the screen brightness for optimal visibility.

Usage Features

The RainPoint Hub is designed for intuitive interaction, both through its physical buttons and the accompanying HOMGAR mobile application.

Physical Button Interaction:

  • Wi-Fi Button: Holding this button for 5 seconds initiates the Smart Connection Mode for easy pairing with your network. If the device is already in connecting mode, releasing and holding it again for 2 seconds switches to AP (Access Point) connection mode, offering an alternative connection method.
  • Light Button: A simple press adjusts the LCD screen backlight brightness, allowing you to customize visibility based on ambient light conditions.
  • ZONE Button: Pressing this button allows you to cycle through and check each smart garden zone (water timer outlet). Holding it for 2 seconds in a chosen zone manually starts watering for 10 minutes, providing quick control for immediate irrigation needs.
  • SENSOR Button: This button allows you to switch between different sensor channels, viewing data from various connected sensors.

Mobile Application (HOMGAR APP) Interaction:

The HOMGAR APP is central to setting up and managing your RainPoint system.

  • Download and Account Setup: The app can be downloaded from the App Store or Google Play, or by scanning a QR code. Users need to create an account or log in to an existing one to start matching devices.
  • Device Connection:
    • Smart WiFi Connection: After powering on the hub, you navigate to the "Add Device" section in the app, select "Display Hub," and enter your 2.4GHz Wi-Fi information. The hub then enters a "SCAN" mode (initiated by holding the Wi-Fi button for 5 seconds), and the app searches for and connects to the device.
    • AP Connection: If Smart Connection Mode is unsuccessful, the AP Connection Mode can be used. This involves switching to AP mode in the app and on the device (holding the Wi-Fi button for 5 seconds until "SCAN" appears, then holding it for another 2 seconds until "AP" appears). The phone then connects to the hub's hotspot (HomGar_xxx) before returning to the app to complete the connection.
  • Home Management: The app allows you to set your home name, location, and other details to intelligently manage your garden irrigation system.
  • All Devices: All connected devices are displayed here, offering quick access to their individual settings and data.
  • Local Weather: The app displays corresponding weather data, complementing the hub's on-screen forecast.
  • Room System Management: After setting your home's location, you can organize and view related devices by room.
  • Add Devices: This function allows you to add new Smart+ series devices to expand your system.
  • Plan Page: This page lists all irrigation plans for your water timers. You can manually enable or disable plans and activate a manual "Rain Delay" to postpone all plans during rainy conditions.
  • Event Page: This section provides a review of all past events, helping you understand how your smart system has operated.
  • Me and Basic Settings: This area allows you to manage your account, access basic settings, and configure unit formats and notifications.
  • Device Page: This dedicated page for the hub displays barometric pressure, current temperature and humidity, highest and lowest recorded temperatures and humidity, and provides access to sub-device management and device data charts.
  • Device Settings: Within the app, you can customize various hub settings:
    • Rain Display: Requires a separately purchased rain gauge.
    • Weather Display: Choose to display weather for "today" or "today and tomorrow."
    • Warning Settings: Set alerts for specific temperature and humidity values.
    • Sensor No. Settings: Configure the display order for sensors and controllers.
    • Timing Settings: Requires a separately purchased precision clock.
    • Receive Channel: Used only if sub-devices cannot connect, typically not requiring user modification.

Connecting Sub-Devices:

Sub-devices like water timers, thermo-hygrometer sensors, soil moisture sensors, and water flow meters can be connected in two ways: via the "Add Device" button on the APP home page or through the "Sub-devices" management section on the hub's device page within the app.

  • Smart 1-Zone Water Timer (HTV113FRF) & Smart 2-Zone Water Timer (HTV213FRF): After inserting batteries, the indicator blinks red. Select "NEXT" in the app to search for devices. Keep the timer and hub close for automatic connection. The button on the timer can also be held to reset and reconnect. Once connected, the next watering plan time for each valve appears on the hub's screen. The ZONE button on the hub can manually start a 10-minute watering cycle.
  • Outdoor Thermo-Hygrometer Sensor (HCS014ARF): Insert batteries, and the red indicator blinks once. Select "Next" in the app to search. Ensure the app is searching before powering on the sensor. Keep the sensor and hub close for automatic connection. Detected data will display under "SENSOR" on the hub's screen.
  • Soil Moisture Sensor (HCS021FRF): Insert batteries, and the indicator blinks red. Select "NEXT" in the app to search. Keep the sensor and hub close for automatic connection. The button can be held to reset and reconnect if initial connection fails. Real-time soil moisture and surface temperature will display on the top right corner of the hub's screen.
  • Water Flow Meter (HCS008FRF): Insert batteries, and the flow meter enters pairing mode automatically. Select "NEXT" in the app to search. Keep the sensor and hub close for automatic connection. Re-inserting batteries can reset and reconnect if initial connection fails. Real-time water flow rate and other information will appear on the device home page in the app.

Maintenance Features

The RainPoint Hub is designed with ease of maintenance in mind, primarily focusing on power management and connection stability.

Power Management:

  • The hub primarily uses a 5V DC adapter for power, which is included. Batteries (3 x AA, not included) are for backup power only, especially important for maintaining Wi-Fi connection.
  • It is crucial to use the correct power adapter for the hub and all connected electronic equipment to ensure proper functioning.
  • If the device is offline, checking if the battery is fully charged or if the power supply is normal is the first step.

Connection Stability:

  • Wi-Fi Connection: The hub requires a 2.4GHz Wi-Fi network to operate normally. If you have a dual-band router, ensure your phone is connected to the 2.4GHz network during setup.
  • Device Proximity: For successful pairing, the hub and connected devices should ideally be within 10 feet (3m) of each other.
  • Troubleshooting Disconnection:
    • Replacing batteries in sensors and sub-devices often resolves connection issues.
    • Distance or physical obstructions (resistance) can cause loss of connection between sensors/sub-devices and the hub. Ensure devices are within range.
    • Verify that the Wi-Fi network is stable and functioning correctly.
    • Restarting the device and attempting to reconnect can resolve temporary issues.
    • If the working Wi-Fi network needs to be changed, press and hold the Wi-Fi button on the hub and re-enter new Wi-Fi information in the app.
  • Outdoor Sensor Battery Life: Outdoor sensors may experience reduced battery life if they are at the edge of their range. Using fresh Alkaline batteries is recommended, as battery life is typically over 12 months with them. Mixed use of old and new batteries, or using Carbon/rechargeable batteries, can significantly reduce battery life. Check for leaking batteries, which can damage the outdoor sensor.
  • Network Signal: A poor network signal or being too far from the router can cause the device to go offline.

General Care:

  • To ensure accurate displays, keep the devices away from freezing temperatures, direct sunlight, rain, or any heat sources. This protects the internal components and maintains the accuracy of temperature and humidity readings.

RainPoint Smart+ HIS019 Specifications

General IconGeneral
ConnectivityWi-Fi
App ControlYes
Timer FunctionYes
Remote ControlYes
Power SourceAC
Frequency60Hz
CertificationFCC
Voice ControlAmazon Alexa, Google Assistant