11
Use a small flat screwdriver and adjust the BIAS
control (located on the top right of the amplifier) for 100
mA, after the unit has warmed up for about 10 minutes.
The normal range to use is from 60 mA to 120 mA, and
changes here will vary the damping factor of the amplifier
slightly. More current increases the damping factor,
whereas less current provides a softer more tube-like
sound. The design center is 100 mA, and that should be
your starting point if you want to experiment. It will vary
from speaker to speaker, and most importantly with your
taste.
The meter reads the combined current for all four
output tubes, and it is normal for this current to vary
slightly with changes in power line voltage
Tube Substitution
The output tubes do not need to be matched, as the sound of the amp does not at all de-
pend on matched output tubes. That’s because the DC restorer circuit eliminates the need to
match tubes. The only caveat here is that the output tubes should all be the same type and vin-
tage.
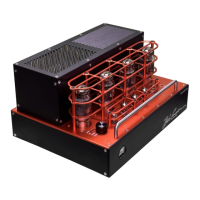
Looking at the amplifier from the front, from left to right: the first tube is a 6AL5 followed by
12AT7, then a 12AX7 in the middle, and finally a second 12AT7 and the final 6AL5. The output
tubes are KT120. Bias adjustment may be required when changing tubes.
Tube Troubleshooting
Once the idling current has been set, it will normally not need to be adjusted for several
years unless you want to a) experiment for different sound; b) if you install different output tubes,
or c) the amplifier suddenly starts to sound funny. If you hear a POP and see a flash, yet the amp
continues to play, you should first check the current (bias meter) and then the output tube fuse.
If the fuse blows, the output current will drop to zero. First replace it WITHOUT replacing
any tubes.
Turn the amp on and monitor the current. If it climbs to within the range you had set, and if
the amp sounds good, all is well.
Often, an output tube has a speck of dust-like impurity, which comes into contact with an
internal element, shorting the element, and is vaporized into gaseous oblivion. The getter, the mir-
ror-like shiny plating on the inside of the tube does its job, absorbs the vaporized material and the
tube is new again. All it takes is a new fuse.
If you install a new fuse and it blows again, you will need to determine which tube is the
culprit.