EasyManua.ls Logo

Rampage Complete Soft Top User Manual

Rampage Complete Soft Top
27 pages
To Next Page IconTo Next Page
Page #1 background imageLoading...
Page #1 background image
Page 1 of 9
Installation Instructions
IS-68215_RevB
Important Safety Information
Hardware
Contents
Complete Soft Top
NOTE: Actual product may vary from illustration.
Ratchet
Torx Bits or Sockets
1987-1995 Jeep Wrangler YJ
With Half Doors
1
2
2
3
1. Main Skin
2. Quarter Windows
(Left and Right)
3. Rear Window
4. Door Skins (pre installed
on Frames)
5. Bow Assembly and
(2) Connecting Tubes
4
4
5
Windshield Uprights
(L&R, with hardware)
Upper Have Door Frames
(with door skins pre-installed)
Tub Belt Rail Kit
(with hardware)
Windshield Channel
(with hardware)
Tailgate Bar Kit
(with Mini-Tonneau and hardware)
Soft Top Storage Bag
Tools Required
Tub Belt Rail Kit
(12) 5/16” Tapping Plates
(12) 5/16” Flat Wasers
(12) 5/16” Torx Bolts
(2) Side Rail Pins
Header Channel
(11) #8 x 1/4” Sheet Metal Screws
Windshield Uprights
(8) #8 x 1/2” Sheet Metal Screws
Tailgate Bar Kit
(4) #10-24 x 1/2” Phillips Machine Screw
(4) #10-24 Nylock Nuts
(4) #10 Flat Washers
(4) #10 Star Washers
(2) #8 x 1” Sheet Metal Screws
Drill Motor & Drill Bits Phillips ScrewdriverSafety Glasses
Off-Road Organizer
NOTE: Installation of the top in warm weather is optimal for ease of installation. Ideal installation temperature should not be less
than 70˚ (21C). Initial installation is the most difficult as the fabric has not been stretched. The top will loosen slightly with use
and warm temperature. Allow about at least an hour for the initial installation.
***Please follow instructions for ease of installation and correct fit.***
For proper installation and best possible fit, please read all instructions BEFORE you begin.
For technical assistance or to obtain missing parts, please call Customer Relations at 1-800-241-7219.
Question and Answer IconNeed help?

Do you have a question about the Rampage Complete Soft Top and is the answer not in the manual?

Rampage Complete Soft Top Specifications

General IconGeneral
CategoryAutomobile Accessories
BrandRampage
MaterialVinyl
ColorBlack Diamond
WindowTinted
TypeComplete Soft Top
InstallationBolt-On
CompatibilityJeep Wrangler

Summary

Important Safety Information

Optimal Installation Temperature

Installation is optimal in warm weather, not less than 70°F (21°C), for ease of installation.

Installation Hardware

Tub Belt Rail Kit Hardware

Details the tapping plates, flat washers, and torx bolts required for the tub belt rail.

Tailgate Bar Kit Hardware

Lists machine screws, lock nuts, washers, and sheet metal screws for the tailgate bar.

Header Channel Hardware

Specifies the sheet metal screws needed for the header channel installation.

Windshield Uprights Hardware

Details the sheet metal screws required for mounting the windshield uprights.

Installation Steps

Remove Existing Soft or Hard Top

Initial step to clear the vehicle for the new soft top installation.

Install Windshield Channel

Position and secure the windshield channel using specified sheet metal screws.

Install Windshield Uprights

Locate, mark, drill, and secure windshield uprights with sheet metal screws.

Install Side Belt Rails

Secure side belt rails using tapping plates, torx bolts, and washers.

Install Corner Belt Rails

Attach corner belt rails using torx screws, washers, and tapping plates.

Install Tailgate Brackets

Position and secure tailgate brackets using machine screws and nuts, drilling if needed.

Assemble Bow Assembly

Connect bow halves using connection tubes, noting foam padding on the front bow.

Install Bow Assembly into Rails

Slide bow assembly ends into side belt rails and secure with side rail pins.

Attach Upper Side Rail

Unfold and connect the passenger upper side rail to the upright pin.

Install Adjustable Spreader Bar

Locate and lock the adjustable spreader bar into its upright position.

Adjust Spreader Bar Tension

Use adjustable sleeve to tighten or loosen soft top fabric as needed.

Lay Main Skin Over Hardware

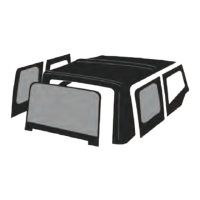
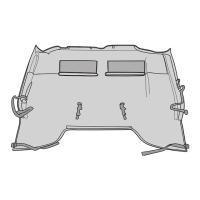
Place the main skin over the installed frame and attach snaps to bows.

Secure Main Skin to Windshield

Insert the front of the top into the windshield channel and connect corner snaps.

Secure Rear Corners

Insert rear corners of the top into the rear corner belt rail.

Snap Rear Support Bow

Pull the bottom of the rear support bow back until it snaps into the side belt rail notch.

Secure Spreader Bars

Push spreader bars up until they snap into place and reinsert locking pin.

Install Side Window

Start zipper, insert plastic strips into channels, and close zippers.

Install Rear Window

Join rear window to main skin via zippers and slide tailgate bar onto rear window flap.

Secure Tailgate Bar

Rotate tailgate bar downward and push into receiving channels on the vehicle.

Fasten Main Skin Snaps

Fasten snaps on the main skin to sliding snaps along the top of the door surrounds.

Door Skin Replacement

Prepare Door Skin

Lay door skin flat, release Velcro, unzip window, and insert front corner.

Reinstall Upper Half Door

Connect bottom corner snap, insert plastic strip along bottom to belt rail.

Care and Cleaning

General Cleaning Recommendations

Hand wash with mild soap, use non-abrasive cloth, rinse thoroughly, avoid automatic car washes.

Protectant Application

Use Ragg Topp or 303 Protectant for UV protection; avoid alcohol-based products.

Window Care and Storage

Park in shade, clean windows before rolling, unroll frequently, avoid rolling below 45°F.

Zipper Maintenance

Clean zippers periodically with soap and water; use zipper lubricant for smooth operation.

Related product manuals