Note:Theappropriatetorquetousewhendrilling
dependsonthethicknessofthemountingsurface
andthetypeofmaterial.
Note:Thesuppliedgasketprovidesasealbetween
theunitandasuitablyatandstiffmountingsurface
orbinnacle.Thegasketshouldbeusedinall
installations.Itmayalsobenecessarytousea
marine-gradesealantifthemountingsurfaceor
binnacleisnotentirelyatandstifforhasarough
surfacenish.
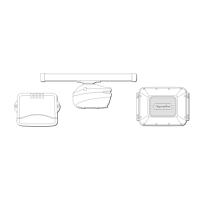
Attachingtherearbezel
Therearbezelmustbettedbeforemountingtheunit
onthesuppliedtrunnionbracket.
1.Removethefrontbezel.Refertotheseparate
instructionsprovidedforthatprocedure.
2.Placethebezelovertherearofthedisplay,ensuring
thatitiscorrectlyalignedwiththedisplay.Applyrm
butevenpressuretothebezelalongthe:
i.Outeredges-workfromthesidesupwardsand
thenalongthetopedge,toensurethatitclips
securelyintoposition.
ii.Inneredges-ensurethatthebezelsitsat
againsttheunit.
D12 183 -2
* = e 7 / e 7D
= c9 5 / c97 c1 25 / c127 / e 95 / e 97 / e 1 25 / e 127
*3
2
1
3.Usethesuppliedscrewstosecurethebezeltothe
display.
Bracket(trunnion)mounting
Thedisplaycanbemountedon abracket.
Beforemountingtheunitensurethatyouhave:
•Selectedasuitablelocation.
•Identiedthecableconnectionsandroutethatthe
cableswilltake.
•Attachthefrontbezel.
1.Markthelocationofthemountingbracketscrew
holesonthechosenmountingsurface.
2.Drillholesforthescrewsusingasuitabledrill,
ensuringthereisnothingbehindthesurfacethat
maybedamaged.
3.Usethesuppliedscrewstoattachthemounting
bracketsecurely.
4.Attachthedisplayunittothemountingbracket.
Note:Theappropriatetorquetousewhendrilling
dependsonthethicknessofthemountingsurface
andthetypeofmaterial.
Frontbezel
Attachingthefrontbezel
Thefollowingprocedureassumesthattheunithas
alreadybeenmountedinposition.
1.Carefullyliftoneedgeofthescreenprotection
lm,sothatitisaccessibleforremovingwhenunit
installationiscomplete.
2.Ensurethememorycardslotdoorisintheopen
position.
3.Orientatethebottom-rightsideofthebezelunderthe
lipofthechartcarddoorandplacethebezelover
thefrontofthedisplay,ensuringthattheclipsalong
thebottomedgeofthebezellatchintoposition.
16e7/e7D/e95/e97/e125/e127/c95/c97/c125/c127
 Loading...