Chapter 1: Operation 3
Locked mode
Not available when the instrument is in auto mode (see below).
Auto mode
In auto mode, all ST60+ Compass instrument button functions, except the ability
to change display illumination, are disabled.
1.3 General operation
To switch between unlocked mode and locked modes, use the lock button.
When you enter locked mode (see the
General operation
illustration on
page 4
),
the current heading is applied as the locked heading and flashes for 5 seconds.
After this time, the heading display shows either the locked heading or the current
heading, depending on what has been set up during User calibration, as the
required display for locked mode (see
Chapter 4, Calibration
).
In lock mode, use the
< and > buttons as necessary, to change the locked heading
value.
To leave locked mode press the
lock button. The average course error flashes on
the digital display for 5 seconds. Errors to starboard are +ve and errors to port are -
ve. If you press the
lock button again while the average course error is flashing,
you re-enter locked mode with the previously stored heading as the locked
heading.
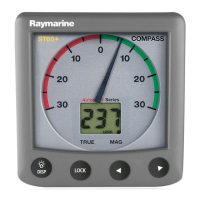
In locked mode, you set a fixed (locked)
heading. A LOCK legend , plus either
the locked heading or the current head-
ing is displayed, depending on what has
been set during User calibration, as the
required display for locked mode.
The pointer shows the difference between
the locked heading and the actual course
being steered, i.e. heading error.
Auto mode is engaged automatically
when the ST60+ Compass instrument is
connected via SeaTalk to a compatible
autopilot. In auto mode the ST60+ Com-
pass instrument acts as a slave display to
the autopilot. The digital display shows an
‘A’ and a LOCK legend, along with the
autopilot locked heading.
The pointer shows the autopilot’s course
error.
Either
locked heading
or
current heading
Hea
ing error
LOCK
D8233-1
Autopilot
locked heading
Autopi
ot
course error
A LOCK
D8232-1
81265_1.book Page 3 Monday, December 5, 2005 9:23 AM
 Loading...