Do you have a question about the Razor RipStik Electric and is the answer not in the manual?
Discusses potential risks and hazards of riding, including serious injury or death.
Emphasizes the need for parental selection and supervision based on child's maturity, skill, and ability.
States product is not for riders under 9 or over 143 lbs (65 kg); rider size and skills are important.
Mandates checking covers, guards, wheels, and maintaining with authorized parts.
Details rules for safe operation, including environment, speed, obstacles, and rider conduct.
Recommends helmet, pads, long sleeves, pants, gloves, and athletic shoes with tied laces.
Instructions on inspecting the charger, using only the recommended charger, and safe charging practices.
Warning about increased risk of injury from ignoring safety advice and using common sense.
Inspect contents for damage, ensure power is OFF, and check for scratches or dents.
Provides estimates for assembly (5 mins) and initial charging (up to 8 hours).
Warns against non-Razor parts and explains motor engagement requires 3 mph movement.
Details where to find the Product I.D. and lists the items included in the box.
Step-by-step guide to installing two AAA batteries into the remote using a Phillips screwdriver.
Explains how to confirm if the remote is paired by checking the product's power button light.
Instructions for pairing the remote with the RipStik Electric if it's not already connected.
Continues the steps for pairing the remote with the RipStik Electric.
Details initial charge time (8 hrs), recharge time (up to 6 hrs), and recommended max charging time (24 hrs).
Advises charging immediately after riding, before storage, unplugging when not in use, and periodic charging.
Warns to use only the recommended charger and that batteries are charged under adult supervision.
Explains charger light indicators: green (standby), red (charging), green (charged).
Outlines essential checks before riding: wheels, frame, hardware, safety gear, laws, and insurance.
Instructions on how to start and ride the RipStik Electric, including kick-starting and motor engagement.
Details methods for stopping, including coasting and dynamic motor braking.
Key steps before starting any repair or maintenance, including turning off power and disconnecting charger.
Step-by-step guide for replacing the front caster wheel using Allen wrenches.
Procedure for removing and replacing the front caster assembly using socket wrench and screwdriver.
Instructions for replacing the rear wheel and hub motor assembly.
Guide for replacing the AAA batteries in the remote control unit.
Steps for replacing the main lithium-ion battery pack in the RipStik Electric.
Guidelines for proper battery storage, handling, and environmentally safe disposal.
Advice on charger inspection, using correct parts, and where to find replacement parts.
Troubleshooting steps for when the product does not work out of the box or no longer works.
Solutions for issues like short run time, slow speed, or battery not holding a charge.
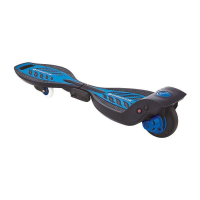
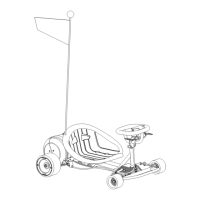
A visual diagram labeling all the components of the RipStik Electric.
A numbered list of all parts included with the RipStik Electric.
Details compliance with FCC Rules, including conditions and measures to correct interference.
Outlines the 90-day limited warranty, exclusions, and conditions that void the warranty.
Provides contact details for customer service, support, and authorized repair centers globally.