50
Remember everything changes when you get wet!
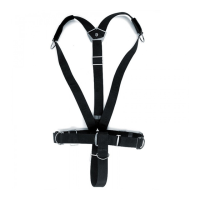
Find some shallow open water or a swimming pool and try out the harness.
The Razor Harness should have a tight fit to increase control of buoyancy, trim and
equipment load.
A sloppy harness equates to a sloppy diver!
Swimming efficiency and gas consumption will improve when the diver and equip-
ment load are all one unit and move together.
Once you have made the final adjustments to your harness you can cut off any
extra webbing and burn the ends to seal them.
Remember to leave enough adjustment in the harness for changes in thickness of
exposure protection or any gain in weight.
All loose ends of webbing remaining can be held in place with the short sections of
bicycle tire inner-tube provided.
Many divers choose to get 2 Razor Harnesses, 1 for cold water diving in a Drysuit
and 1 for warm water diving in a Wetsuit so that they do not have to worry about
adjusting the harness or changing D rings etc. when they change environments.
All the other components of the Razor System will work with either harness
without any further changes needing to be made.
4 Rigging the Razor Harness 2.5
Step 10: Final Adjustments