4
4
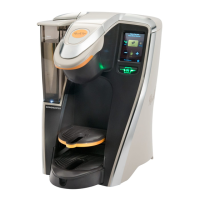
Installation (continued)
Power Supply
WARNING
Disconnect power if the machine functions abnormally and notify qualified service personnel for repairs. Do not
permit non-qualified service personnel to attempt repairs.
No user serviceable components inside the brewer. Do not disassemble brewer.
Notice
This appliance is equipped with a three wire power cord. A dedicated three wire 120V, 15A NEMA 5-15 electrical
circuit must be used.
1. A dedicated 120 VAC, 60 Hz, 15 Amp, type 5-15, electrical circuit is required for proper operation.
2. Always unplug machine before servicing or maintaining the machine.
3. Place power switch in OFF position and plug power cord into the dedicated three wire 120V, 15A, NEMA
5-15 electrical circuit
Set-Up
Priming the internal hot water tank
NOTE: The brewer will not operate until the hot water tank is primed.
Please follow these procedures to ensure proper installation.
Pour- Over version Auto-Fill version
1. Ensure that the water inlet valve cap supplied with
the machine is installed on the water inlet valve to
prevent leaking.
1. Plumb water to the fill valve located on the back of
the brewer. A ¼” female flare x ¼” tube adapter as well
as a ¼” flare x hose adapter provided with the brewer.
Do not use reverse osmosis water.
2. Open reservoir lid. 2. Open water service valve.
3. Fill reservoir with tap or bottled water to the level
indicated on reservoir. Do not use distilled water.
3. Plug unit into a 120V/15 amp receptacle. Turn main
power switch to ON.
4. Plug unit into a 120V/15 amps receptacle. Turn main
power switch to ON.
4. Reservoir will automatically fill.
5. Place a cup in the drip tray of the unit to collect the
water from the priming operation.
5. Place a cup in the drip tray of the unit to collect the
water from the purging operation.
6. The screen will display "Prime Brewer", press BREW
button continue until screen displays "Lift to Brew”.
6. The screen will display "Prime Brewer", press BREW
button continue until screen displays "Lift to Brew".
7. Refill the reservoir to the appropriate level. 7. Allow brewer to reach brewing temperature.
8. Allow brewer to reach brewing temperature.
ENGLISH