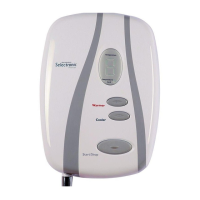
The top-fixing hole is a “key-hole” slot (another key-hole is provided for alternate fixing), and
should be marked and drilled first.
Tighten top screw with head protruding about 10mm from the wall and hook the backplate over
the screw head. This allows for correct and accurate alignment of your shower before marking
and fixing the bottom position.
You may not wish to tighten up both screws at this stage as the holes are elongated to allow for
adjustment after other connections have taken place.
b. PLUMBING
WARNING: ENSURE THAT THE MAINS WATER SUPPLY MEETS THE REQUIREMENTS
BELOW BEFORE CONTINUING WITH INSTALLATION.
The heater must be connected to the mains cold water supply.
This must have a minimum running pressure of 69kPa (0.7 bar, 10 psi)
and a maximum pressure of 690kPa (7.0 bar, 100 psi).
WARNING: BEFORE CONNECTING THE PIPE WORK TO THE SHOWER,
ENSURE THAT THE PIPE WORK IS FULLY FLUSHED OUT.
1. Unscrew the “Red Cap” from the shower outlet pipe and discard it in a suitable manner.
Do not connect the handset until after the shower front cover and corner section are fitted.
WARNING: DO NOT FIT A TAP ON THE SHOWER OUTLET.
WARNING: TAKE CARE TO AVOID RESTRICTING THE OUTLET OF THE
PRESSURE RELIEF DEVICE
9
WHAT TO DO IF THINGS GO WRONG (2)
REDRING AFTER SALES SERVICE
PROFESSIONAL SERVICE
If the previous “Self Help” checks fail to restore the performance, you should seek professional help.
The person who installed the shower is probably the best one to investigate and correct it and is
certainly the person to contact if you have had a problem in the guarantee period.
The following additional checklist is provided for the benefit of the qualified service person.
WARNING: SWITCH OFF THE ELECTRICITY AT THE LOCAL ISOLATOR
BEFORE REMOVING THE COVER TO MAKE CHECKS
Water too HOT Water flow restricted by blockage in filter of solenoid valve.
Switch off water, loosen inlet connection to solenoid, remove filter in solenoid
with long nosed pliers and flush clean.
Water too COLD Check circuit through thermal cut-out.
Check circuit through microswitches on the pressure switch.
Check each element circuit.
Check tightness of electrical connections.
No control over
water flow
Check Drive Gite is correctly engaged into Control Knob (see Diagram 5)
Undo headworks of stabiliser valve.
Check stabiliser is in place and remove any debris in valve.
Water discharges
from pressure
relief valve
Check for cause of high pressure and remove it.
Blockage on outlet e.g. blocked shower handset.
Replace the pressure relief disc (not covered by guarantee).
Water does not
flow when outer
knob “A” is turned
Check circuit through solenoid coil. If defective then replace.
Check circuit through microswitches. If defective then replace.
Power supply not reaching shower.
We offer a technical advisory service on the telephone to
installers and other customers with problems in the field.
RING 0844 372 7766 (UK ONLY)
RING YOUR LOCAL DEALER (Export Variants)
Some spare parts (see later section) can be supplied
against Credit or Debit cards.
RING 0844 372 7750 (UK ONLY)
Remember to quote the exact type of shower, as written
on the front of the shower and on this leaflet.
The model and serial number are located on the bottom
face of the shower.
Make a note of those numbers here, and be sure to quote
them if you call for advice.
Model Number: 53-67_ _ _ _ _ _ _ _ _ _ _ _ _ _
Serial Number: _ _ _ _ _ _ _ _ _ _ _ _ _ _ _ _ _
Note: You may be charged for a service call
if you do not have the serial number.