EasyManua.ls Logo

Reebok RBBE1996.0 User Manual

Reebok RBBE1996.0
20 pages
To Next Page IconTo Next Page
Page #1 background imageLoading...
Page #1 background image
Model No. RBBE1996.0
Serial No.
Write the serial number in the
space above for future reference.
QUESTIONS?
As a manufacturer, we are com-
mitted to providing complete
customer satisfaction. If you
have questions, or if parts are
damaged or missing, PLEASE
CONTACT OUR CUSTOMER
SERVICE DEPARTMENT
DIRECTLY.
CALL TOLL-FREE:
1-877-994-4999
Mon.–Fri., 6 a.m.–6 p.m. MST
ON THE WEB:
www.reebokservice.com
USER’S MANUAL
Visit our website at
www.reebokhomefitness.com
new products, prizes,
fitness tips, and much more!
V
CAUTION
Read all precautions and instruc
-
tions in this manual before using
this equipment. Save this manual
for future reference.
Serial Number Decal (Under Seat)
Question and Answer IconNeed help?

Do you have a question about the Reebok RBBE1996.0 and is the answer not in the manual?

Reebok RBBE1996.0 Specifications

General IconGeneral
BrandReebok
ModelRBBE1996.0
CategoryHome Gym
LanguageEnglish

Summary

Questions and Customer Service

Contact Information

Provides toll-free number and website for customer support.

General Safety Warning

Pre-Use Precautions

Presents a critical warning about reading all precautions before use.

Important Precautions

User Responsibilities and Warnings

Details user responsibilities, prohibited uses, and user limitations.

Health Conditions and Contraindications

Lists medical conditions that may make inversion inadvisable.

Decal Information

Instructions for obtaining and applying a replacement safety decal.

Before You Begin

Product Benefits and Registration

Highlights inversion table benefits and registration process for warranty.

Part Identification Diagram

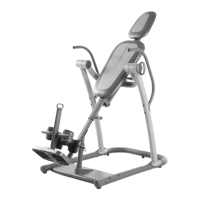
Diagram labeling key components of the inversion table for identification.

General Warning

Crucial safety warning about machine misuse and adherence to manual instructions.

Part Identification Chart

Assembly Instructions

Assembly Preparation and Tools

Guidance on making assembly easier and listing required tools.

Step 1: Base Assembly

Attaching feet and caps to the left and right bases.

Step 2: Connecting Bases

Connecting left and right bases with bolts and locknuts.

Step 3: Attaching Support Leg and Base Plate

Attaching center base components and base plate.

Step 4: Attaching Support Bracket

Connecting the support bracket to the support leg.

Step 5: Attaching Center Base

Connecting the center base to the main left and right bases.

Step 6: Attaching Spacers and Frames

Attaching large spacers and frames to the center frame.

Step 7: Attaching Main Frames to Bases

Securing the left and right frames to the bases.

Step 8: Attaching Covers and Extension

Attaching top/bottom covers and center frame extension.

Step 9: Attaching Headrest and Backrest Frames

Connecting the headrest and backrest frames.

Step 10: Attaching Backrest and Adjustment Knob

Securing backrest to extension and engaging adjustment knob.

Step 11: Attaching Top, Bottom, and Ankle Brace Tubes

Installing tubes into the leg frame and securing them.

Step 12: Attaching Foot Plate

Positioning and finger-tightening the foot plate.

Step 13: Attaching Lock Frame

Sliding and attaching the lock frame with bolts and spacers.

Step 14: Attaching Rear Ankle Braces

Sliding and securing rear ankle braces to the ankle brace tube.

Step 15: Attaching Front Ankle Braces

Attaching front ankle braces to the lock frame.

Step 16: Attaching Leg Frame to Backrest Frame

Connecting the leg frame to the backrest frame using bushing.

Step 17: Attaching Headrest and Backrest

Attaching the headrest and backrest to their respective frames.

Step 18: Attaching Handles

Attaching the handles to the left and right frames.

Locking for Storage

Instructions for locking the table to prevent unsupervised use.

Adjustment Guide

Selecting Backrest Frame Position

Guide to choosing backrest position based on weight and responsiveness.

Adjusting the Leg Frame

Instructions for adjusting the leg frame length for user height.

Operating the Inversion Table

Using the Ankle Lock System

Procedure to secure ankles and related safety warning.

Setting the Inversion Angle

How to select and set desired rotation angles.

Leveling and Locking Procedures

Instructions for leveling the table and locking it for storage.

Rotating on the Inversion Table

Rotating Back

Instructions on how to rotate backward using arm movements.

Rotating Up

How to return to the upright position and manage dizziness.

Developing an Inversion Program

Benefits and General Tips

Information on benefits, nausea, and general usage advice.

Beginner Program

Suggested routine for new users, focusing on low angles and short durations.

Intermediate Program

Routine for users comfortable with inversion, increasing angle and duration.

Full Inversion Program

Advanced routine for maximum inversion, focusing on higher angles and positioning.

Part List

Exploded Drawing

Ordering Replacement Parts

Limited Warranty Information

Related product manuals