35
Assembly drawing 30:
Guide the cables from the receiver to the controller and steering servo through the hinged sealing element (B) on
the side.
Insertthesealofthereceiverboxlidintothegrooveonthelidandthenscrewdownthelid.
Assembly drawing 31:
The right side part should be mounted in the same way as the left side one.
Assembly drawings 32 and 33:
Firstly, screw the metal brackets to the running boards and then screw the running boards to the model vehicle. Then
attachthehookpartsofthexingstriptothemetalbrackets.Attachtheeececomponentstotheinsideofthechassis.
Themovablerunningboardsarelaterpreciselyadjustedafterttingthechassis.
Assembly drawing 34:
When mounting the bumpers, guide the screws through the innermost bore so that the bumper is attached as close
to the chassis as possible.
Assembly drawing 35:
Aftertighteningthewheelnuts,screwonthecoversandtightenrmlywithyourngers.
Assembly drawing 36:
Therearchassismountmustbeassembledsothatwithveholesarevisibleabovethemount.Whenassemblingthe
frontchassismounts,guidethescrewthroughthebottommostboresothatsixdrillholesarestillvisible.
If necessary, you can later adjust the height of the chassis mount as desired.
Assembly drawing 37:
When assembling the parts that are mounted on the chassis, note that the screws are the same size but have differ-
ent heads.
Assembly drawing 38:
Use the double-sided adhesive tape to attach the electronic speed controller (ESC) (neither are included with the
model)totherightsideofthemodelvehicleasshown.Thesuppliedxingloopservestosecurethedriverecharge-
able battery in the battery compartment.
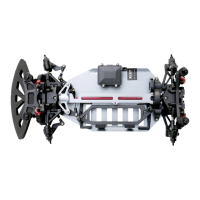
Assembly drawings 39 - 43:
Figures39to43showthechassisfromdifferentperspectives.Thepositionofthestickerscanbeidentiedprecisely
with these diagrams.
Inorderforthestickerstoadhereproperly,rstcleantheattachmentareaonthechassiswithalcohol.Thestickers
caneitherbeattacheddryorwithwatermixedwithsomedetergent.Whenattachingthestickerswithwater,they
can be slid into the correct position without much effort. Then, use a soft plastic spatula to gently remove the water
remaining underneath the sticker.
The chassis can be attached to the vehicle with four chassis clips.