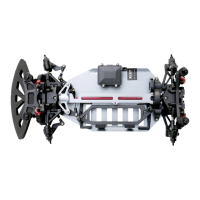
34
Assembly drawing 19:
FirstmountthestabilisationrodusingbothoftheM3x15screws.Thenthesteeringlinkage(D)andthetierod(C)
can be mounted.
Assembly drawing 20:
When mounting the shock absorbers, make sure that the adjusting screw is always on top of the shock absorber.
Assembly drawing 21:
The diagrams show the assembly of the gear. Both parts of the gear housing are marked with identifying letters “A”
and “B” on the inside.
Assembly drawing 22:
Apply some grease to the gears before closing and screwing shut the gear housing.
Assembly drawing 23:
Figure 23 shows the assembly of the gears for the reversing gear. This gear stage allows both cardan shafts to run
in different directions.
Assembly drawing 24:
Firstly,insertthetwohexagonalfrictionsurfacespreciselyintothemaingearandthenputonthecoverdiscs.Then
screwthecouplingunittogetherwiththeshaft.Indoingso,keeptheexactdistanceof1.2mmsothatthecoupling
does not slip too early or too late.
Assembly drawing 25:
Firstly, mount the electric motor and tighten the screws so that the motor can still be moved laterally. Push the motor
gearontothemotorshaftuntilitisushwiththemaingear.TheM4studscrewmustbealignedwiththeattenedside
of the motor shaft. The teeth of both gears must also mesh with one another throughout the width (see also Figure 4
below in this manual).
Then place a thin paper strip between the gears and press the motor gear against the main gear. Screw the motor
tightly in this position. After removing the paper strip, the distance between the two gears and thus the backlash are
set correctly. Then screw on the cover.
Assembly drawings 26 and 27:
Applysomethread-lockinguidtothecardanshaftbolt(A)beforescrewingitin.Notethatthecardanshaftsaredif-
ferent lengths. Therefore, make sure that they are correctly mounted.
Assembly drawing 28:
When mounting the gear, note that the screws are different lengths and make sure that they are correctly positioned.
Assembly drawing 29:
Whenmountingtheleftsidepart,makesurethatthefrontM2.5x10screwhasasmallerdiameter.