Page 35
Operation 12 Crankshaft removal and installation (with sump,
front cover, flywheel, rear seal cove, connecting
rods and crankshaft sprocket removed
Operation 13 Camshaft removal and installation (with timing
chain and sprocket removed)
Operation 14 Camshaft bearing removal and replacement
(with camshaft removed)
Operation 15 Cylinder liner replacement
Operation 16 Engine rebuild
Operation 16 Valve clearance - tappet adjustment
Stud removal
Description
The 850cc engine is a four cylinder in-line unit having a die cast
aluminium cylinder head with cast iron valve guides and sintered iron
valve seats. Die cast aluminium is also used for the cylinder block
which incorporates removable wet liners. The forged steel crankshaft
is mounted on three steel backed main bearings
Routine maintenance
The engine oil level should be checked weekly and topped up if
necessary to keep the oil capacity at 3.13 litres (5.5 pints). It is vital
that this capacity is kept constant for any appreciable drop in the level
will result in poor lubrication and possible engine damage. To ensure
the lubrication system is kept clean and free from impurities the
engine oil should be changed and a new oil filter fitted every 6,000
miles (10,000 km).
Engine service operations
The following service operations give detailed instructions for
servicing and dismantling all the major engine assemblies. Where it is
necessary to remove ancillary components and parts, refer to the
appropriate sections of this manual.
Before re-assembly during any operation, all components should be
thoroughly cleaned, paying attention to joint faces and bearing
surfaces. Any local high spots or burrs on the joint faces should be
carefully removed using a fine file. Ensure that any piece of gasket or
dirt in a blind tapped hole is removed during cleaning, as the bolt or
screw may bottom before the bolt head abuts the mating part. When
tightening a bolt which bottoms a characteristic "springing" may be
felt. If this occurs, the bolt must be removed and the hole cleaned out.
The engine and gearbox assembly is removed from the vehicle by
lifting it through the bonnet aperture. This operation will be greatly
facilitated by the use of a hoist bracket that locates on the rocker box
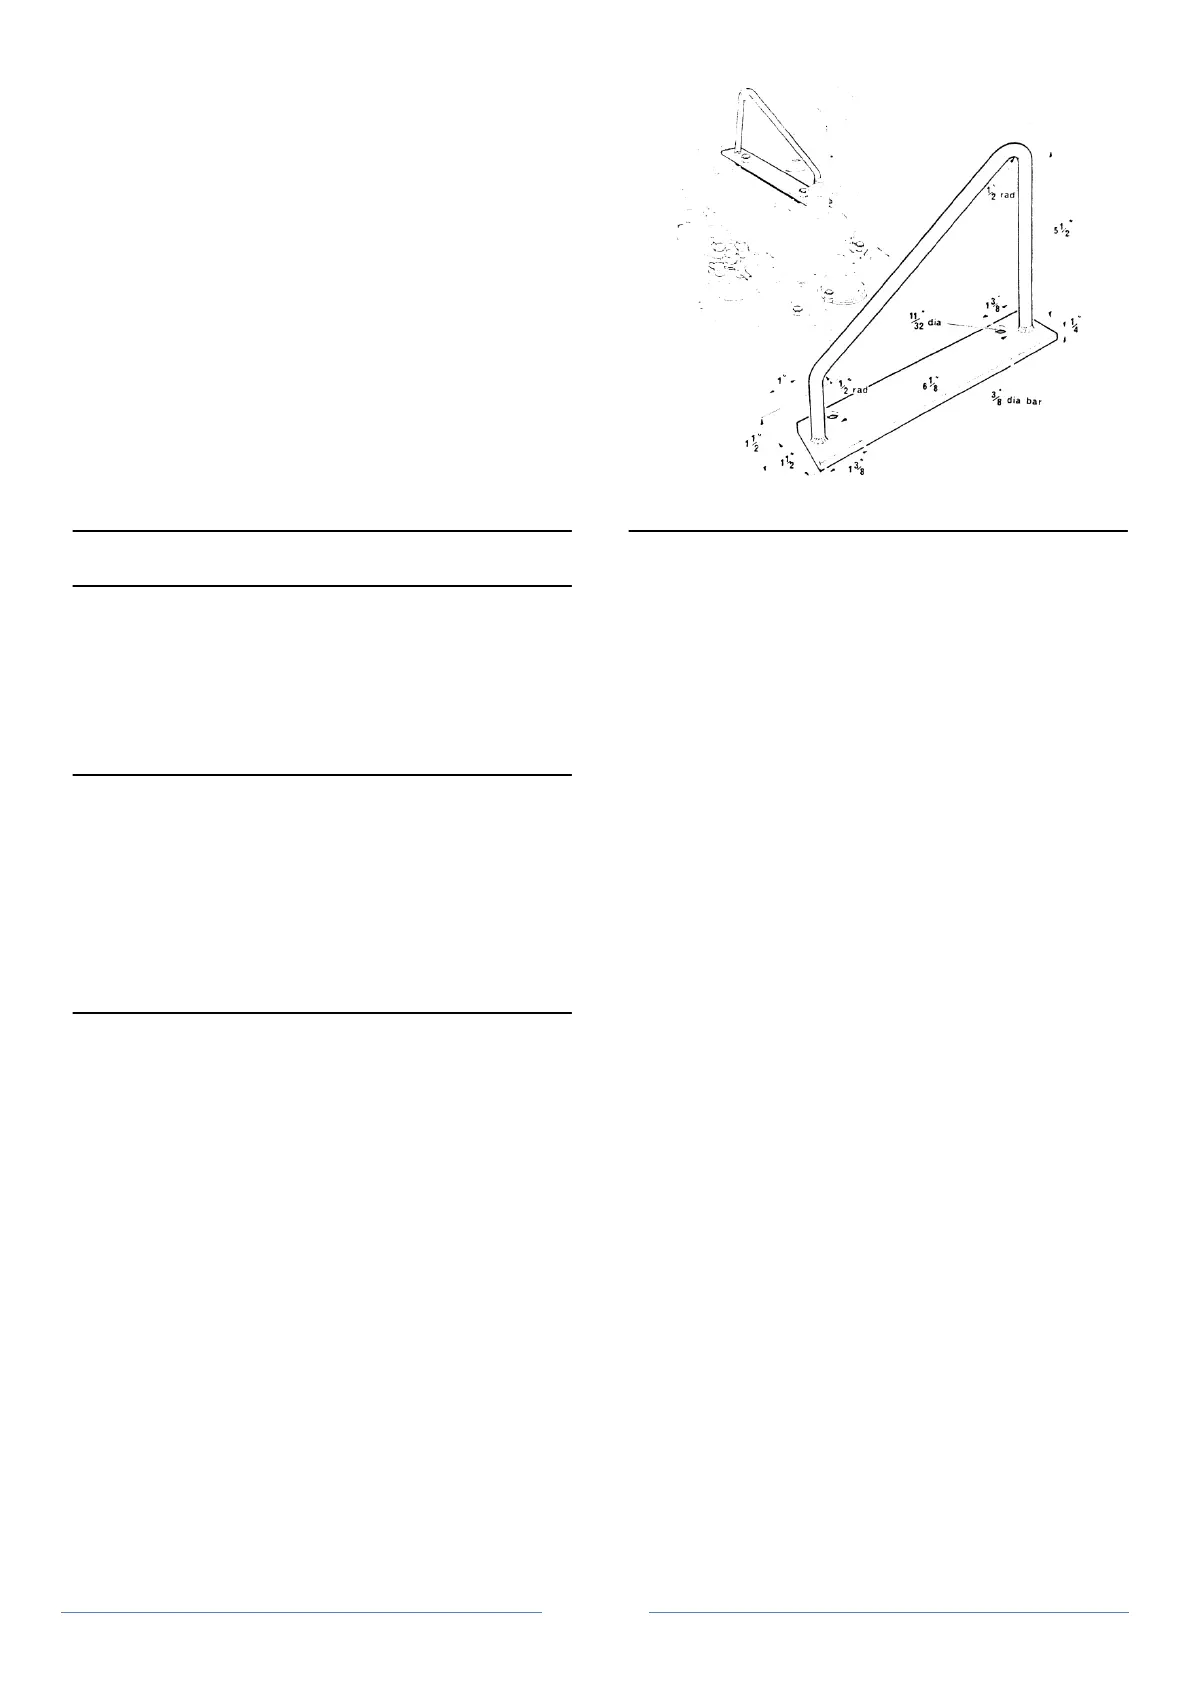
studs. The bracket can be constructed as shown in Figure 1. The use of
this bracket plus the availability of a hoist is assumed in the following
information.
Figure 1 Hoist bracket for engine removal
Operation 1 Engine removal and installation
To remove
1. Remove nuts and washers from bonnet hinges and remove
bonnet lid.
2. Disconnect battery.
3. Drain cooling system.
4. Drain engine oil.
5. Remove radiator complete with hoses (Section E).
6. Disconnect the heater hoses from the engine and bulkhead
and remove.
7. Remove the fresh air hose from the heater unit and
bulkhead stub.
8. Remove the air cleaner body and element.
9. Disconnect the fuel pipe from the tank at the pump and
plug to avoid ingress of dirt. Remove the pump to carburettor fuel
pipe taking care not to damage the pipe when unclipping from the "P"
clip on the rocker cover. Remove the supporting bar for the "P" clip
from the rocker stud.
10. Remove the heater hose clip from the remaining stud.
11. Disconnect starter motor lead.
12. Disconnect alternator harness plug, secured by a spring clip.
13. Disconnect the accelerator cable from the carburettor
bracket.
14. Release the trunnion and disconnect the choke cable.
15. Remove the two nuts securing the exhaust downpipe to the
manifold studs
16. Remove the nut and washer securing the exhaust support
bracket to the bell housing allowing the exhaust system to hang clear
of the engine.
17. Remove the nuts and washers from the front engine
mountings.
18. From inside the car, prise out the gear lever gaiter and
remove the gear lever knob. Remove the gaiter from the lever.
Remove the centre console. prise out the retaining "C" clip from ball
joint cap at the base of the gear lever and lift out the lever.
19. Disconnect the harness earth leads from the front engine
cover adjacent to the thermostat housing.
20. Disconnect the HT and LT leads from the coil.
21. Remove the oil pressure warning light lead from the sender
on the engine block and disconnect the pipe to the oil pressure gauge
if fitted.
 Loading...
