ENGLISH
10
II. SETUP & CONNECTIONS
1. ConnectaregularUSBPSU(notincludedinthescopeofdelivery)totheUSBPSUPort-21-orinsert2Li-Ion18650batteriesintothebattery
compartment-22-.YoucanalsorunSPINwithaUSBpowerbank.
2. In order to take off the Dust Cover -27-, push the
locks in the direction displayed on the im-age. Now
gently remove the dust cover.
NOTE: For more detailed information regarding power
operation, please check chapter „V. Operation/Power
Supply“ in this instruction manual.
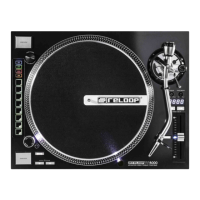
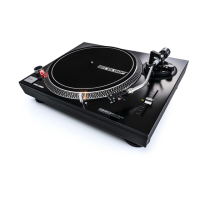
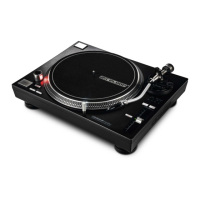
III. OPERATION
1. Play/Stop Button
Press this button to start the turntable. Press again to stop the turntable.
2. Volume Dial
Viathisdialyoucaninnitelyadjustthevolume.
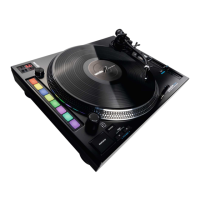
3. Bluetooth Pairing Button
UsethisbuttontopairyourReloopSPINviaBluetoothwithanexternalplaybackdevice.IfSPINisnotpairedwithadevice,thebuttonblinksslowly.
Pressthebuttonforapproximately2secondsandSPINswitchestopairingmode.Nowthebuttonblinksfaster.Youcanpairyoursmartphonevia
BluetoothwithSPIN.Todoso,openyoursmartphone‘sBluetoothsettings.“ReloopSPIN“willbeshown.Nowpairthetwodevices.Uponsuccess-
fulpairing,thebuttonwillbepermanentlylit.NowyoucanplaymusicfromyoursmartphonethroughSPIN,whichactsasaBluetoothspeaker.
4. Aux In Volume Dial
Usethisdialtoadjusttheauxinvolume.
5. USB Rec. Button
Pressthisbuttontostartarecording.Whilerecording,theUSBRecButtonblinksslowly.Inordertostopyourrecording,pressthebuttononce
again;duringsavingprocesstheUSBRec.Buttonblinksfaster.TherecordingfunctioncanbestartedagainassoonastheUSBRec.Buttonis
per-manently lit.
Note: Before recording, connect a USB storage device to the USB Rec. Port -17-. Please make sure that your storage device is formatted in
FAT32. When recording to a USB device, 2 separate folders will be created. You will nd your recording in the rst folder. Recordings are created
in MP3 format.
6. Tone Dial
Usethisdialtoadjustthelowfrequencies.Intheminuspositionthelowfrequenciesareltered(hi-pass).Inplusposition,thewholefrequency
spectrum will be played back.
7. Power LED
Whenthedeviceison,thisLEDislit.
8. Pitch Dial
Usethisdialtoinnitelyadjusttherecord‘spitchinarangeof+/-20%(+10%/-25&@78rpm).
9. Speed Switch
Viathisswitchyoucanselectyourdesiredplaybackspeed.Selectbetween33,45or78rpm.
10. Crossfader
Usethisfadertoswitchbetweentheleftandrightcrossfaderchannels.ThiswayitispossibletoapplyscratchingtechniquessimilartoaDJ
turntableandamixingconsole.
NOTE: If the crossfader is all the way to the right, the aux-in or Bluetooth signal is audible. If you move the fader a little to the left, the vinyl
signal becomes audible as well. If the crossfader is all the way to the left, only the vinyl signal is audible. For further information regarding the
crossfader, please refer to paragraph “IV. Crossfader“ in this instruction manual.
11. 7‘‘ Single Adaptor
Usethisadaptorfor7‘‘recordswhichdisposeofabighole.
12. Tone Arm with cartridge
Thistonearmisalreadyequippedwithacartridge;theneedleisuserreplaceable(seechapter“VI.ReplacingtheCartridgeNeedle“).Toplaya
record,removethetonearmfromtheToneArmHolder-15-ortakeitdownfromtheToneArmRest-14-.Movethetonearmoveryourrecordon
the platter and gently lower the tone arm on your record.
13. Platter
PuttheincludedSlipmat-25-ontheplatter.Thenputarecordthatyouwouldliketoplayontop.
14. Tone Arm Rest
If you want to change a record, temporarily place the tone arm on this rest.
15. Tone Arm Holder
If you do not want to use the turntable for a longer period or you would like to transport it, please clamp the tone arm in this holder.
16. Kensington Lock Slot
SlotforaKensingtonlock.
27
28
29
28