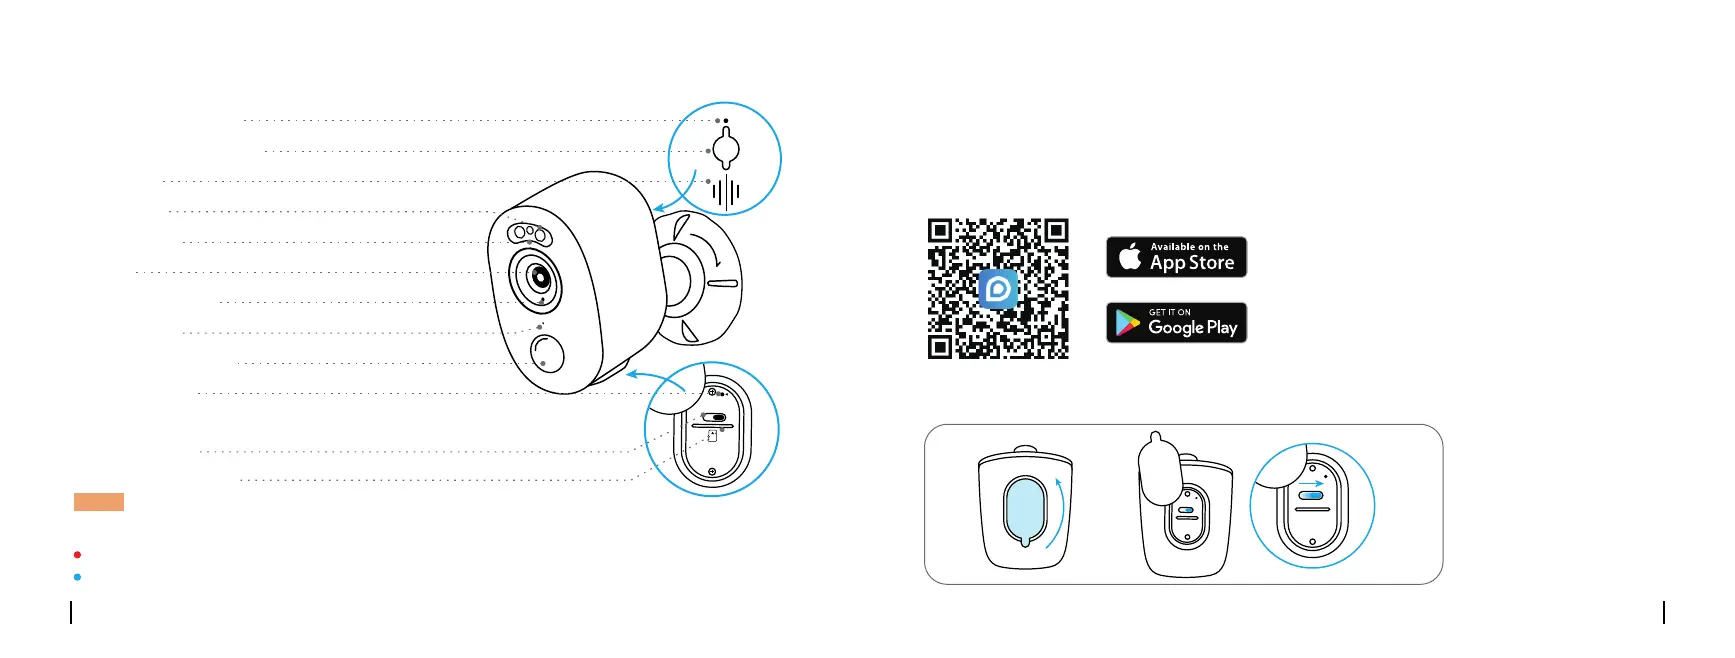
EasyManuals Logo

Reolink Argus 3 Series Operational Instruction

Reolink Argus 3 Series
41 pages
To Next Page IconTo Next Page
To Previous Page IconTo Previous Page
Page #3 background imageLoading...
Page #3 background image
USB
ON
OFF
MicroSD
RST
Camera Introduction
Battery Status LED
Set up the Camera using a Smartphone
Red Light: WiFi connection failed
Blue Light: WiFi connection succeeded
Blinking: Standby status
On: Working status
Set up the Camera
NOTE: Always keep the rubber plug closed firmly.
Speaker
Spotlight
Lens
Daylight Sensor
Reset Button
Dierent states of the status LED:
Status LED
Built-in Mic
PIR Motion Sensor
Power Switch
Micro SD Card Slot
* Press for more than five seconds to reset
the device to factory settings.
Micro USB Power Port
Step 1 Scan to download the Reolink App from the App Store or Google Play store.
Step 2 Turn on the power switch to power on the camera.
EnglishEnglish
ON
MicroSD
MicroSD
Switch
ON
MicroSD
3 4

Other manuals for Reolink Argus 3 Series

Questions and Answers:

Question and Answer IconNeed help?

Do you have a question about the Reolink Argus 3 Series and is the answer not in the manual?

Reolink Argus 3 Series Specifications

General IconGeneral
Weather ResistanceIP65 Weatherproof
Wireless SecurityWPA-PSK/WPA2-PSK
Operating Temperature-10°C to 55°C (14°F to 131°F)
Night VisionUp to 33 feet (10 meters)
Power SourceBattery/Solar Panel
Battery5200mAh Rechargeable
Connectivity2.4 GHz Wi-Fi
AudioTwo-way Audio
StorageMicro SD Card (up to 128GB) and Cloud Storage
Image SensorCMOS Image Sensor
Color Night VisionYes
PIR Detection DistanceUp to 33 feet (10 meters)
PIR Detection Angle100°
Dimensions121x90x56 mm
Weight330g (11.6 oz)
Resolution2K (4MP)
Field of View120° diagonal

Related product manuals