0108MLOOGBEN
11
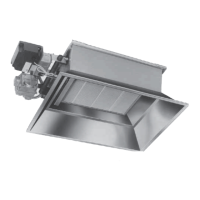
8.5 It is necessary to remove the burner rack assembly
to clean the burner ribbons and to inspect and clean
the inner surfaces of the heat exchanger.
To remove the burner rack assembly refer to figure
7, 6 step procedure
A) Remove Qty. 4 screws and remove bottom
panel.
B) Spring inwards left hand and right hand burner
rack locators and lower front end of burner rack
to below level of casing.
C) Ease burner rack toward front of air heater until
disengaged from injectors.
8.5.1 With the burner assembly removed, it is now
possible to inspect the heat exchanger with the aid
of an inspection lamp and mirror. Cleaning can be
carried out using a stiff flue brush and vacuum
cleaner.
8.5.2 Inspect the burner assembly for damage, corrosion
and cleanness.
With a brush and vacuum clean all exposed surfaces
and flame ports. If injectors are dirty these can be
removed after disconnecting the gas manifold from
the air heater. Any sticky deposits on the injectors
should be removed using acetone.
Do not clean the injector with a sharp metal object.
The orifice is machined to fine limits.
8.5.3 Inspect the igniter element assembly Fig.9 checking
especially the condition of the insulation. If in doubt
about its condition it is wise to renew this item.
N.B. The igniter element is an extremely fragile
device. Handle with care.
8.6 To remove the burner manifold assembly
incorporating the gas burner injectors and multi-
functional gas valve. Figure 10 key 21.
A) Unscrew Qty 4 screws securing adaptor elbow
gas inlet on valve or if gas service connection
will permit unscrew disconnect union fitting
outside.
B) Un-clip wires leading to gas valve operators
noting their appropriate terminal points for
reconnection.
C) Remove Qty. 2 hexagon nuts
securing manifold.
D) Withdraw manifold sideways.
Note: Burner rack assembly must be removed
before manifold can be removed.
8.7 To service the air circulation fan figure 10 key 29
To clean only. The electrical wire connection
between the fan motor and the appliance
termination is long enough to allow removal of the
fan assembly for cleaning purposes. To prevent
strain on the conductors the fan assembly should
be secured with a string or cord whilst carrying out
cleaning.
To replace components of the fan assembly when
it is necessary to disconnect the motor, the motor
lead wire should be disconnected at the motor
end.
Figure 7: ACCESS TO AND REMOVAL OF THE BURNER ASSEMBLY
Legend:
1 & 2.Remove 4 screws front & rear
3. Lower base tray
4. Spring retaining clips to release burner front end and lower (5) at the same time pulling forward (6)
 Loading...