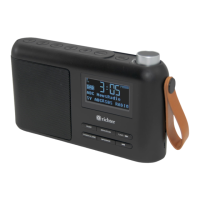
The Richter RR20 is a portable digital radio offering DAB+ and FM reception, along with several modern playback options. Designed for audio entertainment, it is suitable for household use and features a compact, portable design with a built-in rechargeable battery.
Function Description:
The primary function of the Richter RR20 is to provide digital (DAB+) and analog (FM) radio reception. It also supports playback from USB memory sticks, Bluetooth-enabled devices, and external audio sources via an AUX-IN connection. The radio includes alarm functions, a sleep mode, and adjustable backlight settings.
Important Technical Specifications:
- Model: Portable RR20
- Speaker Power: 1 x 2.5" Speaker output 3.0W RMS 10%
- Frequency Ranges:
- FM: 87.5-108MHz
- DAB: 174 - 240 MHz
- USB Playback: Supports mp3, wma, wav files on memory sticks up to 32GB
- Power Supply: Micro USB (5V, 1Amp)
- Charging Time: Approximately 2.5 Hours
- Playtime Time: Approximately 12 Hours @ 50% volume (when fully charged)
- Dimension: 190mm (W) x 50mm (H) x 110mm (D)
- Weight (Net): Approximately 0.43 kg
- Battery: Built-in 3.7v/1800mAh rechargeable Lithium Battery
- Bluetooth Working Distance: Maximum 10 meters (may be reduced by internal walls)
Usage Features:
General Operation:
- Power On/Off & Mode Selection: Long press the Power on/off and Mode selection button (13) to power on/off. Quick press the same button to choose the mode (DAB, FM, Bluetooth, USB, AUX-IN).
- Volume Control: Rotate the Volume/Scroll/Select/Mute/Pause&Play/Snooze, Rotary dial (14) to adjust volume. A quick press of the dial will mute/unmute the volume.
- Charging: Connect the supplied micro-USB cable to the "DC 5V IN" charge input on the right side of the radio and to a USB power source. A small red charge indication light will appear. Charging takes 2.5 to 3 hours. The radio can be used while connected to a USB power source and will enter "Standby" mode when switched off, allowing alarm settings to function.
DAB Radio:
- First Use: Upon first power-on, the radio automatically enters DAB mode and performs a Full Auto Scan. The display shows "Scanning..." and a progress bar. After scanning, it selects the first alphanumerically found station.
- Station Selection: Press the TUNE/>>I button (6) to enter station list mode. Rotate the Volume dial (14) to scroll through the list and press the dial to confirm selection.
- Auto Scan (Repeat): Press and hold the MENU/SCAN button (1) until "Scanning..." appears to perform a full auto scan of the DAB band.
- Manual Tuning: Quick press the MENU/SCAN button (1), then press the dial to confirm. Rotate the dial to select "Manual tune" and press to confirm. Rotate the dial to cycle through DAB Channels/Frequencies (5A to 13F). Press the dial to enter the current multiplex and view signal strength. Note: New stations are not heard during manual tune; search the station list to find them.
FM Radio:
- Mode Selection: Press and hold the Power on/off and Mode selection button (13) to switch on, then quick press it to select FM mode.
- Auto Scan: Press and hold the MENU/SCAN button (1) to enter auto scan and preset mode. The display shows "Scanning..." and pre-sets all found stations.
- Station Selection: Press the PRESET button (12) and rotate the dial to scroll through saved stations. Press the dial to confirm selection.
Preset Memory Setting:
- Storing Presets: In DAB or FM mode, press and hold the PRESET button (12) until "Preset Store" appears. Rotate the dial to select a preset position/number and press the dial to save. "Preset (and the selected number) Stored" will appear.
- Quick Presets (1-5): To store to quick preset buttons (7-11), press and hold the PRESET button until "Preset Store" appears, then press and hold the desired quick preset button (1-5) until "Preset (and the selected number) Stored" appears.
- Recalling Presets: Quick press the PRESET button (12) to enter Preset Recall mode. Rotate the dial to select and press to play a saved station. For quick presets (1-5), simply press the desired button.
Bluetooth Playback:
- Mode Selection: Press and hold the Power on/off and Mode selection button (13) to switch on, then quick press it to select BLUETOOTH mode. "Bluetooth" will flash on the display.
- Pairing: On your smart device, enable Bluetooth, search for devices, and select "PORTABLE RR20" to pair.
- Playback Control: Rotate the Volume dial (14) to adjust volume. A quick press will pause/restart playback. Adjust volume on your smart device if needed.
- Track Navigation: Press TUNE/>>I button (6) to skip forward tracks. Press I<< button (5) to skip back tracks.
- Disconnect: Press and hold the Volume dial (14) to disconnect your smart device.
USB Playback:
- Connection: Plug a USB memory stick into the USB input on the right side of the unit.
- Mode Selection: Press and hold the Power on/off and Mode selection button (13) to switch on, then quick press it to select "USB" mode. "Reading..." will appear.
- Playback Control: Rotate the Volume dial (14) to adjust volume. A quick press will pause/restart playback.
- Track Navigation: Press TUNE/>>I button (6) to skip forward tracks. Press I<< button (5) to skip back tracks.
AUX-IN Playback:
- Connection: Plug a 3.5mm aux audio cable (not included) into the "AUX IN" input on the right side of the unit.
- Mode Selection: Press and hold the Power on/off and Mode selection button (13) to switch on, then quick press it to select "LINE IN" mode.
- Volume Control: Rotate the Volume dial (14) to adjust volume. A quick press will mute/unmute volume.
Alarm Settings:
- Note: Alarm functions only work when the radio is connected to a USB power source (not on battery power). An alarm icon appears when activated.
- Setup: Press and hold the Power on/off and Mode selection button (13) to switch on. Quick press the MENU/SCAN button (1). Rotate the dial until "SYSTEM" appears, press to select. Rotate until "Alarms" appears, press to select.
- Alarm 1/2 Selection: Rotate to select "Alarm1" or "Alarm2" and press to confirm.
- Time Setting: Rotate to select "Time", press to confirm. Rotate to adjust hours, press to confirm. Rotate to adjust minutes, press to confirm.
- Days Setting: Rotate to select "Days", press to confirm. Rotate to select Daily, Once, Weekdays, or Weekends, press to confirm.
- Mode Setting: Rotate to select "Mode", press to confirm. Rotate to select DAB, FM, or Buzzer, press to confirm.
- Volume Setting: Rotate to select "Volume", rotate to set wake-up volume, press to confirm.
- Source Setting: Rotate to select "Last Listened" or "Preset" (for a preset station), press to confirm.
- Save & Activate: Rotate to "Save", press to save. "Alarm1" will display with "Off or On". Press the dial to access status, rotate to select "On or Off", press to confirm.
- Check Alarm Details: When the radio is on, press and hold the DIMMER/ALARM button (3) until "Alarm1" appears. Rotate the dial to step through saved alarm settings.
Sleep Mode Setting:
- Activation: With the radio on, press the SLEEP button (2) to activate sleep function.
- Timer Selection: Press the SLEEP button (2) again to choose desired sleep time: 15 / 30 / 45 / 60 / 75 / 90 minutes.
- Auto Power Off: The unit will power off after the selected sleep time is reached.
Backlight Settings:
- Quick Adjustment: Press the DIMMER/ALARM button (3) to adjust backlight level between High-Medium-Low or off.
- Menu Adjustment: Quick press the MENU/SCAN button (1). Rotate the dial until "SYSTEM" appears, press to select. Rotate until "BACKLIGHT" appears, press to select. Rotate to select "Time out" or "On Level" settings.
- Time Out: Options are "On" or 10 to 180 seconds.
- On Level: Options are High, Medium, or Low.
Maintenance Features:
Troubleshooting:
- FM Hiss / DAB Burbling / Intermittent: Usually due to low signal strength. Check/move antenna. Move radio. Rescan local (high-strength) stations only. For DAB, check local coverage at www.digitalradioplus.com.au ("Can I Get DAB+ Digital Radio") then rescan stations.
Error Messages:
- DAB Mode:
- "Service not available": No DAB reception.
- "Signal error": The DAB signal has been interrupted.
- "No DAB Station": The listed station cannot be found.
- "(No Name)": The current station does not broadcast an identity name.
- "No stations found": No DAB stations are available - check aerial.
- FM Mode:
- "No Radio Text": No RDS text information is available on this station.
- "No PTY": No RDS programme type information is available.
- "No Name": No RDS station name is being broadcast.
Factory Reset:
- Procedure: If experiencing issues, a factory reset can restore the radio's software. Press and hold the Power on/off and Mode selection button (13) to switch on. Quick press the MENU/SCAN button (1). Rotate the dial until "SYSTEM" appears, press to select. Rotate until "Factory reset" appears, press to select. Rotate to select "Yes" and press to confirm.
- Result: The radio will complete a factory reset and commence a new DAB Auto scan.
- For audio entertainment only; improper use is dangerous and voids warranty.
- For household use only; not for outdoor use.
- Excessive sound pressure from earphones/headphones can cause hearing loss.
- Keep packaging material away from children.
- Use only under normal room temperature and humidity conditions; not in tropics or humid climates.
- Outdoor antennas should be away from power lines.
- Avoid moving from cold to warm places to prevent condensation damage.
- Use only manufacturer-recommended attachments/accessories.
- Ensure sufficient ventilation; do not install in enclosed spaces.
- Avoid heat sources (radiators, stoves, etc.).
- Do not apply excessive force to the front/top.
- Do not shift/move when powered on.
- Do not touch/push/rub with sharp objects.
- Do not expose to rain/moisture; avoid dripping/splashing liquids.
- No naked flame sources (e.g., candles) on the product.
- Before connecting to a socket, ensure voltage matches local mains.
- Never pull adapter plug by cord or with wet hands.
- Disconnect adapter plug during faults, lightning storms, cleaning, or prolonged non-use.
- Before cleaning, switch off and disconnect the adapter.
- At end of service life, make defective by disconnecting adapter and cutting cord.
Service and Warranty:
- Repairs/service should only be performed by an authorized service engineer using genuine spare parts.
- The WEEE symbol indicates the product should not be treated as normal household waste and should be recycled.
- The product comes with a 1-year (12 months) warranty from the date of purchase in Australia, provided by Richter Audio PTY LTD.
- Warranty claims require contacting Richter Audio via their website (www.richter.com.au) and submitting proof of purchase.
- Refunds/replacements are available for 14 days after purchase for major failures, not for change of mind.
- Products for repair may be replaced with refurbished products or parts.
- User-generated data may be lost during repair; Richter Audio is not responsible for such loss.
- The owner bears transit risk to/from service center unless Richter Audio arranges transport.
- Richter Audio covers transport costs if they arrange it; other claim expenses are the owner's.
- Richter Audio may seek reimbursement for costs if the product is found to be in good working order.
- Damage during transit due to insufficient packing will be quoted, and repair costs covered by the owner.
- Exclusions: Warranty does not apply if the product was not installed/operated/maintained according to instructions, or for damage from alterations, accidents, misuse, abuse, fire, liquid spillage, mis-adjustment, incorrect voltage, power surges, thunderstorms, acts of God, tampering, unauthorized repairs, defective/incompatible accessories, computer viruses, corrosive conditions, or entry by insects/vermin/foreign objects. It also excludes damage during transportation/installation/moving (unless specified), third-party software/hardware not originally configured, or failures not related to product specifications.