EasyManua.ls Logo

Roberts Ortus DAB Charge - User Manual

Roberts Ortus DAB Charge
2 pages
Print Icon
To Next Page IconTo Next Page
Loading...
Clock radio, quick start guide and safety/warranty leaet.
Features
Controls
continued overleaf...
STEP 1 - Plug in & play DAB radioWhat is in the Box?
Bluetooth audio streaming from smartphone, tablet or laptop
Wireless charging for use with a wireless charging enabled device
DAB / DAB+ / FM RDS wavebands
20 radio station presets (10 DAB and 10 FM)
Multi-level display dimmer
2 alarms with humane wake
Sleep and snooze timers
USB socket for device charging
Headphone socket for private listening
A - Connect to the mains
B - Switch on your clock radio
C - Select a DAB radio station
Please read the safety leaet provided before
connecting your clock radio to the mains.
1 Place your clock radio on a at surface.
2 Fully extend the wire aerial located on the rear of
the clock radio.
3 Plug the mains adaptor into a wall socket and switch
on the socket.
4 A start up screen will show. The clock will set.
Note: If no signals are found it may be necessary to relocate your clock radio to a position
giving better reception and carry out a scan for new stations.
D - Scan for DAB stations
As time passes new stations may become
available or you may have moved to a different
part of the country.
1 Press the Menu button. Press the Tune
Up or Down buttons to highlight ‘SCAN’.
2 Press the OK button. Your radio will perform
a scan of the Band III DAB channels. As
new stations are found, they will be added to the list stored in the radio.
1 Press and release the On/Standby button to switch
on the clock radio. After each use the clock radio
will remember the mode used and then switch on
in that mode the next time it is used. To switch off
your clock radio press the On/Standby button.
2 If this is the rst time the radio is used a scan of
the Band III DAB channels will be carried out.
1 If needed, press the DAB button to select the
DAB mode.
2 Press the Tune Up or Down buttons to step
through the list of available DAB stations.
3 Press the OK button to select the station.
4 Adjust the Volume.
Press and release the OK button to cycle through
the various DAB display options.
The display options are station name, scrolling
text, program type, signal strength (the minimum
signal marker (
) shows the minimum signal
strength needed for good DAB reception),
multiplex name, frequency, bit rate, time and
date.
Search tuning - FM
1 Carefully, fully extend the wire aerial.
2 Press the FM button to select the FM mode.
3 Apply a long press on the Tune Up or Down
buttons. Your radio will scan upwards (low to
high frequency) or downwards (high to low
frequency) and will stop automatically when it
nds a station of sufcient strength.
4 If the signal is strong enough and there is RDS
data present the display will show the station
name for a few seconds. Adjust the Volume.
Press and release the OK button to cycle
through the various FM display options.
To manual tune, press and release the Tune
Up or Down buttons to tune to a station. The
frequency will change in steps of 50 kHz.
STEP 2 - Play FM radio
1 On/Standby / Sleep button
2 Tune Down button
3 Tune Up button
4 Snooze / Ok / Info button
5 Alarm button
6 Menu / Back button
7 Volume Up button
8 Volume Down button
9 Dimmer button
10 Preset button
11 Light sensor
12 Bluetooth Pair button
13 FM button
14 DAB button
15 Wireless charging pad
16 LED display
17 Loudspeaker
18 USB socket (for service use only)
19 DAB / FM wire aerial
20 Headphone socket
21 USB charging socket
22 AC adaptor cable
DAB
There are 20 memory presets, 10 for DAB and 10 for FM. Presets are remembered by the
clock radio in the event of a power failure.
To store a preset
1 Tune to the required radio station.
2 Apply a long press on the Preset button.
3 Press the Tune Up or Down buttons to select the
desired station number under which you wish to
store the station. Press the OK button. The display
will show for example, ‘P1 SAVED’. Repeat this
procedure for the remaining presets.
To recall a preset
1 Choose DAB or FM mode.
2 Press and release the Preset button.
3 Use the Tune Up or Down buttons to select the
desired preset. Press OK. Your clock radio will
tune to the station stored in the preset memory.
Note: The display will show ‘EMPTY’ if no station
has been stored to that preset.
Preset radio stations
1 Ensure Bluetooth is enabled on your smart device. Ensure your clock radio is
switched on.
2 Press and release the Bluetooth Pair button to
select the Bluetooth mode. The Bluetooth icon
will ash on the display and your clock radio will
show that it is ‘discoverable’.
3 On your smart device select ‘Ortus DAB Charge’.
Once the connection is established the icon will
remain steady. You may now play your music.
4 Adjust the volume on your Bluetooth device or
on your clock radio. Press OK for information.
5 The audio player in your smart device may be
able to respond to the Play/Pause, Next or
Previous track on the clock radio. Press the
Bluetooth Pair button to pause playback. Press
the button again to resume playback. Press the
Tune Up or Down buttons to skip to the next or
previous track. Note: Not all player applications
or devices may respond to all of these buttons.
6 To connect a different device apply a long press
on the Bluetooth Pair button. Your clock radio
will become discoverable by other devices.
STEP 3 - Bluetooth
Menu options
1 To access or exit your clock radio’s menu
system press the Menu button.
2 Press the Tune Up or Down and OK
buttons to select menu options.
3 To exit menu options, press the Menu
button as needed.
18
20
17
19
21
22
It is recommended that the DAB band be used wherever possible as better
results in terms of quality and freedom from interference will usually be obtained
than on the FM band.
Tune
Tune
DimPreset
Snooze
OK
DAB FM
Vol
Vol
13
14
15
12
2 3 5 6 7
89
10
11
4
1
16
DAB
Snooze
OK
Tune
DAB
FM
Tune
Snooze
OK
FM
Preset
Tune
Snooze
OK
DAB
Tune
Snooze
OK
Snooze
OK
Tune
Snooze
OK
Question and Answer IconNeed help?

Do you have a question about the Roberts Ortus DAB Charge and is the answer not in the manual?

Summary

Plug In and Play DAB Radio

Connect to the Mains

Procedure for connecting the clock radio to the mains power supply.

Switch on Clock Radio

Instructions for powering on the clock radio and initial DAB channel scan.

Select DAB Radio Station

Guide on how to tune into and select DAB radio stations.

Scan for DAB Stations

Procedure to scan for new DAB stations when reception conditions change.

Play FM Radio

Search Tuning FM Radio

Instructions for automatically tuning into FM radio stations.

Preset Radio Stations

Guide for storing and recalling FM and DAB radio station presets.

Bluetooth Connectivity

Pair and Play Bluetooth Audio

Steps to pair a Bluetooth device and play audio wirelessly.

Setting Alarms

Configure Alarm Settings

Detailed steps for setting up to two alarms with various wake-up options.

Snooze Alarm Function

How to use the snooze function to temporarily silence an active alarm.

Cancel Alarm

Instructions for cancelling an active alarm.

DAB and FM Menu Options

DAB Menu Functions

Accessing and using DAB menu options like Manual Tune, DRC, and Prune.

FM Menu Functions

Accessing and using FM menu options like Scan Setting.

Sleep Timer Function

Setting the sleep timer to automatically turn off the radio.

System Settings

Set Clock Format

Configuring the clock display between 12-hour and 24-hour format.

Set Clock Manually

Manually setting the time and date when automatic update is unavailable.

Automatic Clock Update

Managing automatic clock time updates via DAB, FM, or disabling.

Other Information

Factory Reset

Performing a factory reset to restore the clock radio to its initial state.

Language Selection

Changing the display language of the clock radio.

Snooze Time Setting

Customizing the duration for the alarm snooze function.

Dimmer Control

Adjusting the display brightness or using auto-dimming.

Wireless Charging

Enable and Use Wireless Charging

Instructions for charging compatible devices wirelessly.

Product Specifications

Power and Circuit Features

Details on power requirements, USB output, and headphone socket.

Aerial and Bluetooth Standards

Information on aerial system and supported Bluetooth standards.

Frequency Coverage

Specifies the frequency ranges for FM and DAB reception.

AC Adaptor Details

Technical specifications for the AC power adaptor.

Overview

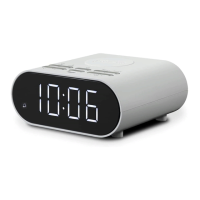
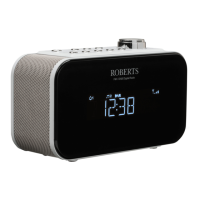
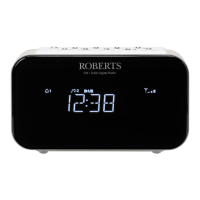
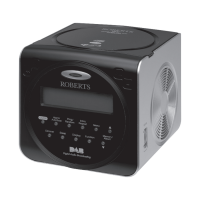
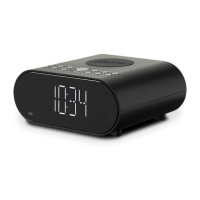
This document describes the Roberts Ortus DAB Charge FM RDS / DAB+ / Bluetooth wireless charging clock radio.

Function Description

The Roberts Ortus DAB Charge is a versatile clock radio designed for modern users, offering a range of audio playback options, alarm functions, and convenient charging capabilities. It supports Bluetooth audio streaming from smartphones, tablets, or laptops, and features wireless charging for compatible devices. The radio can receive DAB/DAB+ and FM RDS wavebands, providing access to a wide variety of radio stations. It includes 20 radio station presets (10 DAB and 10 FM) for quick access to favorite stations. The device also incorporates a multi-level display dimmer for comfortable viewing, two alarms with a humane wake function, and sleep and snooze timers for flexible use. For added convenience, it has a USB socket for device charging and a headphone socket for private listening.

Important Technical Specifications

Power Requirements:

  • Mains (Adaptor): 100~240V, 50/60Hz
  • USB Output: 5V/1A

Circuit Features:

  • Headphone Socket: 3.5mm
  • Aerial System: DAB / FM wire aerial

Bluetooth Specifications:

  • Bluetooth Standards: A2DP, AVRCP
  • Bluetooth Codec Supported: SBC
  • Bluetooth Frequencies: 2.402 - 2.480GHz
  • Bluetooth Version: 5.0

Frequency Coverage:

  • FM: 87.5 - 108MHz
  • DAB: 174.928 - 239.200MHz

Product Markings:

  • The device indicates AC voltage and DC voltage.

Mains Adaptor:

  • Manufacturer: Dongguan Turnmax Electronic Co., Ltd.
  • Model: TM-K018VP-00503000PE-03
  • Input Voltage: AC100-240V
  • Input AC Frequency: 50/60Hz
  • Output Voltage: DC5.0V
  • Output Current: 3.0A
  • Output Power: 15.0W
  • Average Active Efficiency: ≥ 81.39%
  • Efficiency at Low Load (10%): 78.76%
  • No-load Power Consumption: < 0.1W

The name plate is located underneath the clock radio. The company reserves the right to amend the specification without notice.

Usage Features

Getting Started:

  1. Place the clock radio on a flat surface.
  2. Fully extend the wire aerial at the rear.
  3. Plug the mains adaptor into a wall socket and switch on. A start-up screen will show, and the clock will set. If no signals are found, relocation or a new scan may be needed.
  4. Press the On/Standby button to switch on. The radio will remember the last used mode. A Band III DAB channel scan will be performed if it's the first use.

DAB Radio:

  1. Press the DAB button.
  2. Use Tune Up or Down buttons to step through available DAB stations.
  3. Press OK to select a station.
  4. Adjust Volume.
  5. Press OK to cycle through DAB display options (station name, scrolling text, program type, signal strength, multiplex name, frequency, bit rate, time, and date).
  6. Scanning: Press Menu, select 'SCAN' using Tune Up/Down, and press OK to perform a Band III DAB channel scan. New stations will be added to the list.
  7. Manual Tune: In DAB menu, choose 'MANUAL' then the desired DAB channel.
  8. DRC (Dynamic Range Control): In DAB menu, choose 'DRC' then '0', '1/2' or '1' to make quieter sounds easier to hear in noisy environments. Not all DAB broadcasts use DRC.
  9. Prune Station: In DAB menu, choose 'PRUNE' then 'PRUNE?' to remove unavailable stations.

FM Radio:

  1. Fully extend the wire aerial.
  2. Press the FM button.
  3. Apply a long press on Tune Up or Down to scan upwards or downwards. The radio will stop on stations with sufficient strength.
  4. If RDS data is present, the station name will display. Adjust Volume.
  5. Press OK to cycle through FM display options.
  6. For manual tuning, press Tune Up or Down to change frequency in 50 kHz steps.
  7. Scan Setting: In FM menu, choose 'SETTING' then 'DISTANT' (scans weak and strong signals) or 'LOCAL' (scans stations with good reception).

Preset Radio Stations (10 DAB, 10 FM):

  • Store: Tune to a station, apply a long press on Preset, use Tune Up/Down to select a preset number, and press OK.
  • Recall: Choose DAB or FM, press Preset, use Tune Up/Down to select the desired preset, and press OK. 'EMPTY' is shown if no station is stored.

Bluetooth:

  1. Enable Bluetooth on your smart device.
  2. Press the Bluetooth Pair button to select Bluetooth mode. The Bluetooth icon will flash, and the radio will show 'discoverable'.
  3. On your smart device, select 'Ortus DAB Charge'. The icon will become steady upon connection.
  4. Adjust volume on your device or the clock radio. Press OK for information.
  5. The clock radio may respond to Play/Pause, Next, or Previous track commands from your smart device. Press Bluetooth Pair to pause/resume. Press Tune Up/Down for next/previous track. Note: Not all player applications or devices support all commands.
  6. To connect a different device, apply a long press on the Bluetooth Pair button to make the clock radio discoverable again.

Alarms (2 alarms: DAB, FM, or Buzzer):

  1. In standby or on, apply a long press on the Alarm button. Alarm 1 will show. Press Tune Up to select Alarm 2 if needed, then press OK.
  2. Set desired alarm hour and minute.
  3. Choose alarm day option: ONCE, WEEKDAYS, WEEKENDS, or DAILY.
  4. Choose alarm source: DAB, FM, or BUZZER.
  5. Set desired alarm volume using Tune Up/Down.
  6. Press OK to confirm. 'SAVED' will show.
  7. Radio alarms are indicated by the ♫ symbol, buzzer alarms by the ? symbol. Alarms sound for up to 60 minutes unless cancelled. If the radio cannot tune to the selected station, the buzzer will be used.
  8. Snooze: When an alarm sounds, press Snooze/OK to silence for a selected number of minutes. 'SNOOZE' will display. This can be repeated. To cancel snooze, press On/Standby.
  9. Cancel Alarm: While an alarm is sounding, press On/Standby. In standby, repeatedly press Alarm to enable/disable alarms.

Wireless Charging:

  1. Ensure the clock radio is plugged into mains.
  2. Place your wireless charging enabled device onto the wireless charging pad.
  3. Your device will start charging, and the charging indicator (())) will show. If it flashes, it indicates a non-wireless charging device or poor connection. A solid indicator means connected.
  4. Charging time depends on the device. Standby/On - 5W.
  5. A USB socket at the rear can also be used for device charging.

System Settings:

  • Set Clock Format: In Menu, choose 'SYSTEM', 'TIME', 'FORMAT', then '12' or '24'. A PM indicator is shown for 12-hour format.
  • Set Clock Manually: If no DAB signal, in Menu, choose 'SYSTEM', 'TIME', 'SET TIME'. Use Tune Up/Down and OK to set hour, minute, day, month, and year. 'SAVED' will show.
  • Automatic Clock Update: In Menu, choose 'SYSTEM', 'TIME', 'UPDATE', then 'ANY', 'DAB', 'FM', or 'NO UPDATE'.
  • Sleep Timer: Apply a long press on On/Standby. Set desired sleep time (10 to 120 minutes). Press On/Standby to cancel or set to 'Off'.
  • Factory Reset: In Menu, choose 'SYSTEM', 'FACTORY', then 'RESET?'. All user settings will be erased.
  • Language: In Menu, choose 'SYSTEM', 'LANGUAGE', then select your desired language.
  • Snooze Time: In Menu, choose 'SYSTEM', 'SNOOZE', then select your desired snooze time (5, 9, 15, 20 minutes, or none).
  • Software Version: In Menu, choose 'SYSTEM', then 'SW version' (for reference).
  • Dimmer: Press Dimmer to choose Low, Med 1, Med 2, High, or Auto. 'AUTO' adjusts brightness based on environment.

Maintenance Features

  • The unit will automatically switch to standby mode if in Bluetooth stop mode for more than 15 minutes. Press On/Standby to use again.
  • The clock radio is designed and engineered in the UK.
  • The company reserves the right to amend specifications without notice.
  • It is recommended that the DAB band be used wherever possible for better quality and freedom from interference.
  • A 3.5mm Headphone Socket is provided, muting the internal loudspeaker when a plug is inserted. Be aware that headphone sensitivity can vary widely.

Roberts Ortus DAB Charge Specifications

General IconGeneral
BrandRoberts
ModelOrtus DAB Charge
CategoryClock Radio
LanguageEnglish

Related product manuals