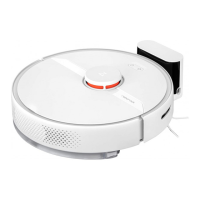
14
Unscrew the side brush screw. Remove and
clean the side brush. Reinstall the brush
and tighten the screw.
Use a tool, such as a small
screwdriver, to pry out the axle and
take out the wheel.
D3-1—
Notes:
Ŏ
It is recommended to wipe the main brushes with a
wet cloth. If the main brushes are wet, air-dry them
away from direct sunlight.
Ŏ
Do not use corrosive cleaning fluid or disinfectant to
clean the main brushes.
Ŏ
To prevent injury caused by blades used to cut hair inside
the main brush cover, make sure to install two main
brushes in place before installing the main brush cover.
*
Clean monthly and replace every 3-6 months.
Flexible Side Brush
%
*
Clean as required.
Omnidirectional Wheel
%
Rinse the wheel and the axle with
water to remove any hair and dirt.
Air-dry, reinstall, and press the wheel
and axle back in place.
D3-2—
Clean the main wheels with a soft, dry cloth.
The omnidirectional wheel bracket cannot be
removed.
Note:
*
Clean as required.
Main Wheels
%
*
Clean as required.
Dustbin
%
Remove the magnetic top cover and
press the dustbin latch to take out
the dustbin.
D5-1—
Leave the dustbin and the washable
filter to dry.
D5-4—
To prevent blockage, only use clean water without
any cleaning liquid.
Note:
Remove the washable filter and
empty the dustbin.
D5-2—
Fill the dustbin with clean water and
reinstall the washable filter. Gently
shake the dustbin, and then pour
out the dirty water.
D5-3—
Unscrew the screw in the middle of
the mop cloth.
D7-1—
*
Clean as required and replace every 3-6 months.
Edgewise Mop Cloth
%
Remove the filter.D6-1—
Rinse the filter repeatedly and tap it
to remove as much dirt as possible.
D6-2—
Do not touch the surface of the filter with hands,
brush, or hard objects to avoid potential damage.
Note:
Purchase an additional filter and alternate if
necessary.
Note:
*
Clean every 2 weeks and replace every 6-12 months.
Washable Filter
%
Allow at least 24 hours for the filter
to dry thoroughly and reinstall it.
D6-3—
Remove the mop cloth from the mop
cloth mount. Clean the mop cloth
and air-dry it.
D8-1—
Slide the mop cloth in from the
opening of the attachment slot, and
then stick it flat in place.
D8-2—
A dirty mop cloth will affect the mopping
performance. Clean it before use.
Note:
Use a soft, dry cloth to wipe and clean all
sensors, including:
*
Clean as required and replace every 3-6 months.
VibraRise Mop Cloth
%
*
Clean as required.
Robot Sensors
%
D9-1—Reactive AI Obstacle Recognition
Sensor
D9-2—Dock Locator
D9-3—Carpet Sensor
D9-4—Wall Sensor
D9-5—Communication Sensor
D9-6—Cliff Sensors
Wash the mop cloth and air-dry it.D7-2—
Reinstall the mop cloth and tighten
the screw.
D7-3—
A dirty mop cloth will affect the mopping
performance. Clean it before use.
Note:
Reinstall the main brushes. Firmly snap
the main brush bearings into place.
Only after the bearings are securely
installed, fit the main brush cover.
D1-9—
Reinstall the main brush cover. Make
sure its four teeth are fully seated in
the slots, and press the main brush
cover until you hear it lock with a click.
D1-10
—