Recording a Pattern
118118
Recording
parameter
Value Explanation
Resolution
[E5] knob
Species the note timing value at which
quantization is applied.
GRID: 1/32 (
)–1/4 ( )
SHUFFLE: 1/16 (
)–1/8 ( )
Strength [E6]
knob
0–100%
This setting is used with grid
quantize. It species the degree
to which your notes are moved to
precise intervals of the note values
specied by the RESOLUTION
setting. If this is set to “100%”, the
notes that you record are moved
all the way to exact intervals of
the specied RESOLUTION. With
lower percentages, less correction
is applied. If this is set to “0%”, the
timing is not corrected at all.
Rate [E6]
knob
0–100%
This setting is used with shue
quantize.
If this is set to “50%”, the notes
sound at equal intervals. Raising
the value produces a bouncy feel
as with dotted notes.
50 5050 50
90 10 90 10
Rate=50%
Rate=90%
<RHY
SYNC>
OFF, ON
Species whether the currently
selected rhythm pattern is
automatically played and recorded
(ON) or not recorded (OFF) when
recording starts. (p. 44)
<LOOP
REC SW>
ON
Continue recording even after
you’ve recorded the measures
specied by the Length setting.
OFF
Transition from recording to
playback when you’ve recorded
the measures specied by the
Length setting.
<REC
EVENT>
Lets you select the performance data that is
recorded during realtime recording.
NOTE Note messages
CONTROL
CHANGE
Control change messages
PITCH BEND Pitch bend messages
CHANNEL
AFTER
Channel aftertouch messages
POLY AFTER Polyphonic aftertouch messages
[E5] CLICK OFF, ON
Turns the click (metronome) on/
o.
Tempo [E4]
knob
=5–300
Species the tempo.
Length [E3]
knob
1–64
(Ver. 1.01 or later)
Species the length of the pattern.
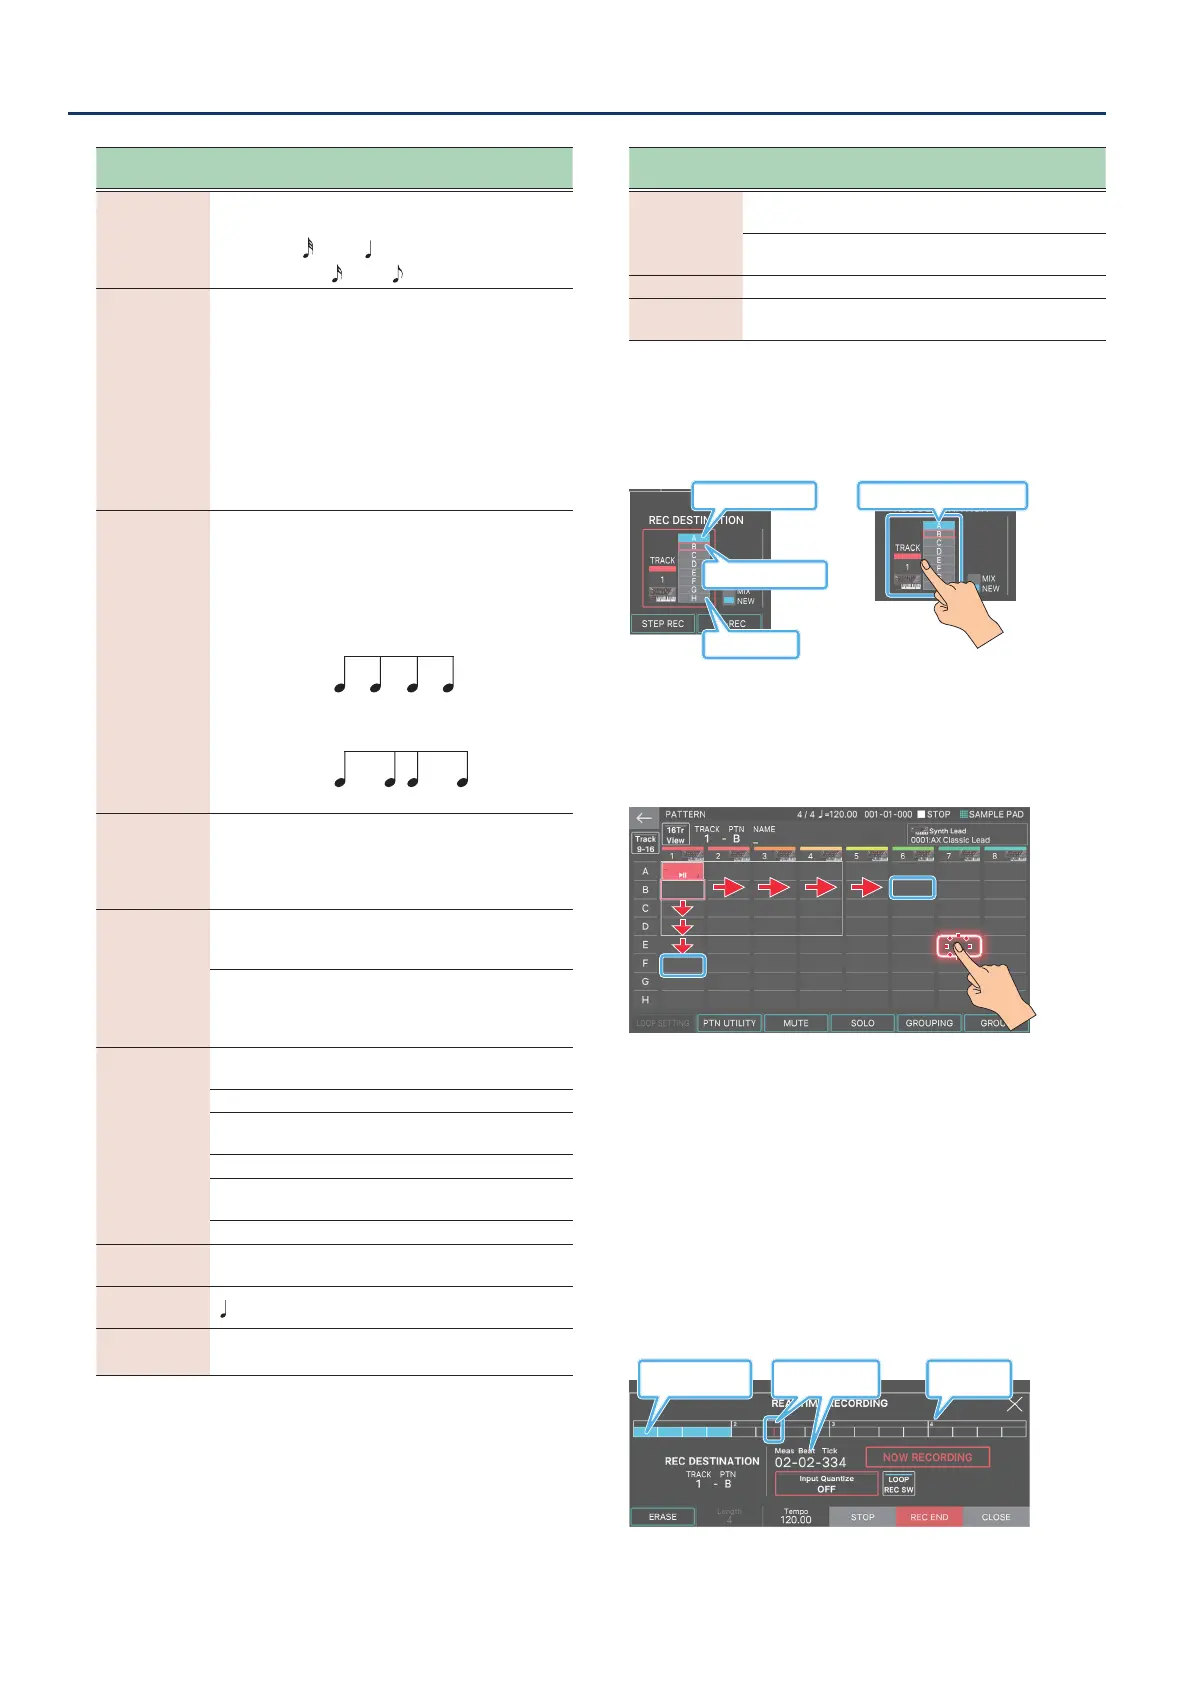
3. Make TRACK/PATTERN settings.
Recording
parameter
Value Explanation
NEW/MIX
MIX
Overdub-record onto the pattern
of the selected track.
NEW
Newly record onto an empty
pattern of the selected track.
TRACK 1–16 Indicates the track to record.
PATTERN A–H
Indicates the pattern of the track
to record.
In the example shown in the illustration below, TRACK 1-B is
selected. Of patterns A–H, the selected pattern is enclosed
by a red frame.
Already-recorded patterns are solid blue.
<TRACK/PATTERN>
Recorded pattern
Select TRACK 1-B
Empty Pattern
When you touch <TRACK/PATTERN>, you move to the
PATTERN screen, where you can select the track (1–16) and
pattern (A–H) to record. You can select the track and pattern
by using the [
à
] [
á
] [
ã
] [
â
] buttons to move the red frame,
or by directly touching a vacant area in the screen.
Since zones and tracks correspond with each other, using
the ZONE SELECT buttons to switch the current zone also
changes the recording-destination track in tandem. If you
change the recording-destination track, the zone played by
the track also changes in tandem.
(Example) Zone 2 (Bass): Track 2
Ó
Zone 10 (Drum): Track 10
4. Press the [óREC] button.
5. Press the [øPLAY] button to start recording.
You can also start recording by touching <START>.
The REALTIME RECORDING screen appears.
Measure
indication
Recorded data
exists
Playback position
indicator
 Loading...