4
Panel Descriptions
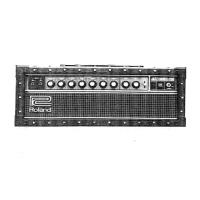
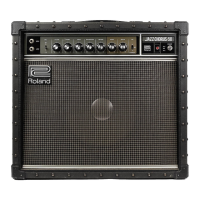
Front Panel
1 INPUT jacks
Connect your electric guitar or eect unit here. If you’re connecting
a guitar directly, or a monaural eect unit, connect it to the L/
MONO jack. If you connect a stereo-output eect unit to these
jacks, you’ll obtain a stereo eect with the left and right speakers of
the JC-22.
* If you connect your guitar to the R jack, the sound is heard only
from the right speaker.
2 [BRI] (Bright) switch
Brightens the mid- and high-frequency range, making the sound
more crisp.
3 [VOLUME] knob
Adjusts the overall volume.
4 [TREBLE] / [MIDDLE] / [BASS] knobs
Adjust the volume of the high-, mid-, and low-frequency ranges
respectively.
5 [REVERB] knob
Adjusts the reverb depth.
6 CHORUS
The JC-22 features dimensional space chorus eects.
[SPEED] knob
Adjusts the modulation speed of chorus.
[DEPTH] knob
Adjusts the modulation depth of chorus. If this is set to “OFF,” chorus
is not applied.
7 [POWER] switch
Turns the power of the JC-22 on/o. When the power is on, the
indicator is lit.
Turning the Power On/O
1. Make sure that the JC-22’s [VOLUME] knob and the
volume of the devices connected to the JC-22 are set to 0.
* Before connecting your instrument to the JC-22’s INPUT jacks,
set the [VOLUME] knob to the minimum setting (far left).
2. Turn on the JC-22.
* Before turning the unit on/o, always be sure to
turn the volume down. Even with the volume
turned down, you might hear some sound when
switching the unit on/o. However, this is normal
and does not indicate a malfunction.
3. Turn on the power of the connected devices.
4. Adjust the volume levels for the devices.
Before switching o the power, lower the volume on each of the
devices in your system and then TURN OFF the devices in the
reverse order to which they were switched on.
* If you need to turn o the power completely, rst turn o the
unit, then unplug the power cord from the power outlet. Refer
to “To completely turn o power to the unit, pull out the plug
from the outlet” (p. 2).
1 2 3 5 76
L R
4

 Loading...