EasyManua.ls Logo

Roland KD-85 User Manual

Roland KD-85
8 pages
To Next Page IconTo Next Page
Page #1 background imageLoading...
Page #1 background image
03895089 ’05-6-2N
Owners Manual
Thank you, and congratulations on your choice of the Roland KD-85 V-Kick Trigger Pad.
201a
Before using this unit, carefully read the sections entitled: “USING THE UNIT SAFELY” and “IMPORTANT NOTES”
(p. 6; p. 7). These sections provide important information concerning the proper operation of the unit. Additionally,
in order to feel assured that you have gained a good grasp of every feature provided by your new unit, Owner’s
manual should be read in its entirety. The manual should be saved and kept on hand as a convenient reference.
fig.Cover.e
202
Copyright © 2005 ROLAND CORPORATION
All rights reserved. No part of this publication may be reproduced in
any form without the written permission of ROLAND CORPORATION.
VERY IMPORTANT!!!
BEFORE playing the pad, you must TUNE it to your preferred
playing tension. They are NOT tuned before shipping. Failure to
adjust tension may result in damage to the trigger sensor.
Contents of the Package
KD-85 (pad unit)
Stay
Leg x 2
Beater
Connection Cable
Tuning Key
Owner’s Manual (this manual)
Names of Conponents
Tuning Bolt
Rubber Foot
Head
Foot
Stand Plate
Cusion
Sensor
Hoop
Leg
T-Bolt
Frame
Bracket
Output Jack
Stay
* This package does not include a kick pedal. Use with a commercially available kick pedal installed on the KD-85.
Please be aware that by using a felt beater, you risk causing damage to the head as a result of the metal portions of
the beater that can become exposed when the felt wears thin.
KD-85_e 1 ページ 2005年5月12日 木曜日 午前10時47分
Question and Answer IconNeed help?

Do you have a question about the Roland KD-85 and is the answer not in the manual?
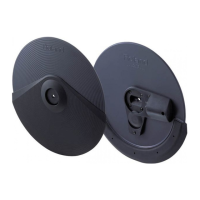
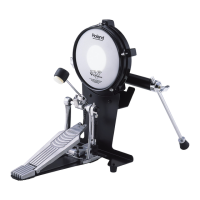
Roland KD-85 Specifications

General IconGeneral
TypeKick Drum Pad
Size8 inches
Surface MaterialMesh Head
CompatibilityRoland V-Drums and other electronic drum modules
Diameter8 inches

Summary

Adjusting the Head Tension

Tighten Tuning Bolts

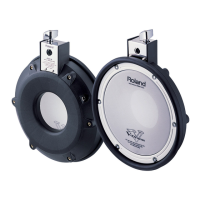
Tighten tuning bolts to achieve a 7.5 mm space between frame and hoop.

Fine-tune Adjustment

Continue adjusting tension while checking for desired feel and response.

Connecting to a Percussion Sound Module

Head Replacement

When to Replace the Head

Identify signs indicating the need for head replacement, such as tears.

Procedure for Head Replacement

Detailed steps for removing the old head and installing a new one.

Using the Unit Safely

About Warning and Caution Notices

Explanation of symbols indicating warnings and cautions for safe operation.

About the Symbols

Understanding symbols for important instructions, prohibitions, and required actions.

General Safety Guidelines

Crucial safety guidelines for operating the unit properly and safely.

Important Notes

Placement

Guidance on unit placement to prevent heat, moisture, and damage.

Maintenance

Instructions for cleaning the unit using appropriate cloths and detergents.

Additional Precautions

Advice on handling controls, cables, volume, and transportation.

Related product manuals