Do you have a question about the Russound KPSC and is the answer not in the manual?
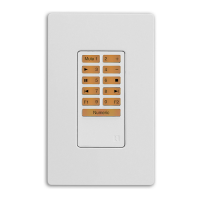
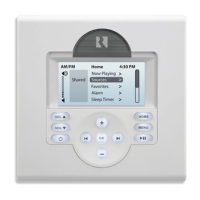
Details the front panel layout and primary control functions including numeric entry.
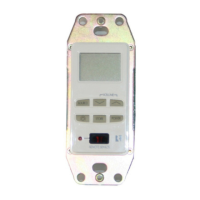
Describes the 12-pin connector located on the left side of the keypad.
Covers wire routing, electrical box requirements, wiring, and final assembly.
Comprehensive safety guidelines covering operation, environment, and servicing.
Specific warnings and care instructions for handling and cleaning the unit.
Explains primary source controls and the numeric entry mode functionality.
Details how to program and recall favorite settings using F1 and F2 buttons.
Lists physical dimensions, weight, and the 12-pin keypad port.
Details the 2-year warranty, what it covers, and common exclusions.
Outlines the process for returning the unit for warranty repair.
Lists the components included in the KPSC keypad package.
The KPSC Keypad is an in-wall, Decora® style single-gang keypad accessory designed to connect to a KP6 or KPL keypad (wall plate not included). This keypad provides source control and numeric control capability to the CAA66 system keypads. It features amber backlit, soft-touch control buttons for ease of use. It's important to note that the KPSC keypad cannot be used with a CAS44 controller system.
The KPSC keypad serves as an interface for controlling audio sources and entering numeric values within a compatible audio system. Its primary function is to extend the control capabilities of KP6 or KPL keypads by offering dedicated buttons for common audio operations and a numeric entry mode.
The KPSC keypad's front panel is organized for intuitive operation. It includes:
The KPSC keypad connects to a KP6 or KPL keypad via a 12-pin connector. For installation, a double-gang electrical box and faceplate are required. The installation process involves several steps:
The KPSC keypad enhances the functionality of a KP6 or KPL keypad by providing both source control and numeric input capabilities. The amber backlighting of the buttons ensures visibility and ease of use in various lighting conditions.
When the "Numeric" button is pressed, it illuminates in red, signaling the transition to numeric entry mode. This mode allows for the input of digits from 0 to 9. The system receives a "Prefix" command upon entering this mode. To exit numeric mode and return to source control, the "Numeric" button is pressed again, which sends a "Suffix" command. If no further input is made within 3 seconds, the system automatically sends a "Suffix" command and reverts to source control.
The F1 and F2 favorite buttons are programmed by pressing and holding them. This action saves the current input source and volume level settings. These saved settings can then be recalled with a single press. Users can overwrite existing favorite settings by simply pressing and holding the button again with new desired settings.
To ensure safe and proper operation of the KPSC keypad, several safety instructions must be followed:
The KPSC keypad is designed for durability and minimal maintenance. Regular cleaning of the front panel with a soft cloth is recommended to preserve its appearance. Avoid harsh chemicals or abrasive materials to prevent damage to the finish or lettering.
In the event of a malfunction or damage, the device is covered by a warranty. For any issues requiring service, it is crucial to contact Russound for a Return Authorization number before shipping the unit for repair. This ensures proper handling and adherence to warranty terms. The warranty covers defects in materials and workmanship for two years from the date of purchase, with Russound replacing defective parts and correcting workmanship issues at no charge.
However, the warranty does not cover damage from abuse, accidents, misuse, negligence, improper installation, power surges, lightning strikes, normal wear, altered products, or products with removed/defaced serial numbers. Purchasing from unauthorized dealers also voids the warranty.
When returning the unit for repair, it must be securely packed in a corrugated container with at least three inches of resilient material to protect it from transit damage.
This comprehensive description highlights the KPSC keypad's functionality, ease of use, installation process, and important safety and maintenance guidelines, ensuring users can effectively integrate and operate the device within their audio systems.
| Category | Keypad |
|---|---|
| Model | KPSC |
| Manufacturer | Russound |
| Finish | White |
| IR Repeater | No |
| Compatibility | Russound multi-room audio systems |
| Control | Source selection, volume control, power |
| Display | LED indicators |
| Voltage | 12VDC |
| Communication Protocol | Proprietary Russound protocol |
| Mounting | Wall mount |
| Dimensions | 4.5" x 2.75" x 1.25" (114mm x 70mm x 32mm) |