5B
TRAMPOLINE FRAME ASSEMBLY
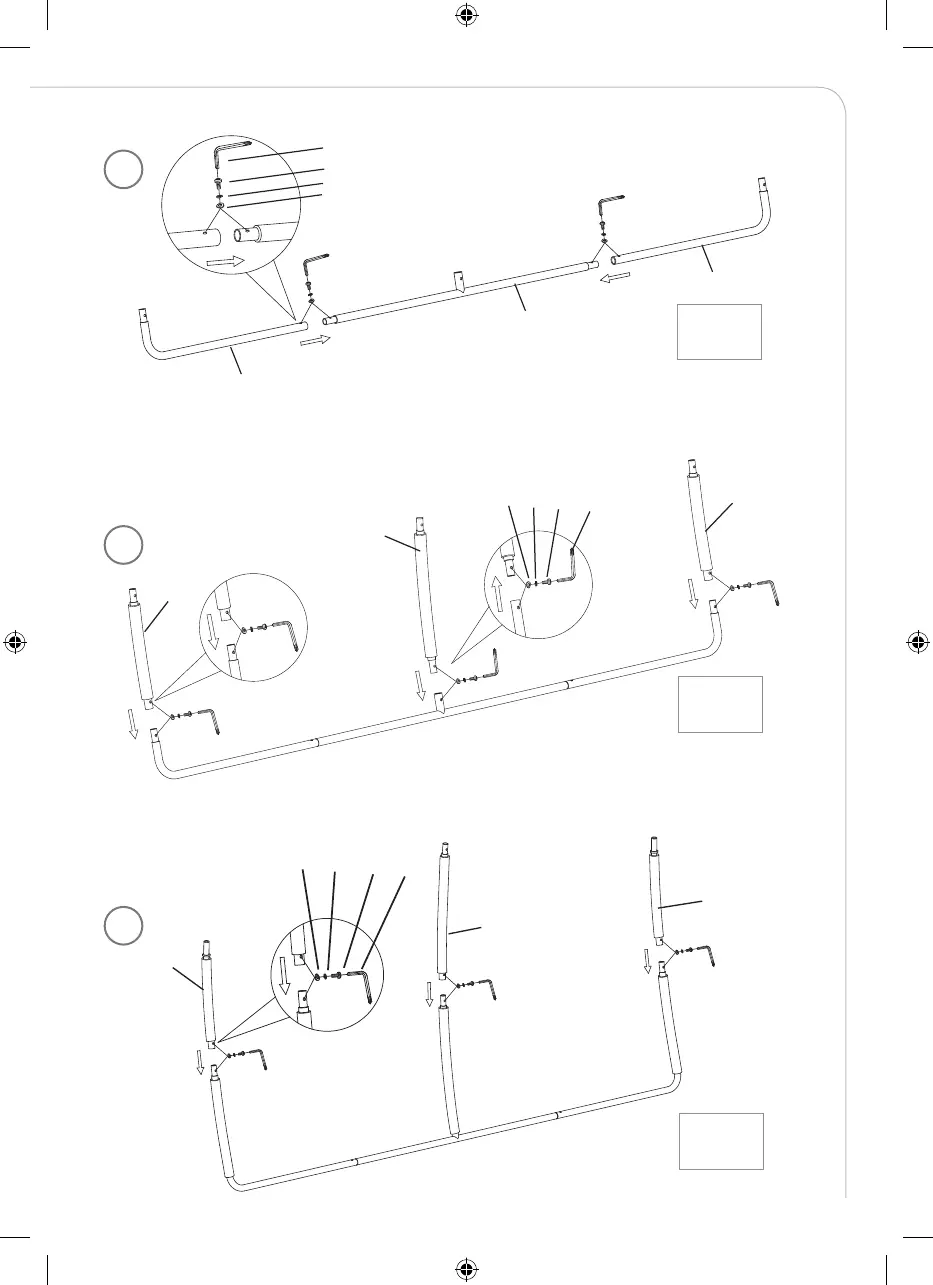
C. Connect Short Extension Tube (# 14) to the two ends and Long Extension Tube with Compressed End (#
16) to the center. Secure all parts using Arc Washer (# G), Spring Lock Washer (# E), Screw (# F) and Allen
Wrench (# I) as shown in FIGURE 9.
D. Connect Short Extension Tube with Reinforced Ring (# 13) to the two ends and Long Extension Tube (# 15)
to the center. Secure all parts using Arc Washer (# G), Spring Lock Washer (# E), Sc
rew (# F) and Allen
Wrench (# I) as shown in FIGURE 10. Repeat in the same manner for the other set of Side Leg Support.
5C
5D
TRAMPOLINE FRAME ASSEMBLY
Step 5 –Side Leg Support Assembly
A. Lay out all parts shown below in FIGURE 7.
B. Connect Left L-Shape Base (# 10) and Right L-Shape Base (# 11) to the two ends of T-Shape Base (# 12)
using Arc Washer (# G), Spring Lock Washer (# E), Screw (# F) and Allen Wrench (# I) as shown in FIGURE 8.
TRAMPOLINE FRAME ASSEMBLY
C. Connect Short Extension Tube (# 14) to the two ends and Long Extension Tube with Compressed End (#
16) to the center. Secure all parts using Arc Washer (# G), Spring Lock Washer (# E), Screw (# F) and Allen
Wrench (# I) as shown in FIGURE 9.
D. Connect Short Extension Tube with Reinforced Ring (# 13) to the two ends and Long Extension Tube (# 15)
to the center. Secure all parts using Arc Washer (# G), Spring Lock Washer (# E), Sc
rew (# F) and Allen
Wrench (# I) as shown in FIGURE 10. Repeat in the same manner for the other set of Side Leg Support.
x2
x2
x2
61
IM_759013120301_Trampoline_Advanced_550x400cm_v3.indd 61 2021-01-27 17:49