English (Original instructions)
leading to possible serious personal injury.
WARNING
To prevent accidental starting that could cause
VHULRXVSHUVRQDO LQMXU\ DOZD\V GLVFRQQHFWWKH
HQJLQHVSDUNSOXJZLUHIURPWKHVSDUNSOXJZKHQ
assembling parts.
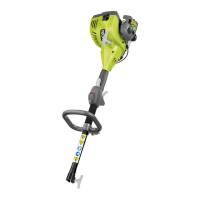
PACKING LIST
3RZHUKHDG
Front handle
6KRXOGHUVWUDS
2-cycle oil
&RPELQDWLRQZUHQFK
Operator's manual
Figure sheet
INSTALLING THE POWER HEAD SHAFT TO
THE ATTACHMENT (Fig. 2a)
Ŷ 7KHDWWDFKPHQWFRQQHFWVWRWKHSRZHUKHDGE\PHDQV
of a coupler device.
Ŷ /RRVHQ WKH NQRE RQ WKH FRXSOHU RI WKH SRZHU KHDG
shaft and remove the end cap from the attachment.
Ŷ Push in the button located on the attachment shaft.
$OLJQWKHEXWWRQZLWKWKHJXLGHUHFHVVRQWKHSRZHU
KHDGFRXSOHUDQGVOLGHWKHWZRVKDIWVWRJHWKHU
Ŷ Rotate the attachment shaft until the button locks into
the positioning hole.
NOTE: If the button does not release completely in
the positioning hole, the shafts are not locked into
SODFH6OLJKWO\URWDWHIURPVLGHWRVLGHXQWLOWKHEXWWRQ
is locked into place.
Ŷ Tighten the knob securely.
WARNING
Be certain the knob is fully tightened before
operating the equipment; check it periodically for
tightness during use to avoid serious injury.
REMOVING THE ATTACHMENT FROM THE POWER
HEAD
Ŷ Loosen the knob.
Ŷ 3XVKLQWKHEXWWRQDQGWZLVWWKHVKDIWVWRUHPRYHDQG
separate the ends.
ATTACHING THE HANGER CAP (Fig. 2b)
Ŷ To use the hanger cap, push in the button and place
WKHKDQJHUFDSRYHUWKHORZHUHQGRIWKHDWWDFKPHQW
shaft.
Ŷ 6OLJKWO\URWDWHWKHFDSIURPVLGHWRVLGHXQWLOWKHEXWWRQ
locks into place.
NOTE: The secondary hole in the attachment shaft can be
XVHGIRUKDQJLQJSXUSRVHVDVZHOO
ATTACHING THE FRONT HANDLE (Fig. 2c)
1. Remove the securing bolts and bracket from the front
handle.
2. Align the pin into upper shaft slot.
3. Install the front handle onto the upper shaft.
Note7KHIURQWKDQGOHVKRXOGWLOWVOLJKWO\WRZDUGVWKH
RSHUDWRUZKHQFRUUHFWO\ILWWHG
4. Place the securing bolts through the front handle
and securely tighten them into the captive nuts on the
bracket.
Note: Do not attempt to remove the pin on the bracket,
this pin limits the upper position of the front handle.
ATTACHING THE SHOULDER STRAP (Fig. 2d)
Ŷ Connect the latch on the shoulder strap to the strap
hanger.
Ŷ Adjust the shoulder strap hanger to a balanced
SRVLWLRQ ZKHUH WKH EODGH RU FXWWHU DWWDFKPHQW ZLOO
VXVSHQG EHWZHHQ PP WR PP DERYH WKH
ground surface.
Ŷ Adjust the strap hanger to a comfortable position.
Note: To quickly release the product from the shoulder
strap, sharply pull the quick release tab.
OPERATION
WARNING
5HDG WKH RSHUDWLRQ PDQXDO DQG IROORZ DOO
ZDUQLQJVDQGVDIHW\LQVWUXFWLRQV
WARNING
Wear eye, hearing, and head protection.
WARNING
Keep all bystanders, especially children and
pets, at least 15m from the operating area.
WARNING
'RQRWDOORZIDPLOLDULW\ZLWKWKLVSURGXFWWRPDNH
you careless. Remember that a careless fraction
of a second is sufficient to inflict serious injury.
WARNING
Do not use any attachments or accessories
not recommended by the manufacturer of this
product. The use of attachments or accessories
not recommended can result in serious personal
injury.
13
 Loading...