13
If after cleaning the quartz sleeve, there is no signifi cant improvement in the ultraviolet intensity, as shown on the intensity meter,
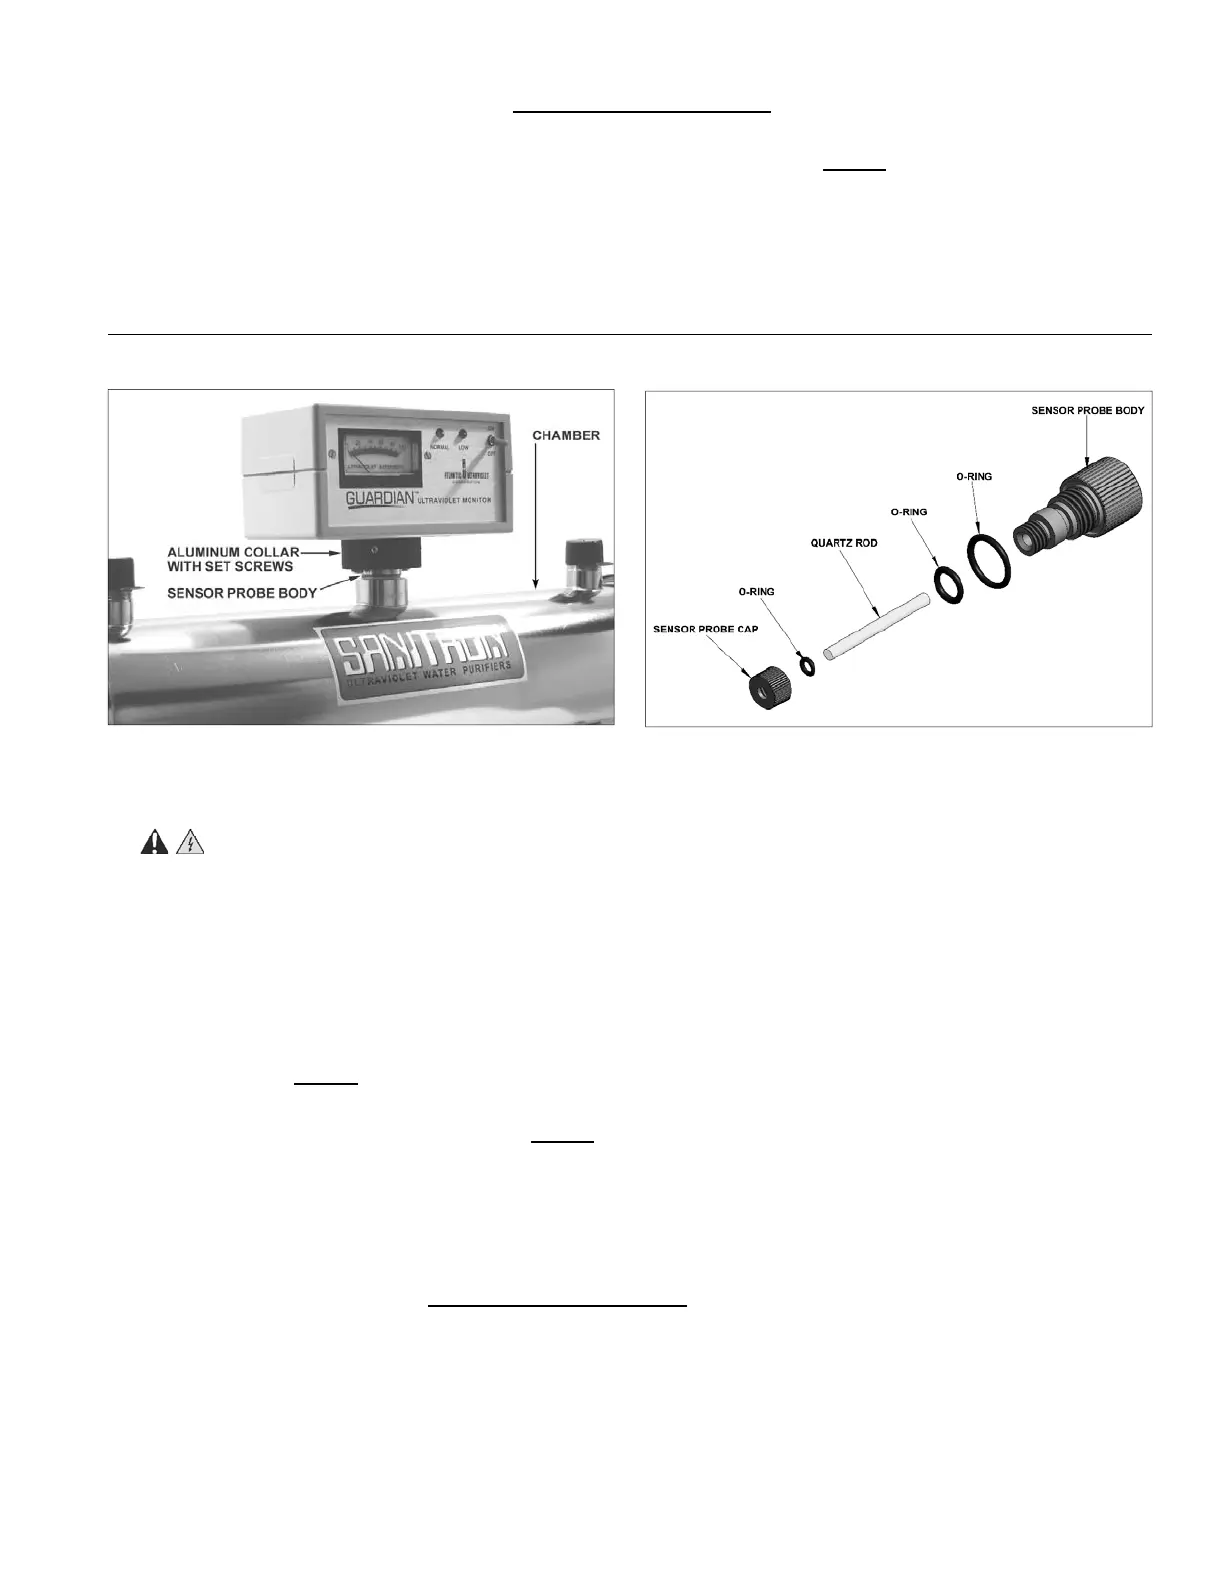
it may be necessary to clean the Ultraviolet Monitor’s sensor probe. The sensor probe body mounts in a fi tting, located in the
center of the disinfection chamber, and protrudes into the chamber.
1. WARNING: Disconnect power to water purifi er.
2. Shut off water supply to the water purifi er via the inlet and outlet shut off valves. Drain the chamber by removing the drain
plug. Once the chamber is drained, remove any old sealing tape from the threads of the drain plug, rewrap with 1/2” wide
Tefl on® thread sealing tape, reinstall and tighten the drain plug.
3. Disconnect power to the Ultraviolet Monitor; remove from chamber by loosening the two setscrews on the aluminum collar
and lifting it free from probe body.
4. Unscrew the sensor probe and remove from the chamber.
5. Remove the quartz rod sensor probe cap, from the probe body. Take care not to damage the quartz rod, o-ring or the threads
of the probe body. NOTE: It is recommended, when servicing the sensor probe, to work in a clean, dry area.
6. Once the quartz rod is removed, clean with alcohol or a mild detergent, and rinse with clean water. Stubborn stains usually
can be removed with a dilute hydrochloric acid. NOTE: Follow all manufacturer’s instructions and precautions when
handling chemicals. Once the quartz rod has been cleaned, handle the rod by the sides, to avoid getting fi ngerprints on the
quartz rod faces.
7. Clean the probe body, by removing any dirt or deposits on all surfaces. O-rings should be inspected and can be replaced if
worn or damaged.
8. Reassemble, replacing the o-rings, quartz rod and securing in place with the quartz rod sensor probe cap. Tighten the quartz
rod sensor probe cap by hand only, DO NOT USE HAND TOOLS. Tightening with hand tools may damage the quartz rod
or o-ring seal.
9. Reinstall sensor probe into the center fi tting of the chamber and hand tighten.
10. Slowly restore water supply to the water purifi er, pressurize, and check for leaks. Once it is determined that there are no
leaks, inlet valve can be fully opened.
11. Reposition Ultraviolet Monitor on probe body and tighten set screws.
12. Restore power to the water purifi er and ultraviolet monitor. If after the cleaning of the quartz rod, there is still no signifi cant
improvement in the ultraviolet intensity, as shown on the intensity meter, proceed to the “Troubleshooting” section.
12. Re-install o-rings, Tefl on® washers, and static gland nuts. Be sure o-rings are placed on quartz sleeve before Tefl on® washer.
Tighten static gland nuts fi rmly by hand only, DO NOT USE HAND TOOLS. Tightening with hand tools is likely to cause
quartz sleeve to break.
13. Re-assemble ballast housing to purifi er chamber, using hardware removed in Step 2. NOTE: When re-assembling ballast
housing to purifi er chamber, electrical power cord should exit ballast housing from the end mounted opposite the drain plug.
14. When all connections are complete, allow water to enter the water purifi er at a low fl ow rate until the purifi er is pressurized.
With the purifi er pressurized, it should be checked for leaks.
15. See “Lamp Installation or Replacement” section to properly re-install the lamp into the water purifi e
r.
OPTIONAL GUARDIAN
TM
ULTRAVIOLET MONITOR SENSOR PROBE CLEANING
Figure 7- Ultraviolet Monitor and Sensor Probe
Figure 8 - Sensor Probe