3-13
Control of 3-WAY ECO-i SYSTEM
1
2
3
4
5
6
7
8
2. Wireless Remote Controller
Common to All Models
2. How to Install the Wireless Remote
ontroller Receiver
2-1. Warning about Installation of Receivers
The wireless remote uses a very weak infrared light for its signal, which can result in the signal not being received
because of the following influences, so take care in where the unit is installed.
• Inverter or rapid-start type fluorescent lights. (Models without glow lamps)
• Plasma display or LCD televisions.
• Direct sunlight or other sources of bright light.
2-2. Warning about Installing Remote Controls
2-3. Things to remember when wired and wireless remotes are installed at the same time
If a remote control is to be operated from a remote control holder that is hung on a wall, turn on the lights in the
room as well as any electrical appliances and then check to make sure the air conditioner works with the remote
control in the location where it will be installed. If it works, continue with installation.
(1)
If the air conditioner is to be switched from the main sensor to a remote control sensor, pay attention to the
following when installing.
• Locate where no warm or cold drafts will affect it.
• Locate in a place free from direct sunlight.
• Locate where it will not be affected by any other heat/cold source.
(2)
Two remote controls can be used to control the unit if the wireless remote control kit is installed at the same time as the
wired remote control. (Up to 2 remotes [a wireless remote kit and the wired remote control] can be installed.)
When using 2 remotes, one or more units can be operated by the remotes.
If the wireless remote control is to be the secondary, turn the #3 switch on the wireless receiver (operation panel) from OFF
to ON. In case of RCS-XM18BG.WL, turn the switch on the wireless receiver from [MAIN] to [SUB].
When wiring remote controls, be sure to double-check the terminal numbers of the indoor unit before connecting
them so there are no mistakes in the wiring. (Damage will occur if high voltage [e.g. supply voltage] is applied.)
1.
It is not possible to use more than one wireless remote control kit with one indoor unit. (A receiver located separately can
be used at the same time.)
2.
If both a wireless and a wired remote control are to be installed and used at the same time, one of them must be set up as
the sub remote control.
3.
If the wired remote control is to be the sub remote, change the wired remote control to the sub remote.
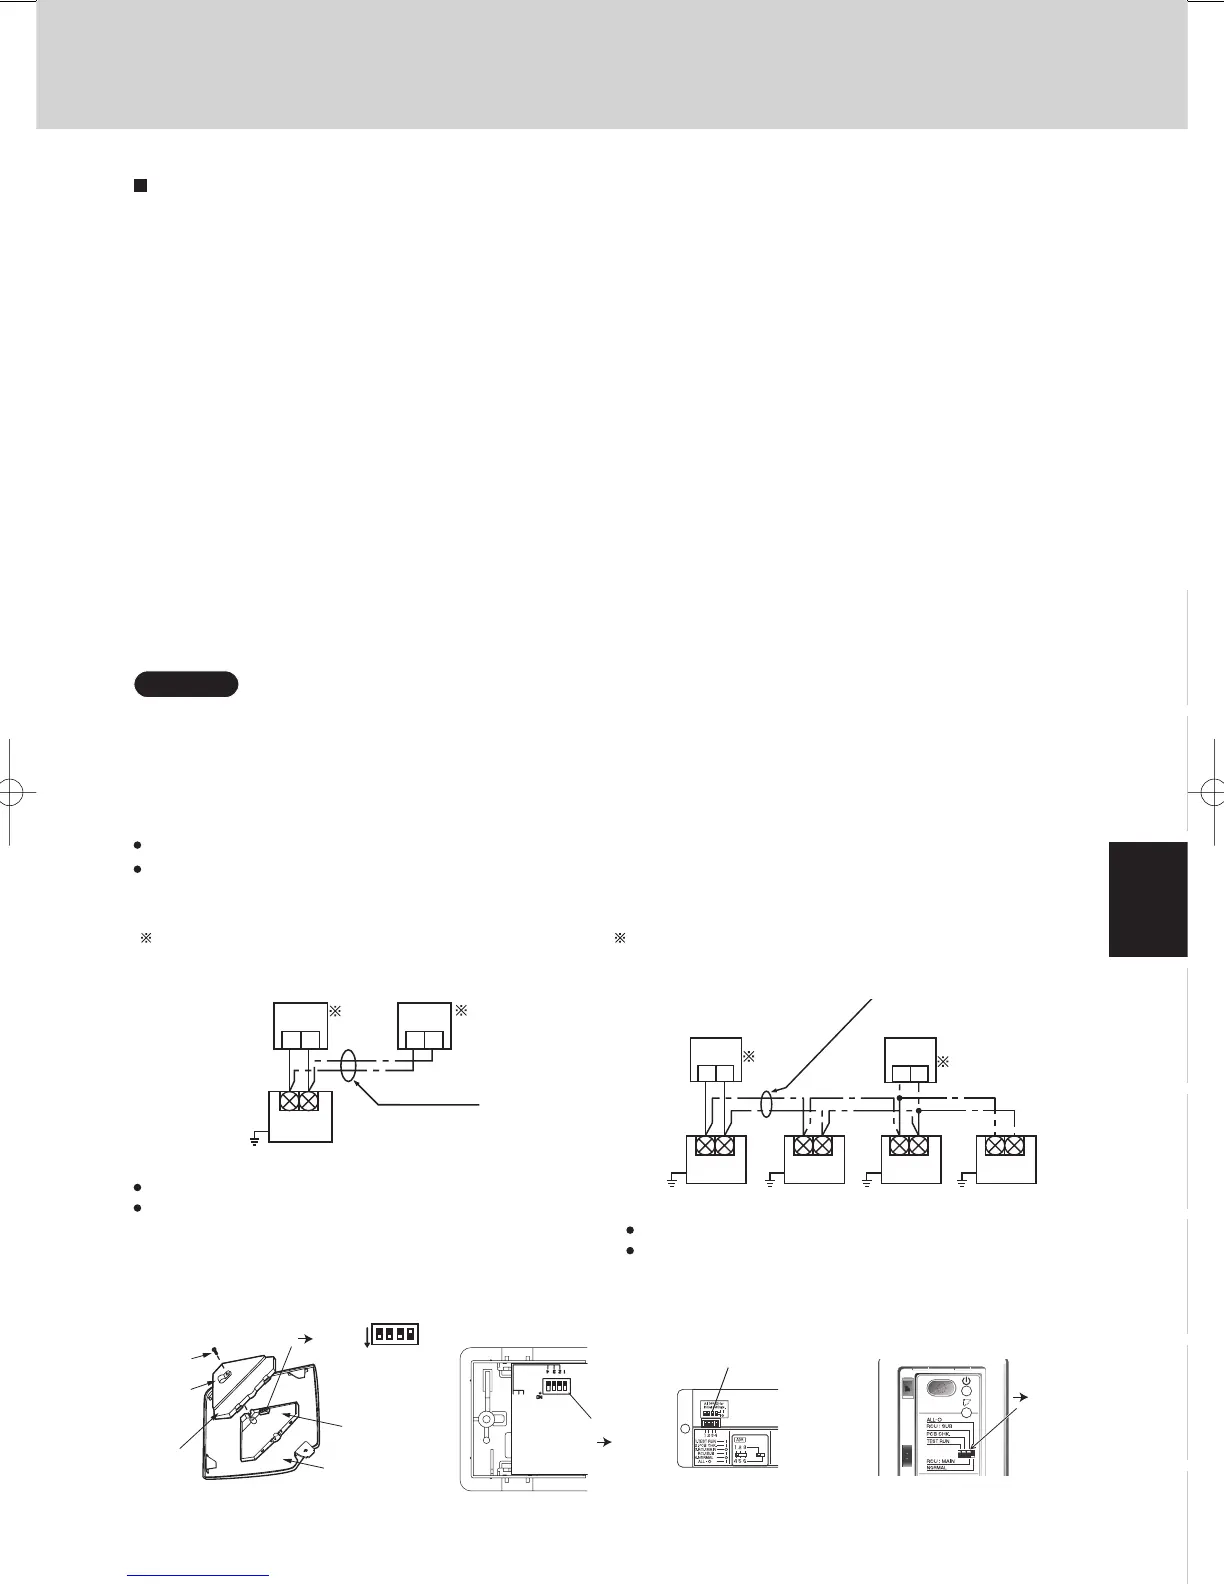
When 1 indoor unit is operated by 2 remote controls:
Either of the remotes can be set to main/sub.
Wireless Remote Control Kit
Wired Remote Control
Receiver
(Sold Separately) (Sold Separately)
Remote Control Wiring
(Field Supply)
Indoor Unit
Grounding
wire Earth
Use wiring of 0.5 mm
2
to 2 mm
2
for field supply.
Use a total wire length of no more than 400 m.
(Main)
(Sub)
If a group of units are to be controlled by 2 remote controls;
Main/sub remote controls will work regardless of which indoor
unit they are installed to.
Wireless Remote
Control Kit
Wired Remote
Control
1st Indoor
Unit
2nd Indoor
Unit
3rd Indoor
Unit
4th Indoor
Unit
(Main)
(Sub )
Grounding
wire (Earth)
Cross-wiring Remotes for Group
Control (Field Supply)
Use wiring of 0.5 mm
2
to 2 mm
2
for eld supply.
Make the total wire length when cross-wiring a group no
more than 200 m.
RCS-SH80BG.WL
DIP Switch 3
RCS-SS80BG.WL
S003
Bit 3: OFF ON
Screw
Cable
clamp
PCB
Cover
Receiver PCB
Adjustable
Corner Cap
1
2
3
4
ON
S003
Bit 3: OFF ON
RCS-TRP80BG.WL RCS-BH80BG.WL
RCU: MAIN
RCU: SUB
CN1
12 12
CN1
12 12
NOTE
TD831143-00W-3WAY.indb13TD831143-00W-3WAY.indb13 2008/12/0110:26:232008/12/0110:26:23
 Loading...