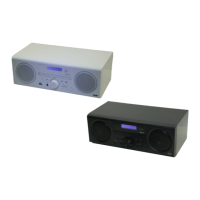
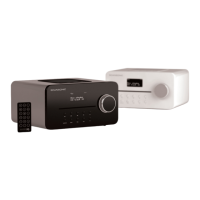
20
Bluetooth® operation
The unit has a Bluetooth function that can receive a signal within 8 metres.
Pairing the unit with a Bluetooth device to listen to music:
1. While in the ON mode, press MODE repeatedly on the unit or press
BLUETOOTH on the remote to select Bluetooth mode.
2. IftheunitisnotpairedwithanyBluetoothdevice,thedisplaywillash
“BT LINK”.
3. Activate your Bluetooth device and select the search mode.
4. “BT speaker N” will appear on your Bluetooth device list.
5. Select “BT speaker N” and enter “0000” for the password if necessary.
6. To disconnect the Bluetooth function, switch to another function on the
unit or disable the function from your Bluetooth device.
USB operation
1. When a USB device is connected to the unit, press MODE repeatedly
on the unit or press USB on the remote to select USB mode.
2. The unit will automatically display the total number of tracks.
3. All playback features are the same as if you were playing an MP3 CD.
general operation
powering ON/OFF
Scan Time
00:00:00” and synchronize to the current local time if you can receive a DAB signal in your
location. After approximate one minute, it will switch to STANDBY mode.
t Press on the unit or press ON/STAND-BY on the remote control to switch the unit to
ON mode.
t Press to switch the unit back to STANDBY mode.
t
completely.
t When the unit is idle for approximately 15 minutes, it will automatically switch to standby.
t
selecting modes
Press MODE repeatedly to switch between DAB, FM, CD, USB, AUX and Bluetooth modes.
adjusting the volume
t Turn the VOLUME +/– dial on the unit or press VOLUME +/– on the remote control to
adjust the volume.
t
MUTE on the remote control. Press MUTE again
or press VOLUME +/– on the remote control or turn VOLUME +/– to resume normal
listening.
auto setting the clock
The clock can be updated automatically if you can receive a DAB signal in your location.
In order to synchronise to the current local time you must leave it on the DAB station for a
short period of time.
manually setting the time
1. During Standby mode, press and hold CLOCK on the remote control. The hour digits
2. Press to adjust the hour digits, and then press CLOCK
3. Press to adjust the minute digits, and then press CLOCK
4. The time is now set.
15
MODE repeatedly on the unit or press
CD, USB, TUNER/DAB, AUDIO IN,
BLUETOOTH on the remote
• If the signal strength is weak, your Bluetooth receiver may
disconnect, but it will re-enter pairing mode automatically.
• For better signal reception, remove any obstacles between the
unit and the Bluetooth device.
• TheunitsupportsA2DP(AdvancedAudioDistgributionProle)
andAVRCP(AudioVideoRemoteControlProle)functions.
This can only be paired with one Bluetooth device at one time.
• Compatibility with all devices and media types is not guaranteed.
• Some mobile phones with the Bluetooth funtion may connect
and disconnect as you make and end calls. This is not an
indication of a problem with your unit.
battery replacement for the remote control
The remote control requires a LR6 1.5V AA/AM3 battery.
1. Open the battery cover.
2. Insert the supplied battery according to the direction indicated in the battery compartment.
When inserting or removing the battery, push it towards the (–) battery terminals.
3. Close the cover.
Handling the Battery
t Improper or incorrect use of batteries may cause corrosion or battery leakage, which could
t Install the battery correctly in the battery compartment. Normally the battery’s positive
polarity (+) will face up.
t Use only the battery type indicated in this manual.
t Do not dispose of the used battery as domestic waste. Dispose of it in accordance with
local regulations.
t Small button cell batteries such as the one used in the remote control are easily swallowed
by young children and this is dangerous. Keep loose button cells away from young children
and make sure that the battery is secure in the remote control. Seek medical advice if you
believe a battery cell has been swallowed.
11
• TheunitcanonlyplayMP3leformatinUSBoperation.
• IfyourUSBdeviceisloadedwithMP3’sbutthedisplaykeeps
showing“NO”onthedisplay,theformatofyourdevicemightnotbe
compatiblewiththeunit.
• ThisunitsupportsUSBversions1.1and2.0.
• TheunitcansupportUSBdeviceswithupto32GBofmemory.
• TheunitmaynotbecompatiblewithallUSBdevicesandmemory
cards,thisisnotanindicationofaproblemwiththeunit.
 Loading...