17
• Theuseofincorrectordamagedmainscablescanlead
to injuries caused by electricity.
• Theoperatinginstructionssuppliedwiththespecial
accessories must be observed and carefully read when
Scheppach special accessories are used.
• Even when all safety measures are taken, some re-
maining hazards which are not yet evident may still
be present.
• Remaininghazardscanbeminimizedbyfollowingthe
instructionsin“SafetyPrecautions“,“ProperUse“and
in the entire operating manual.
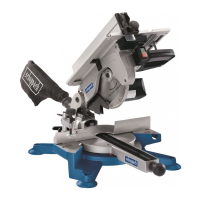
Assembly
Important:
When unpacking, take care to locate all the small parts of
the machine supplied inside the carton box.
Fig. 1
Place the table top (1) onto a work bench after having
removed the packing pad a underneath the motor.
Fig. 1.1
Fastenthebaseleg(2)ontothetabletopusing2hexa-
gon bolts M6 x 16, 2 washers 6 and 2 nuts M6. Tighten
the bolts slightly by hand.
Fig. 2
Fasten the switch (6)to the tabletop using 2 hexagon
bolts M6 x 16, 2 washers 6, and 2 nuts M6.
• Obrażenia spowodowane wadliwymi piłami
tarczowymi. Piły tarczowe powinny być regularnie
sprawdzane przed każdym użyciem pod kątem ich
niezawodności.
• Zagrożenie porażeniem prądem związane z użyciem
niewłaściwych przewodów elektrycznych.
• Przy podłączaniu dodatkowych akcesoriów należy
dokładnie przestrzegać zapisów instrukcji obsługi.
• Pomimo podjętych środków ostrożności może wystąpić
pewne ryzyko.
• W przypadku przestrzegania zasad bezpieczeństwa,
wskazówek niniejszej instrukcji obsługi oraz właściwego
stosowania ryzyko można zminimalizować.
Montaż
Uwaga! Podczas rozpakowywania zwróć uwagę, czy
w wewnętrznych częściach opakowania nie znajdują
się małe części maszyny!
Rys.1
Połóż blat stołu (1) na stół warsztatowy (folię
zabezpieczającą spod silnika należy usunąć).
Rys.1.1
Zamontuj nogę stojaka (2) do blatu stołu za pomocą 2
sześciokątnych śrub M6 x 16, 2 podkładek 6 i 2 nakrętek
M6.
Rys.2
Zamontuj przełącznik (6) do blatu stołu za pomocą 2
sześciokątnych śrub M6 x 16, 2 podkładek 6 i 2 nakrętek
BA hs 120o (st 12).indd 17 08.04.11 10:50