A DIN UNIT MAY REQUIRE
DASH MODIFICATIONS.
NOTA: La instalación de
una unidad DIN puede
requerir modifi car el
tablero del vehículo.
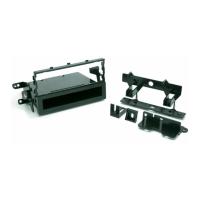
1980-88 Ford Thunderbird
1983-88 Mercury Cougar
RADIO REMOVAL:
1. Remove two screws from the pocket between
the ashtray and radio trim. Remove the pocket.
2. Remove four screws from the radio trim: two
from the top, and two from the bottom edge.
3. Remove the radio trim.
4. Remove four screws retaining the radio and remove the radio.
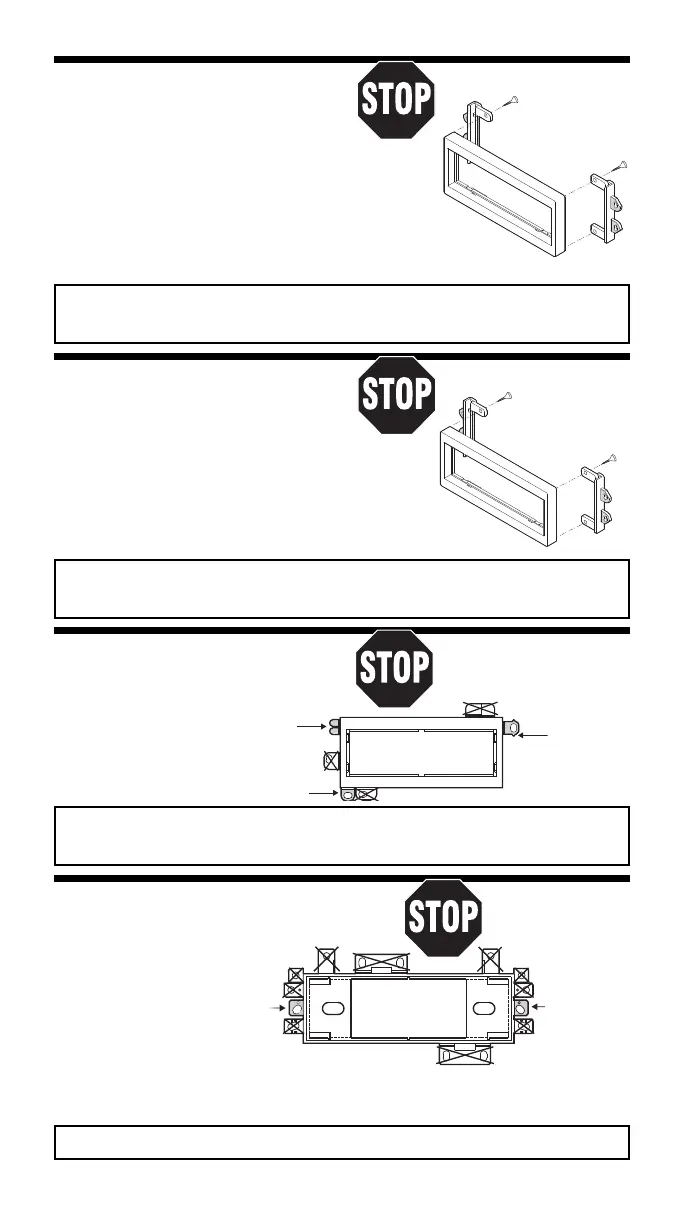
SECURE THE BRACKETS TO THE BOSSES LOCATED ON THE BACK SIDE OF THE
KIT WITH THE SUPPLIED HARDWARE. SEE PAGE 3.
Asegurar los braquetes en sus ranuras en la parte posterior del juego usando los
tornillos autoenroscantes provistos. Ver la página 3.
Read pages 2-4 for kit assembly.
NOTE: INSTALLATION OF
A DIN UNIT MAY REQUIRE
DASH MODIFICATIONS.
NOTA: La instalación de
una unidad DIN puede
requerir modifi car el
tablero del vehículo.
Disconnect the power, antenna and all speaker & electrical connections.
USE THE SHADED MOUNTING TABS AND THE INDICATED BRACKETS. CUT OFF THE REMAINING TABS
AND DISCARD. FOR DIN ISO INSTALLATION, SEE PAGE 4.
Usar las pestañas sombreadas y los braquetes indicados. Cortar las pestañas restantes y descartarlas.
Para la instalación de radios DIN ISO ver la página 4.
1980-82 Mercury Cougar XR-7
Read pages 2-4 for kit assembly.
NOTE: INSTALLATION OF
RADIO REMOVAL:
1. Remove three screws inside the ashtray
from the radio trim panel.
2. Remove the radio knobs, pull the trim panel out from
the bottom & remove it.
3. Remove four screws securing the radio mounting bracket to
the dash, and pull the assembly out.
4. Disconnect the power, antenna, and all speaker & electrical connections.
SECURE THE BRACKETS TO THE BOSSES LOCATED ON THE BACK
SIDE OF THE KIT WITH THE SUPPLIED HARDWARE. SEE PAGE 3.
Asegurar los braquetes en sus ranuras en la parte posterior del juego
usando los tornillos autoenroscantes provistos. Ver la página 3.
Read pages 2-4
for kit assembly.
USE THE SHADED MOUNTING TABS AND THE INDICATED BRACKETS. CUT OFF THE REMAINING TABS
AND DISCARD. FOR DIN ISO INSTALLATION, SEE PAGE 4.
Usar las pestañas sombreadas y los braquetes indicados. Cortar las pestañas restantes y descartarlas.
Para la instalación de radios DIN ISO ver la página 4.
USE THE SHADED MOUNTING TABS AND THE INDICATED BRACKETS. CUT OFF THE REMAINING TABS
AND DISCARD. FOR DIN ISO INSTALLATION, SEE PAGE 4.
Usar las pestañas sombreadas y los braquetes indicados. Cortar las pestañas restantes y descartarlas.
Para la instalación de radios DIN ISO ver la página 4.
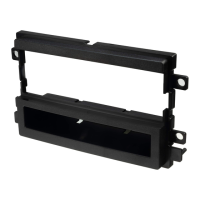
#2190 PANEL
USE THESE
SUPPORT TABS
AS REQUIRED
Usar tantas de estas
pestañas como sea
necesario
USE THIS BRACKET
Usar este braquete
REMOVE
ALIGNMENT
PIN - BOTTOM
Sacar la
clavija de
alineamiento
- Inferior
Read pages 2-4
for kit assembly.
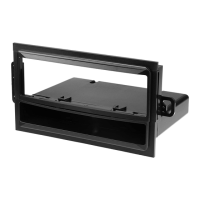
#1550 PANEL
USE
BRACKETS
SHOWN
Usar los
braquetes que
se muestran.
USE
BRACKETS
SHOWN
Usar los
braquetes que
se muestran.
1997-01 Jeep Cherokee
RADIO REMOVAL:
1. Pop out dash bezel
bottom fi rst and
remove.
2. Extract two screws
holding radio,
unplug and remove.
1984-96 Jeep Cherokee
1985-92 Jeep Commanche
1984-91 Jeep Grand Wagoneer
RADIO REMOVAL:
1. Remove two screws
from the instrument
panel, one from
above the cigarette
lighter, and one from
above the headlight switch. Unsnap and remove the lower
steering column trim piece and remove the trim panel.
2. If equipped with a factory radio, remove the two screws
securing the radio brackets to the dashboard.
3. Pull the radio out of the cavity, disconnect all electrical connections, then remove the radio.
USE THE SHADED MOUNTING TABS AND THE INDICATED BRACKETS. CUT OFF THE REMAINING TABS AND DISCARD.
Usar las pestañas sombreadas y los braquetes indicados. Cortar las pestañas restantes y descartarlas.
21
 Loading...