1996-98 Jeep Grand Cherokee
Read pages 2-4
RADIO REMOVAL:
for kit assembly.
1. Extract five screws from along top of dash instrument bezel.
2. Carefully pop out wood grain trim panel around A/C heater control.
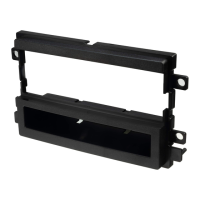
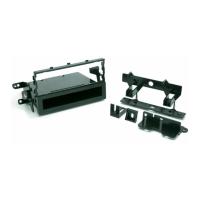
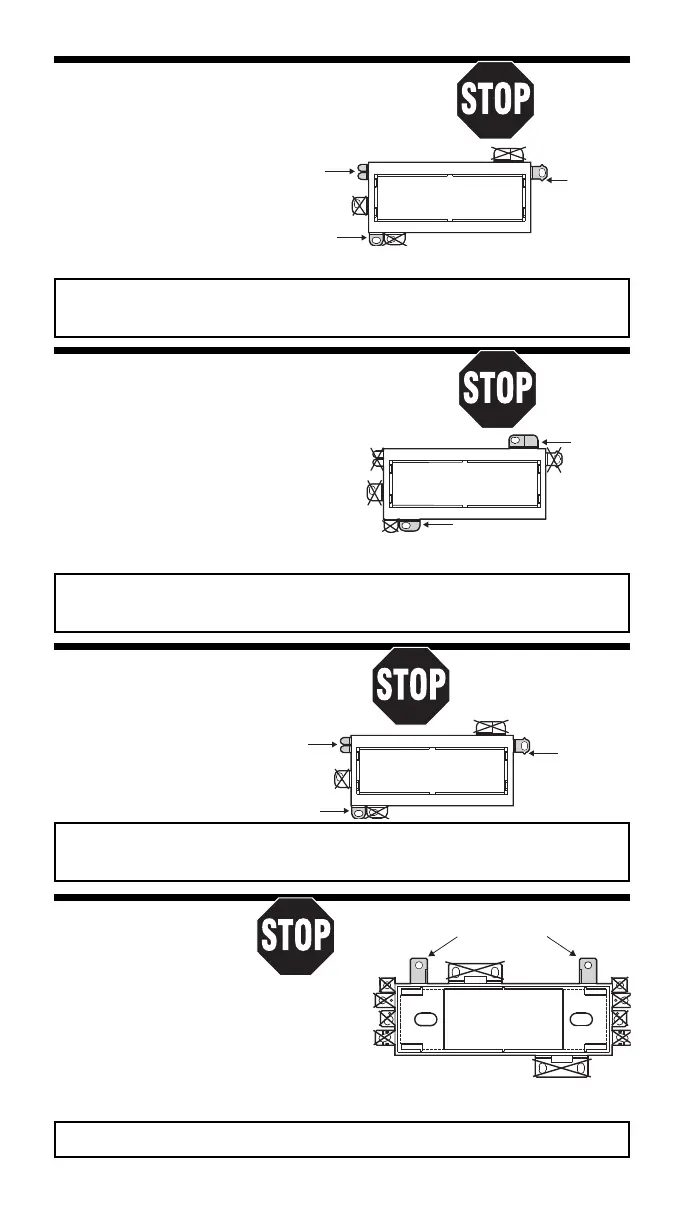
#2190 PANEL
REMOVE
3. Carefully pop out wood
USE THESE SUPPORT
ALIGNMENT
grain trim panel around
TABS AS REQUIRED
PIN -
Usar tantas de estas
BOTTOM
headlight switch.
pestañas como sea
Sacar la
4. Extract four screws from
necesario
clavija de
along bottom of dash
alineamiento
- Inferior
instrument bezel, lift up
USE THIS BRACKET
Usar este braquete
and away to remove.
5. Extract two 3/8'' hex heard bolts holding radio, unplug connectors and remove.
USE THE SHADED MOUNTING TABS AND THE INDICATED BRACKETS. CUT OFF THE REMAINING TABS
AND DISCARD. FOR DIN ISO INSTALLATION, SEE PAGE 4.
Usar las pestañas sombreadas y los braquetes indicados. Cortar las pestañas restantes y descartarlas.
Para la instalación de radios DIN ISO ver la página 4.
1993-95 Jeep Grand Cherokee
Read pages 2-4
for kit assembly.
1992 Jeep Grand Wagoneer
RADIO REMOVAL:
1. Extract two screws from above the radio securing the radio trim bezel.
2. Extract two screws from above the diagnostics
display panel securing the radio trim bezel.
3. Carefully remove the ashtray and extract two
screws located in the ashtray cavity securing
the radio trim bezel.
4. Pull the radio trim bezel away from the dash,
unplug all connectors and remove the bezel.
5. Extract two nuts securing the radio to the dash, and pull the radio
from the cavity; unplug all connectors and remove the radio.
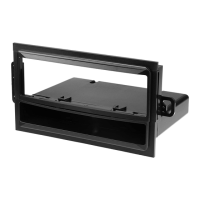
#2190 PANEL
USE THIS BRACKET (BOTTOM)
Usar este braquete (Inferior)
USE THIS
BRACKET
(TOP)
Usar este
braquete
(Superior)
USE THE SHADED MOUNTING TABS AND THE INDICATED BRACKETS. CUT OFF THE REMAINING TABS
AND DISCARD. FOR DIN ISO INSTALLATION, SEE PAGE 4.
Usar las pestañas sombreadas y los braquetes indicados. Cortar las pestañas restantes y descartarlas.
Para la instalación de radios DIN ISO ver la página 4.
#2190 PANEL
1997-02 Jeep Wrangler
RADIO REMOVAL:
1. Extract two screws
USE THESE
from dash bezel.
SUPPORT TABS
2. Pry on bezel to release
AS REQUIRED
Usar tantas de estas
spring clips and remove.
pestañas como sea
3. Extract two screws
necesario
holding radio, unplug
USE THIS BRACKET
and remove.
Usar este braquete
Read pages 2-4
for kit assembly.
REMOVE
ALIGNMENT
PIN -
BOTTOM
Sacar la
clavija de
alineamiento
- Inferior
USE THESE BRACKETS
1984-95 Jeep Wrangler
Read pages 2-4
Usar estos braquetes
for kit assembly.
RADIO REMOVAL:
1. Remove three screws from the
lower edge of the dash trim.
2. Extract three screws from the upper
edge of the dash trim.
3. Remove the dash trim.
4. If the vehicle is not equipped with a factory radio,
remove two screws securing the pocket and remove
the pocket. If the vehicle is equipped with a factory radio,
remove two screws from the radio mounting bracket.
USE THE SHADED MOUNTING TABS AND THE INDICATED BRACKETS. CUT OFF THE REMAINING TABS
AND DISCARD. FOR DIN ISO INSTALLATION, SEE PAGE 4.
Usar las pestañas sombreadas y los braquetes indicados. Cortar las pestañas restantes y descartarlas.
Para la instalación de radios DIN ISO ver la página 4.
#1550 PANEL
5. Pull the radio out of the cavity, disconnect all electrical connections, then remove the radio.
USE THE SHADED MOUNTING TABS AND THE INDICATED BRACKETS. CUT OFF THE REMAINING TABS AND DISCARD.
Usar las pestañas sombreadas y los braquetes indicados. Cortar las pestañas restantes y descartarlas.
22
 Loading...