Secure the ends of all hoses to the hose tails with two stainless steel worm-drive hose clips,
ensuring that all inlet connections are airtight and that all outlet connections are watertight.
The Discharge Elbow (key 16) may be rotated 360° to suit your installation. Always slacken
the 2 securing screws, adjust the discharge elbow to the required position and re-tighten the 2
securing screws before you connect the hose to it.
Remove the white hose supplied with the toilet, which connects the flushing pump outlet tail to the elbow
(key 12).
Replace the white hose with a longer length of 19mm (3/4") id hose and arrange it to form an anti-syphon
loop whose highest point is at least 20cm (8") above the highest possible waterline, and fit the Vented Loop
at the highest point.
Secure the ends of all hoses with two stainless steel worm-drive hose clips.
Rotate the intake seal (key 5) so that the elbow points upwards.
OPTION 1: TOILET BELOW THE WATERLINE
5.2 INLET PIPEWORK - 2 OPTIONS
6
page
5
page
YOU MUST fit a 19mm (3/4") Vented Loop fitting, Run the inlet hose by the most direct
route from the inlet seacock to the flushing pump inlet tail.
If the toilet is connected to ANY through-hull fittings, and if the rim of the bowl falls below the waterline,
water may flood in causing the craft to sink, which may result in loss of life.
Therefore, if the rim of the toilet is less than 20cm (8") above the waterline when the craft is at rest, or if
there is ANY possibility that the rim of the bowl may be below the waterline at ANY time, a ventilated anti-
syphon loop MUST be fitted in any pipework connected to a through-hull fitting, irrespective of whether inlet
or outlet.
USE VENTED LOOPS!
SPECIAL NOTE 1:
The smaller bore inlet pipework is more hazardous than the larger outlet pipework. Unless there is a
ventilated anti-syphon loop in the inlet pipework, water will flow into the bowl whenever both the inlet
seacock is open and the rim of the bowl is below the actual waterline.
Although moving the Flush Control Lever (key 24) to the "Shut" position will restrict the flow, this lever
CANNOT be relied upon as a shut-off valve.
Making a loop in the hose without fitting a vent may be just as hazardous as no loop at all, because water
may syphon over a loop. It is the vent that actually prevents the syphon.
Run the inlet hose by the most direct route from the inlet seacock to the flushing pump inlet tail.
For maximum convenience of use, install a 19mm (3/4") in-line non-return valve next to the inlet seacock,
which will ensure that the pump remains primed in between usages.
OPTION 2: TOILET ALWAYS ABOVE THE HEELED WATERLINE
YOU MAY need A 19mm (3/4") non-return valve
5.3 OUTLET PIPEWORK - 4 OPTIONS
Arrange the outlet hose to form a loop which is at least 20cm (8") above the highest possible waterline, and
fit the vented loop at the highest point.
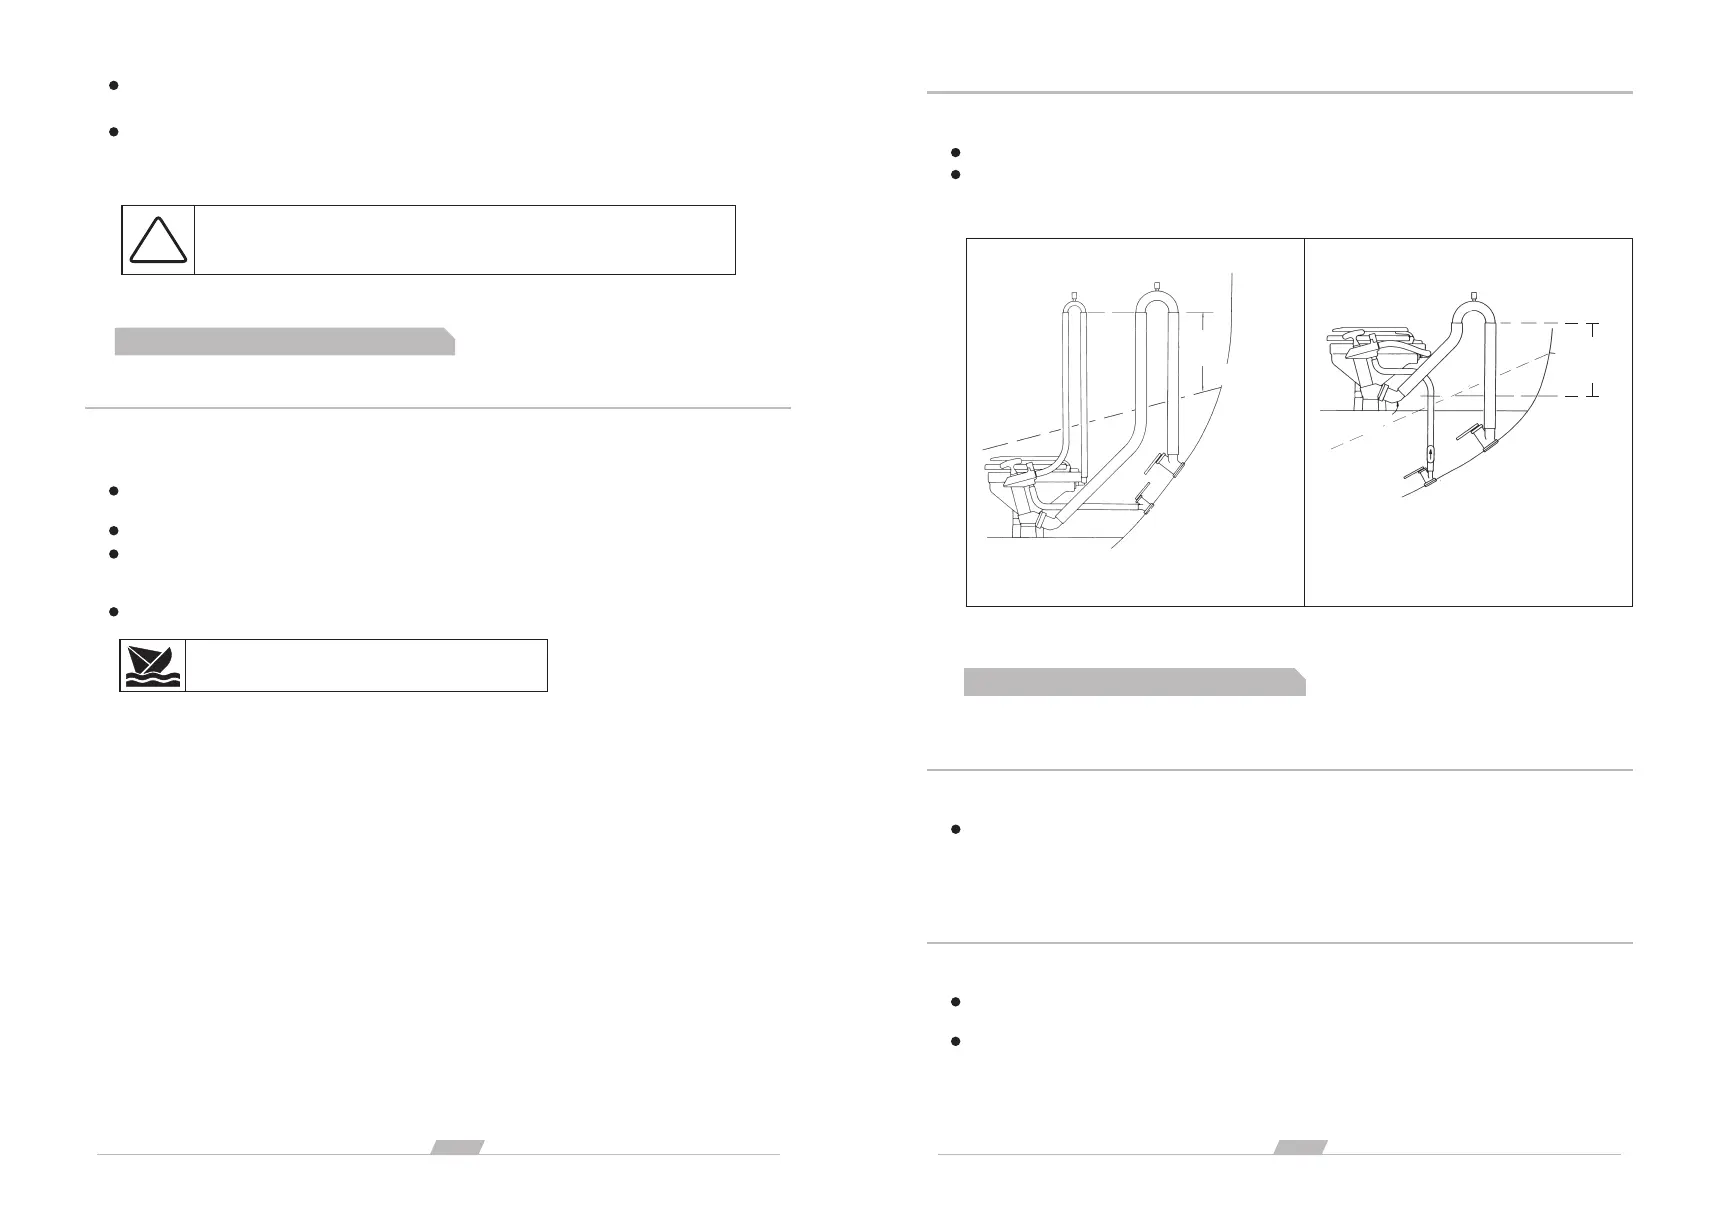
OPTION 1: TOILET BELOW THE WATERLINE AND DISCHARGING OVERBOARD.
(See Figure 1 on Page 6)
YOU MUST fit a 38mm (11/2") Vented Loop fitting
Run the outlet hose up from the discharge elbow to form a loop at least 30cm (12") higher than the
discharge elbow.
If you fit a vented loop at the top of the hose loop this will ensure that you can keep some water in the base
of the toilet without risk of it being siphoned away.
OPTION 2: TOILET ABOVE THE WATERLINE, AND DISCHARGING OVERBOARD.
(See Figure 2 on Page 6)
YOU MAY fit a 38mm (11/2") Vented Loop fitting
Figure 1.
Figure 2.
HEELED
WATERLINE
OPTIONAL:38mm (1 1/2") VENTED LOOP
HEE
LED WA
TER LINE
AT LEAST
20cm (8")
38mm (1 1/2")
OUTLET
SEACOCK
19mm (3/4")
INLET
SEACOCK
DISCHARGE
ELBOW
OPTIONAL NON-
RETURN VALVE
19mm (3/4")
INLET
SEACOCK
38mm (1 1/2")
OUTLET
SEACOCK
AT LEAST
30cm
(12")
SPECIAL NOTE 2:
19mm (3/4")
VENTED
LOOP
38mm (1 1/2")
VENTED LOOP
CAUTION: Failure to follow this procedure may result in leaks
between the discharge elbow and the pump cylinder.
!
HAZARD RISK - Bowl Rim Below Waterline
 Loading...